10 subtle mistakes to avoid in character animation
Turn a good animation into a great one by fixing Pixar animator Eddy Okba’s list of 10 subtle errors that even experienced artists often miss – from unrealistic poses for hands and feet to unrealistic blinks and lip sync.
Small details can make the difference between a good character animation and a great one. In this article, I’m going to reveal 10 subtle errors that animators often make: things that I’ve learned from supervisors, leads, peers and my own day-to-day experience working at studios like Illumination Mac Guff, Sony Pictures Imageworks and Pixar, on movies including Minions, Spider-Man: Into the Spider-Verse and Lightyear. Eliminating them from your own work will add that extra 5-10% polish to a pose or to an animation.
The images for this article were created using AnimSchool’s Malcolm 2.0 rig, which you can download free to use in Maya 2017+ on Windows or macOS. However, the tips themselves apply to any animation software.
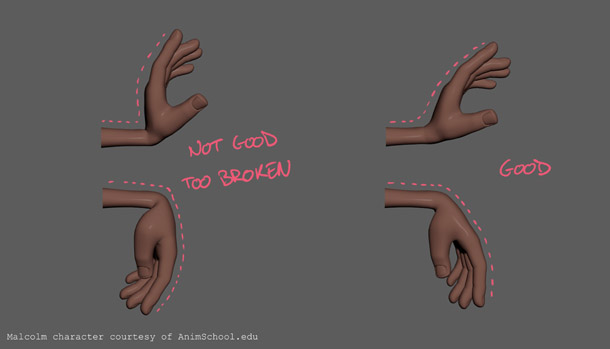
1. Avoid broken ankles and wrists
When you’re posing your character, make sure they’re comfortable! Check the overall pose by rotating around the character in perspective view and make sure that their ankles and wrists aren’t bent unnaturally.
For a human character, you can check the pose against the limitations of your own body. Can you get your hands and feet into those positions naturally? If not, change them! For example, in the image at the top of the story, pulling the heel up helps the overall pose, making the character look more grounded.
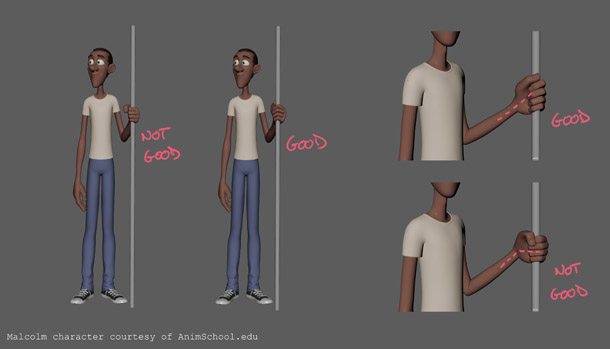
2. Avoid making fists when grasping objects
It’s tempting to use a fist pose when your character is holding an object. Don’t give in to temptation. Instead, follow the previous tip about creating natural-looking poses: rather than squeezing the object inside a fist, make the palm of the hand and the fingers go around it. Your character’s hands are the second thing that the audience will notice about them, after their eyes, and they say a lot about the character’s overall attitude.
Bonus tip: I like to scale up my characters’ hands. Making them around 1.1x bigger than they would be in reality gives them more presence. Malcolm already has big hands, so perhaps this makes them too big, but this trick works very well when you’re animating a child character.
3. Avoid tube limbs
CG characters can be very rigid, with straight tubes for limbs. For a more natural look and a better silhouette, bend the arms, forearms and thighs slightly. It creates the illusion of real muscles and bones, like the triceps in the upper arm, the radius and ulna in the forearm, and the quadriceps in the thighs. (You could do the same for the calves, but the calves of the Malcolm rig already have a nice slight curve to them.)
Only do this sparingly: the viewer should feel the result, not see it. Otherwise, you’re noodling the limbs.
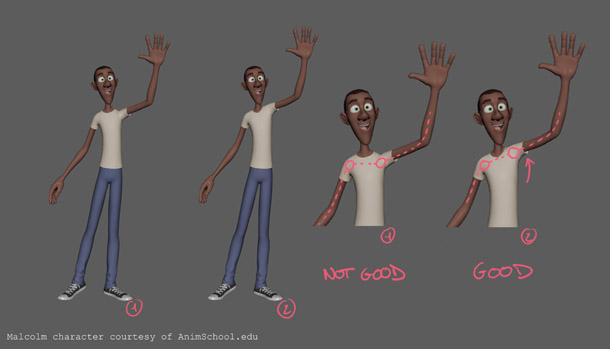
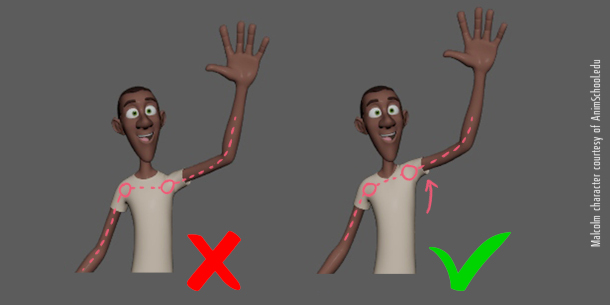
4. Avoid rigid shoulders
Don’t forget to use the shoulders! A common mistake is not to move them when posing a character’s arms, but they’re where the motion is actually coming from, particularly when the character is lifting their arms.
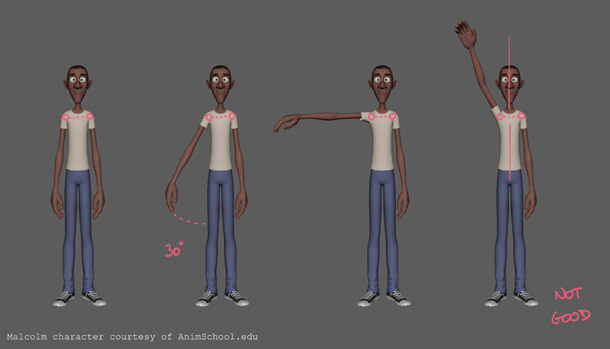
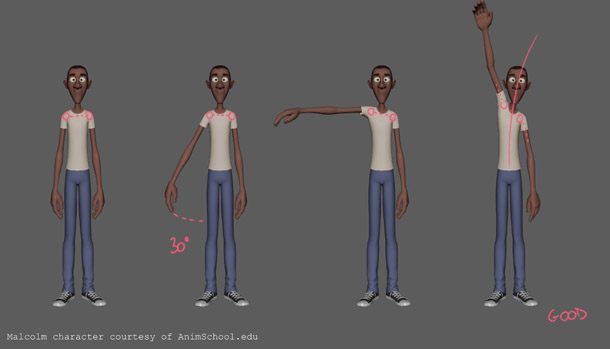
I’d suggest involving the shoulders whenever the character’s arms rotate more than 30° away from the body. Move them forward and backward as well as up and down. If the character is lifting their shoulder very high, you may need to rotate the head, neck and chest as well. Everything is connected.
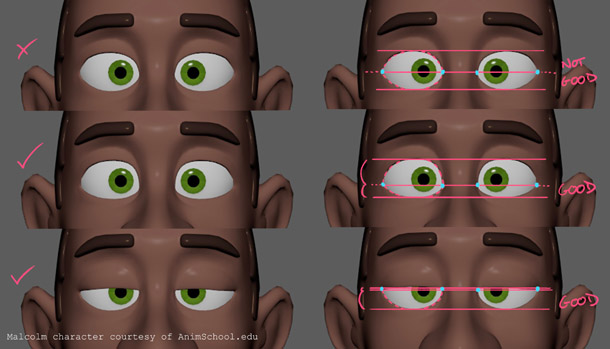
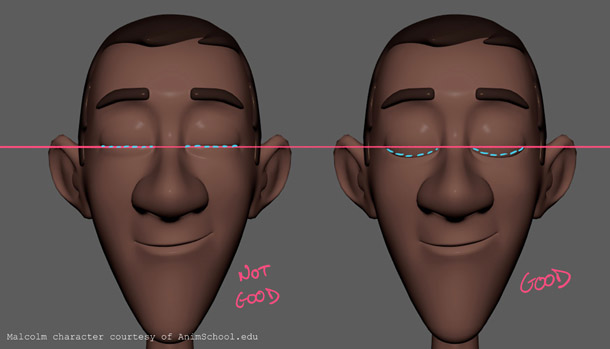
5. Avoid almond-shaped eyes
What I call an almond-shaped eye is when the corners are right on the midline between the lower and the upper lids. It isn’t an appealing look.
Instead, lower the corners of the eye, and move the peak of the eyelids closer to the pupils. This works for any eye pose, from a neutral pose to the eyes wide open, including a chilled-out/bored expression.
6. Avoid blinking along the median line of the eye
When we blink, our eyelids usually come down below the midline between the corners of the eye. But some character rigs come with a neutral blink right in the middle. If this is the case, be sure to change the blink height value, if it exists, or to double-check your eyes’ closed position.
This is for a classic, day-to-day blink. You can deviate from it in special cases: for example, for a character in pain, or for anime-style inverted smiling eyes.
7. Avoid looking down during a blink
Animators sometimes move the irises of a character’s eyes down as they blink, then back up as the eyes reopen. Perhaps it’s because they don’t want to have a frame where only the whites of the eyes are visible (which I agree doesn’t look very appealing). Perhaps it just seems more ‘animated’.
For a long time, I animated this way myself, but it isn’t realistic, at least for a casual blink. We don’t look down at all when we blink – if we’re looking at something, we keep looking at it. If a character has an intense expression, moving the eyes as they blink can lessen that intensity, and having everything moving at once can make a character look over-animated.
That said, using a blink to cover a change in look direction (from left to right, for example), can be great, so experiment and see what works best for your own animations.
8. Avoid going too wide and too narrow with the mouth during lip-sync
When animating dialogue, try not to vary the width of a character’s mouth too much from one phoneme to the next. In the example below (‘Hello CG Channel’), the mouth goes wide and narrow for ‘He’ and ‘llo’, ‘C’ goes narrow-wide, ‘G’ narrow-wide, and ‘cha’ and ‘nnel’ wide then narrow.
Not good: the width of the character’s mouth and position of the chin vary too much during the animation.
Take a look at the corners of the mouth and the jaw. For the ‘hello’, the animation works quite well: the emphasis falls on the word, so it takes some time to say. But because ‘CG Channel’ is spoken fairly quickly, articulating every single phoneme makes the animation appear to flicker.
In reality, we don’t perfectly reshape our mouths for every syllable that we speak: an ‘o’ sound doesn’t always mean a perfectly rounded mouth. Depending on the speed at which a character is speaking, and their overall expression (smiling, shouting, angry, etc.), the same sound could result in two completely different shapes.
Good: reducing the amplitude of the movements prevents the animation from flickering.
In this version, for ‘CG Channel’, I kept the mouth a bit wider, as the character is smiling slightly. I kept the ‘C-G-Cha’ in the same range, then went narrower – but not too narrow – for the ‘nnel’.
Notice how I’ve done the same thing with the jaw control so that the jaw doesn’t flicker up and down. A good way to feel when a character’s jaw should open, and by how much, is to try saying the line of dialogue yourself with your hand under your chin.
In the video above, you can see the two versions side by side.
Bonus tip: I like to offset my lip-sync animations two frames to the left on the timeline, so that the character’s mouth is shaped before they say the line. I still don’t know if that’s legitimate, or just a personal preference. Try it for yourself, and see if it feels more natural to you as well.
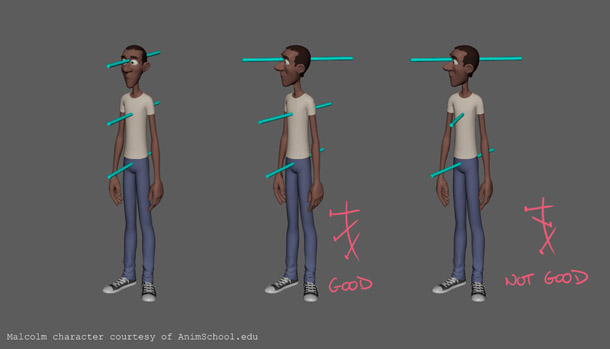
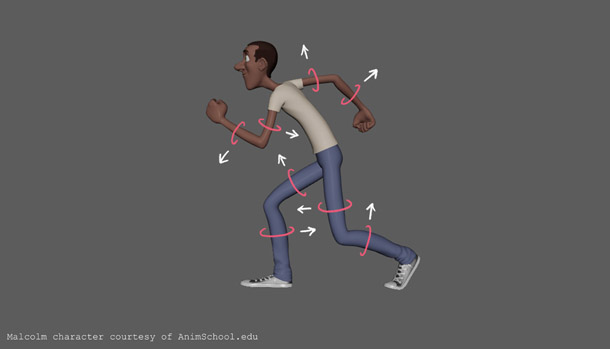
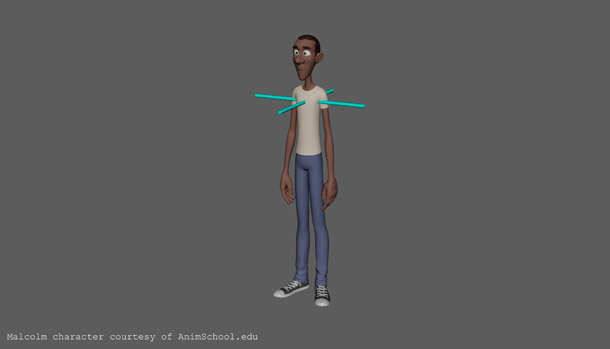
9. Avoid counter-balanced torsion
It’s easy to lose track of controllers as you animate, but don’t counter-rotate different parts of a character’s body, or things will quickly get messy. Being rigorous will save you time when it comes the spline pass, or when addressing a note from a director or supervisor.
A useful trick to keep track of torsion is to constrain cylinders to the character’s head, chest and body. Put them on a separate layer so that you can toggle their visibility on and off.
You can do the same thing to track animation, for which you may want have the cylinders cross one another.

10. Avoid dirty animation
“Keep your station clear,” says Colette to Linguini in Ratatouille. It may sound like generic advice, but planning a shot in advance, then working cleanly, is really important if you want to be able to work with total creativity and to react quickly to notes.
I like to key everything as I’m starting a shot, so that I have a keyframe for every body part on every pose. Later, I delay and break things down, but first, I control each pose with no floating curves.
Keep things simple with controllers: head, neck, chest and Centre of Gravity (COG) for the spine. Some rigs have a body control and a COG control: use only one of them, or it will be hard to track which does what.
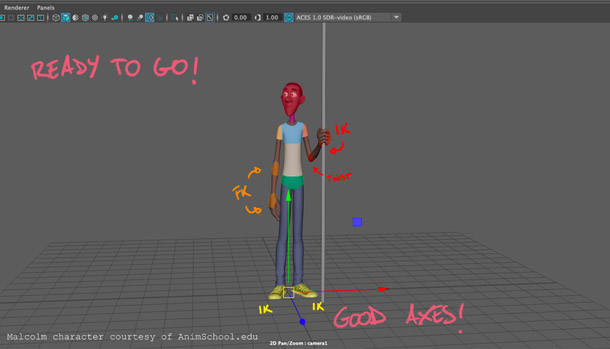
If you need to use IK/FK, make sure your axes are set up correctly. For example, if your character has to walk in a specific direction, make sure the axes are aligned in that direction!
 About the author: Eddy Okba is an animator at Pixar Animation Studios. He started his career at Illumination Mac Guff in France before joining Sony Pictures Imageworks on the Academy Award-winner Spider-Man: Into the Spider-Verse. He was also a lead animator at Animal Logic. See Eddy’s work on his Vimeo channel and his website.