Review: LightWave 11.0 to 11.6

The past two years have seen a remarkable resurgence in LightWave’s fortunes. Darkside Studios co-founder Andy Bishop looks back over the entire 11.x series of releases, and assesses the work NewTek has left to do.
Over 20 years ago, while living in Atlanta, GA, I worked with a fantastic bunch of guys on a piece of music software called Bars and Pipes on the Amiga. It integrated with a third-party product called the Video Toaster, which contained within it a 3D program called LightWave 3D. When I started using it, I realised it was my future. All these years later, I still use LightWave.
So when I was asked to review the latest version of the software, I couldn’t help thinking how remarkable it is that this privately owned, independent 3D application is still here, when nearly all the world’s top 3D packages are owned by one giant, publicly traded company. Certainly, after LightWave 9.6, the program lost its way for a few years, but even at its lowest ebb, it was still a great render solution.
Who still uses LightWave?
Most people know the type of TV programmes LightWave has been used on (most of the Star Treks, Battlestar Galactica, CSI, and so on), but fewer know how heavily it is still used at major US facilities like Stargate Studios, or that it was used on SyFy’s recent hit show, Defiance.
At Darkside Studios, we created nearly all the VFX in the BBC shows Outcasts and Origins of Us in LightWave, and also work on shows such as Horizon, Spooks and Hustle. This year alone, we have used it on several fully animated pilots and numerous Discovery and National Geographic Channel shows, as well as several commercials. We use Softimage alongside LightWave on a lot of jobs as well, and this combination has generally served us well.
A breakdown from Darkside Studios’ VFX work on the six-part BBC sci-fi drama Outcasts. Darkside uses LightWave alongside a range of other 3D software, notably Softimage, in its broadcast work.
A change in development strategy
A few years ago, LightWave underwent a huge change, with Rob Powers, virtual art department supervisor on Avatar, joining NewTek as vice president of 3D development. While the impact of the first release he oversaw perhaps wasn’t as great as it should have been, it was a clear indication of the vision he had for the future of the software, particularly through its virtual studio tools.
Since then, LightWave has taken on a whole new lease of life. Recent releases have provided LightWave users with a much better workflow, and a set of tools that start to make the software competitive with the other big 3D packages once more. Unlike many previous upgrades, LightWave 11.0, 11.5 and 11.6 have seen new features integrated seamlessly, along with a major tidy-up of the interface. And, as those version numbers indicate, this level of commitment was not a one-off.
So what are those new features? Let’s run through the most significant ones.
Features added in LightWave 11.0 and 11.5
Instancing (added in LightWave 11.0)
Instancing enables you to duplicate any piece of geometry many times without the huge memory overhead that comes with loading lots of objects. This is a feature that most LightWave users have wanted for years, and for which they previously had to rely on a third-party plugin, HD Instance.
All the usual Radial Array and Rectangular Array options are available, along with Motion Path, Time Offset and Random Seed. The controls can be accessed via the Instancer tab in Layout’s Object Properties panel, or via individual Instance Generators, which gives the system immense power and flexibility. Colours can be assigned to the instances at random or according to rules, and there is a really good weighting tool with the option to animate weights over time.
The new system works extremely well, and we have already used it on several TV shows. On a sequence that required us to create a swarm of a CG bats, on a machine with 12GB of RAM and a 2GB Quadro 4000 graphics card, the most I could manage without instancing was 300, and even then, the scene took 15 minutes to load. Instancing gave me 1,000 bats, and real-time refresh rates.
A shot with over 5,000 asteroids, created with LightWave 11’s instancing tools. It would be nice to see the same degree of control over rotation rate as in the FX Linker plugin, but other than that, it works great.
Flocking (added in 11.0, updated in 11.5)
Flocking is a natural extension of instancing, but can also be used with HyperVoxels and, as is usual, with LightWave features is remarkably easy to use. Every revision created during the beta phase added real improvements, and as comments from beta testers went in, NewTek listened and updated as necessary. I mention this only to illustrate the sea change at the company: a real commitment to making the end-user experience much better and a willingness to listen to users when adding and enhancing features.
A new and very naturalistic path control system was added in 11.5, with full backwards compatibility to the old flight mode system, for those who prefer the flowing, if less controllable, motions it generates. However, this has resulted in the removal of the old presets Swarm, Flock, Herd, School and Fleet. Instead, behaviours like Avoid, Goal and Deflect are assignable to objects, all of which are adjustable, and can be animated over time.
Both flocking and instancing can be viewed in OpenGL and Viewport Preview Rendering (VPR) and are fully influenced by all optical traits such as motion blur and depth of field.
Bullet dynamics (added in 11.0, updated in 11.5):
If ever there was a feel-good feature, it’s Bullet dynamics! For many years, I would hand-animate hard-body dynamics, trying to imagine what effect one object striking another would have. This was fun to do, but very time-consuming. Bullet will create the same result more accurately, and much more quickly.
A quick test of Bullet dynamics using the LightWave logo and a lot of blocks and balls combined with a soft object or two. This scene took only 20 minutes to build and simulate.
Other 3D packages have similar features, but this is as good an implementation as any that I have seen. It fits well into the LightWave UI and is compatible with the rest of its feature set, including Fracture and FiberFX.
The soft body options added in 11.5 are a great addition, and extend Bullet’s capabilities beyond the usual shattering glass and crumbling rock. Soft body simulations are equally easy to set up, although some presets for both soft and hard bodies would be nice.
Another simple test simulation, this time of cloth interacting dynamically with other objects. This also took only 20 minutes to create, despite me never having used the tools before.
I recently used Bullet to create a few rolling dice animations for two casino brands, one of which is shown below. The whole process took a few hours from beginning to end, with the longest part of the job being changing the start position of the dice so they rolled just enough to leave the logo visible. This type of animation work needs to be easy and fast, and thanks to this toolset, that’s exactly what it is. Most of the time is spent on the fun part: adjusting settings.
An animation created for a casino. The new Bullet toolset makes this kind of work fast and easy.
Fracture (added in 11.0)
Fracture cuts up an object in a very natural way: great for exploding and shattering meshes. It’s an ideal tool to use in conjunction with Bullet dynamics, and has the usual capabilities you would expect from this kind of tool.
Again, as it was developed, the LightWave team listened to feedback, adding the Voronoi algorithm, which does a fairly good job of breaking up glass. Although 3ds Max’s toolset is probably still strongest in this area, Fracture does what it needs to, and is as good as the tools I’ve seen in many other 3D packages.
Unified Sampling (added in 11.0)
Unified Sampling was probably one of LightWave 11.0’s hardest features to sell to end users, changing as it did a well-known and well-understood method for handling anti-aliasing, shading and light sampling. However, it was a necessary change: the old method was making LightWave slow. Unified Sampling isn’t a glamorous feature, but I’m beginning to think it might be the most important one in 11.0. It has revolutionised rendering at Darkside Studios, and in one specific area, the improvement in render speed has been amazing.
I use HyperVoxels a lot, but while working on BBC’s Outcasts, I hit 24 hours per frame on a regular basis for the smoke and dust passes needed. The results looked good, but boy, did the line producer want to kill me. The problem was that in old versions of LightWave, settings lived in different places throughout the interface. Most users, me included, would leave most of them on their default values, and simply adjust anti-aliasing, with no further form of optimisation. It was simply a case of rendering until there was no shimmer or anti-aliasing problems. The new Unified Sampling methods have brought down those frame times considerably, in some cases by a factor of ten. Even with extremely low settings, it’s possible to get clean renders.
In LightWave 11, most features, such as Shading Samples and Light Samples, live under Render Globals. The previous anti-aliasing system has been superseded by Minimum Samples and Maximum Samples, enabling LightWave to self-adjust as necessary. This is augmented by Threshold and Oversample settings that adjust the adaptive sampling threshold on a fractional level. Combined with LightWave’s excellent Photoreal motion blur, these can give exceptional results really quickly.
On the down side, optical motion blur has problems with character animations imported in MDD format. An increase in render time from two minutes per frame to 15 minutes per frame isn’t uncommon during complex moves. The end result is excellent and photographically accurate, but the render hit is awful. LightWave has several other motion blur options (the older Classic and Dithered motion blur) that don’t suffer this hit.
The Radiosity engine has also had a major overhaul, greatly improving its speed and the stability of its output. If you spend some time trying different set-ups, the work will pay dividends. However, this is still an area that could do with improvement – or at least presets to make it easy for an animator to get solid results.
The Camera and Lights, although themselves unchanged, also gain the benefit of Unified Sampling. Area lights, for example, are now considerably faster, barely impacting render times in most scenes.
Shadow Catcher node (added in 11.0)
When putting a CG object into a live shot, HDR lighting is important. LightWave handles this perfectly, but getting shadows to drop onto live elements can be a real pain. The new Shadow Catcher node in LightWave 11.0 makes this easy: just add your live plate for compositing in the background, add a poly to each part that needs a shadow or reflection, then assign the Shadow Catcher. The node includes inputs for Reflection, shadow Color and Roughness. This helps immensely with live-action work, and again, is really well implemented.
FiberFX (updated in 11.0 and 11.5)
LightWave’s FiberFX hair system has also had a major overhaul, and now is fully multi-threaded – and consequently much faster. Combined with fiber modelling and colouring enhancements and general bug-culling, this has created a much more usable hair generator that’s now robust enough to be used for major effects work. In particular, the way alphas are handled makes FiberFX far more usable in situations where hair has to be composited into a shot.
New additions in 11.5 include compatibility with Bullet dynamics, though I have found this to be a fairly cumbersome addition.
Increased maximum render resolution (added in 11.0)
In previous versions of LightWave, maximum render output resolution was 16,000 x 16,000 pixels. That was big enough for most people, but certain styles of print work benefit a hike in resolution, so NewTek has now increased that to 100,000 x 100,000 pixels. Print workflow also benefits from a new Print Camera feature supporting 47 standard paper presets, a DPI conversion utility, and support for bleed.
The resolution at which HyperVoxels can be baked has also been increased, visibly improving smoke and dust flythroughs. In previous builds, baking resulted in a huge loss of detail and repeating patterns. The increase in resolution doesn’t eliminate these problems entirely, but the baked results are now really usable.
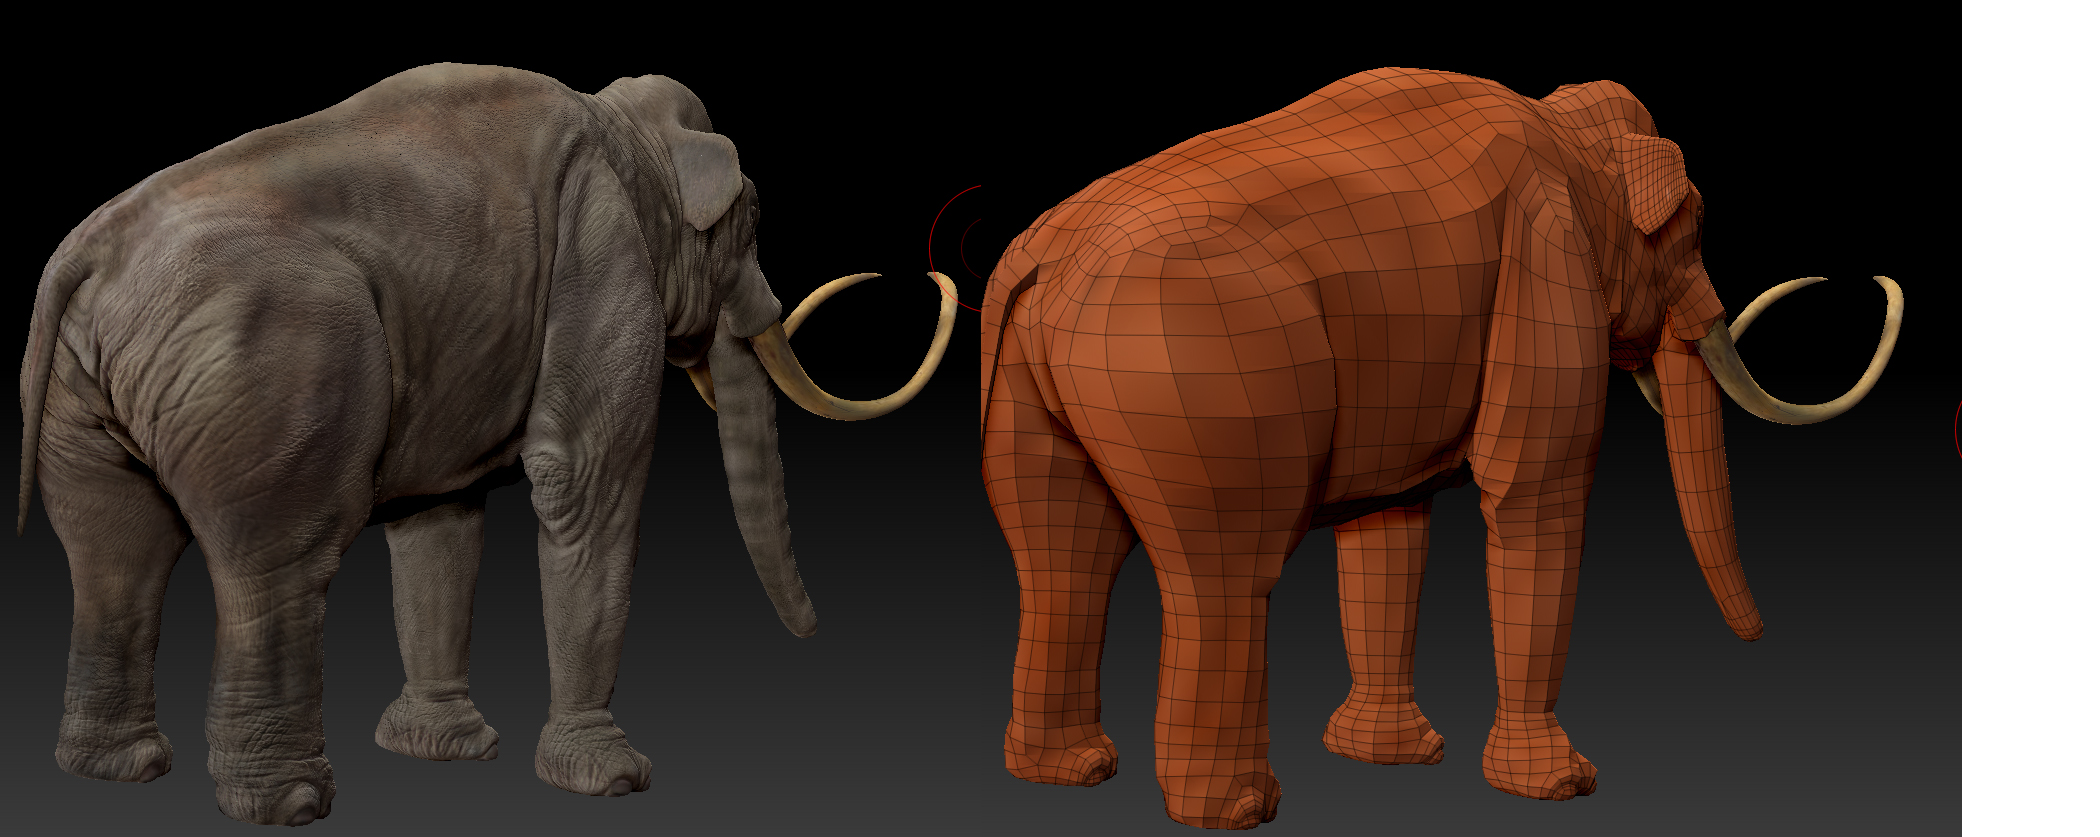
GoZ for LightWave helps import models created in ZBrush into the software. Image: Graham Toms.
GoZ support (added in 11.0, updated in 11.5)
Data interchange has been improved throughout the 11.x series of releases, including support for ZBrush’s GoZ. FBX support has also been greatly enhanced, while Unity support has been added.
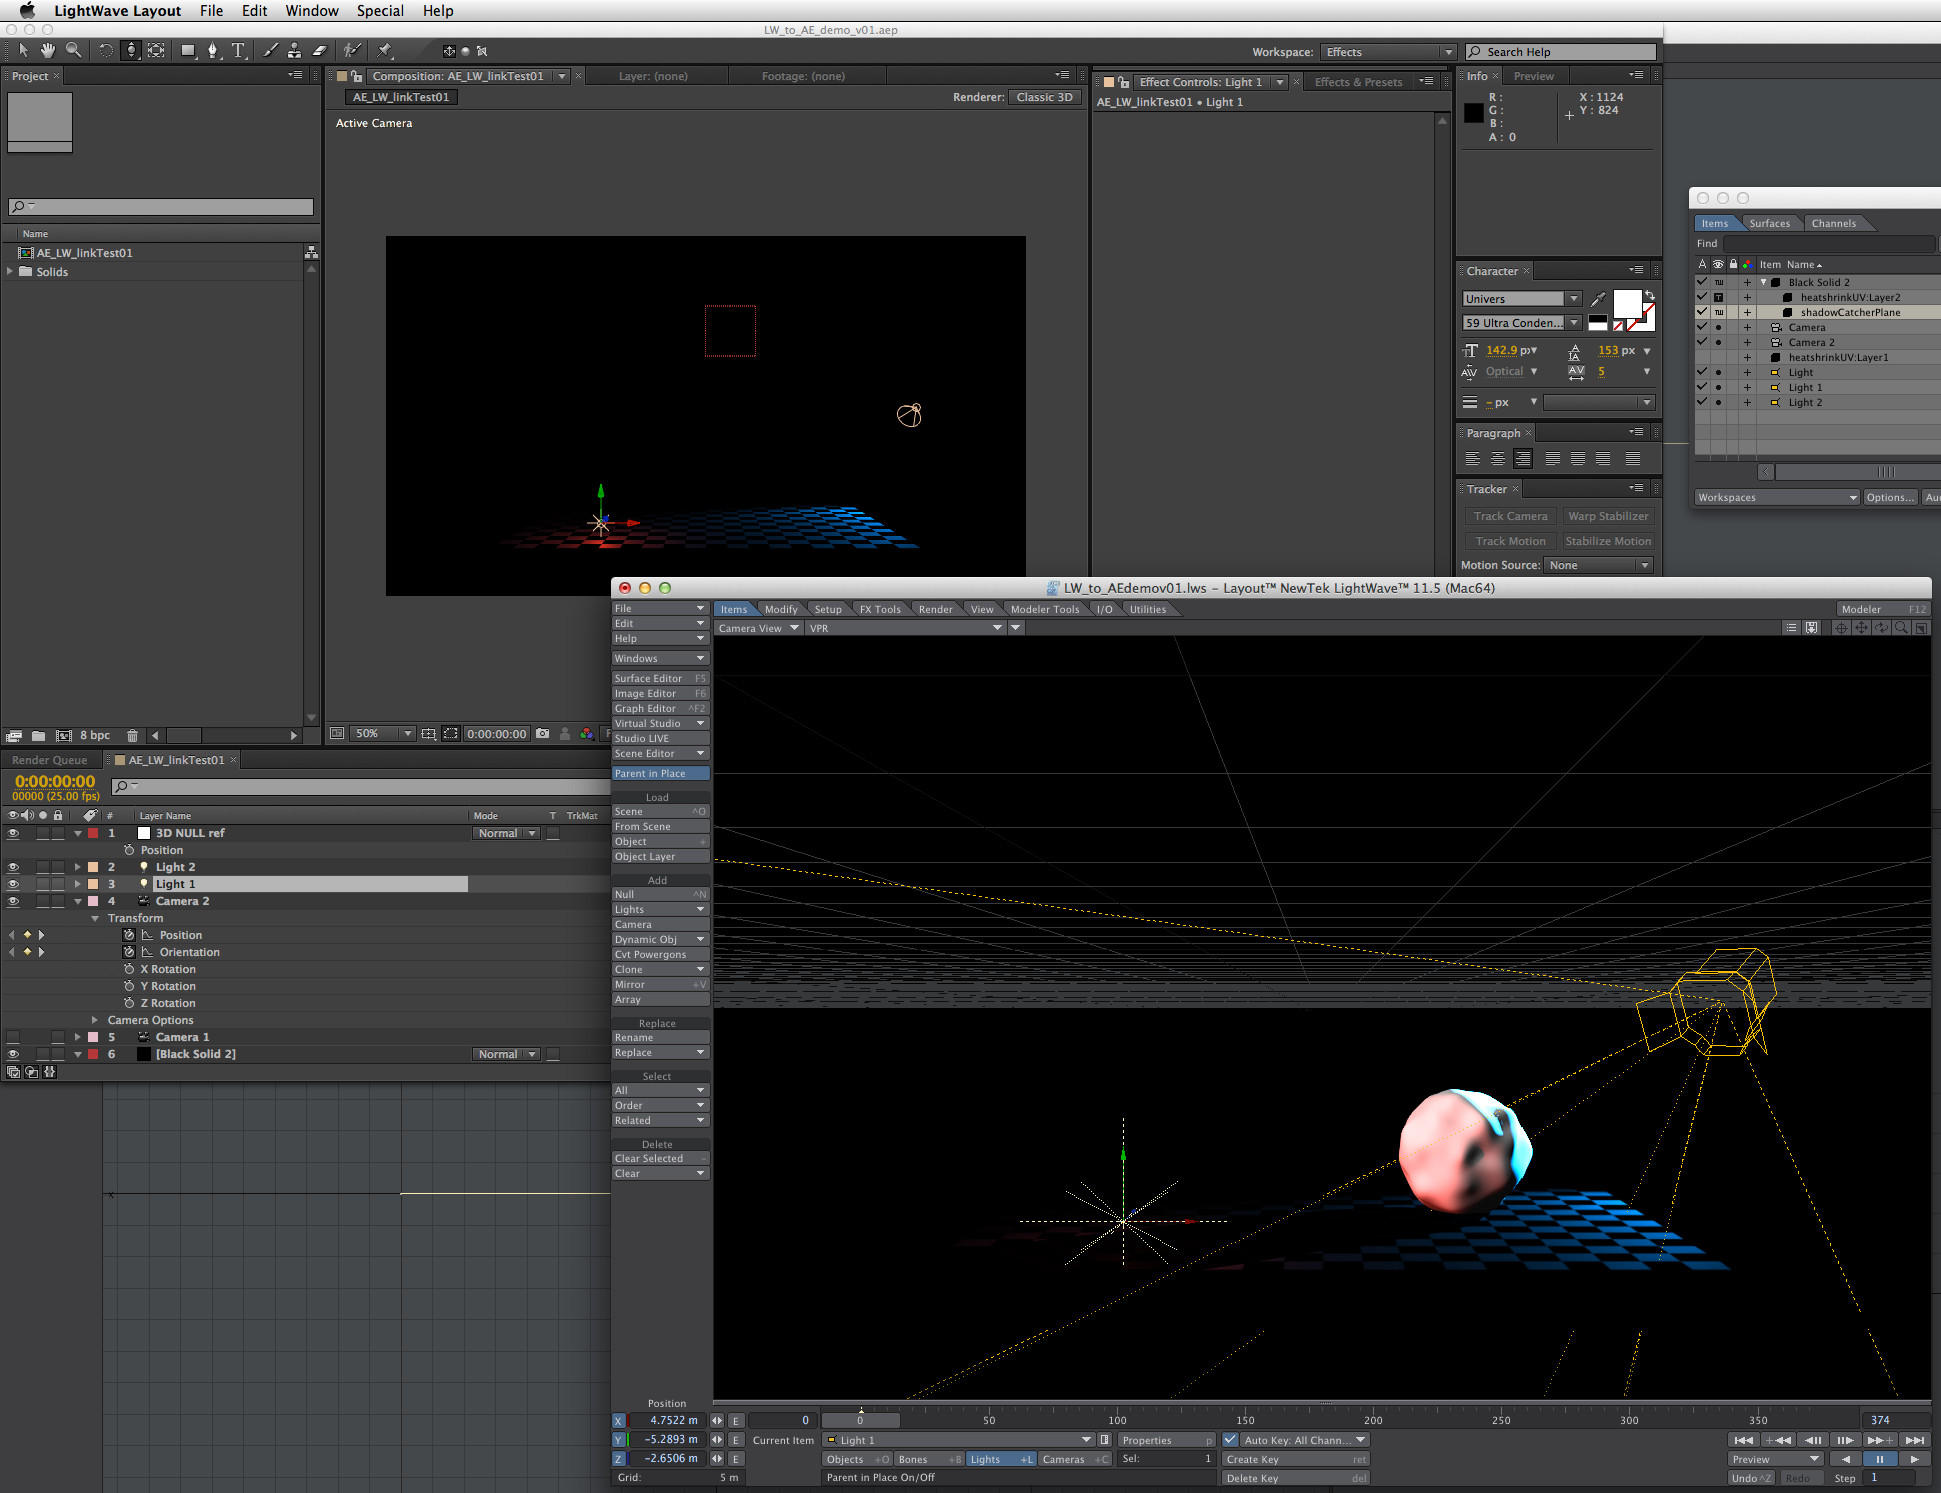
LightWave 11.5’s direct link to After Effects offers robust, bidirectional workflow between the two packages. Of all the major 3D tools, Cinema 4D probably has the best link to After Effects, but LightWave comes close.
LightWave to After Effects integration (added in 11.5)
The new direct link to After Effects was another welcome addition in 11.5, enabling you to send cameras, lights and nulls over to AE so that any additional animation, text or graphical elements added match the position and orientation of your LightWave scene seamlessly.
When you select a scene asset and hit the Send to AE button located in the I/O tab, After Effects will load, create a composition of the same camera format and resolution, and bring in the LightWave asset into that comp, typically named as you have it in LightWave. Attaching text, flares or other effects is a breeze.
A small plugin named AetoLW.aex makes it possible to allow data to be passed back to LightWave: just add it to your After Effects plugins folder, and you’re done. Alternatively, if you have set up your comp and want to do some 3D work that cannot be done in After Effects, you can use File > Export > Send Selected Layer to LightWave 3D.
Currently, there is no object support, but with the advent of Cineware in After Effects CC, object data can be manipulated directly in After Effects.
This is a robust integration and makes it more desirable to work up 2D and 3D graphics in tandem, harnessing the power of post-processing filters and grading tools in After Effects. There are a few issues when syncing multiple items, and having odd file names for elements can cause the sync to hang, but problems are rare.
Genoma (added in 11.5)
Genoma is another fantastic addition, for the first time giving LightWave a stable and relatively intuitive rigging system that reduces the constant problem of gimbal lock within the rig. Rather than a complete new rigging system, Genoma is a set of pre-built rigs with hidden holding bones and so on already created for you. Any serious LightWave character animator will love it.
Is it as good as the rigging systems in Softimage or Maya? No, and in the long term, the system in Softimage should be the target to beat. But it is efficient and highly usable, and I hope it will become more powerful.
In-camera skew matching for CMOS sensor distortions (added in 11.5):
Digital cameras based around CCDs capture a full frame instantly, including any motion blur, but excluding sensor or scanline lag. This kind of footage is easy to add effects to. In contrast, cameras based around CMOS sensors – which include both the Canon EOS C300 and C500 and models from RED – capture the frame from top to the bottom, pixel by pixel and line by line. This can skew the footage, particularly in fast pans or fast action scenes, making it harder to add CGI, since you either need to correct the footage or distort the CGI to match.
LightWave 11.5 provides an easy remedy, simulating capture skewing optically with motion blur at render time. It’s an elegant solution that works in combination with the optical motion blur and lens distortion, and in stereo.
Features added in LightWave 11.6
Raycasting
The new Raycasting node enables you to lock an object to a surface, using raycasting to determine where your object ends and the next one begins. A car could be made to follow an undulating road, for example, or an object placed onto a shelf more easily. This isn’t a simple follow plugin: it literally snaps an object to the surface of your choice. It’s one of those tools that pops up from time to time that makes a certain type of animation really easy.
Support for 3D printing
LightWave has always used real-world scaling, making the support for 3D printing added in version 11.6, including the option to export in STL, PLY and VRML formats and new geometry clean-up tools, a very cool addition straight out of the box: if you have a model one foot high in LightWave, it will print out as a one-foot-high physical model. It sounds obvious, but most other 3D packages don’t use real-world units, making it necessary to scale models. The existing Thicken tool is also ideal for extruding depth internally to create a hollow but enclosed mesh: necessary for printing, since costs scale directly according to the amount of polymer used.
For anyone needing to see a physical model as part of their workflow, LightWave is now the logical choice. We will use it for client IP visualisation, making character designs easier to communicate to non-3D-literate execs.
CgFX shaders
The CgFX shader format has been supported in other packages for some time where, among other things, it makes it possible to preview in-game assets more accurately in the viewport. LightWave 11.6 adds a set of CgFX-compatible shaders. They are compatible with all modern Nvidia cards, and work in OpenGL view.
New colour picker
A major improvement over the old colour picker, the new picker can select colours by Kelvin temperature or Wavelength, pick colours from an image or the desktop, and adds Tint, Shades, Offset and a new library feature.
Compound Node
LightWave 11.6 also enables users to save complex nodal structures as compound nodes, saving huge amounts of screen real estate.
DPX support
DPX is the most commonly used intermediate format for scanned film, and is a significant improvement over PNG or TGA. Like Cineon, it enables you to output colour in 10, 12, 16 and 32 bits per colour channel. As well as supporting DPX, LightWave 11.6 can also load LUT files directly via the .3dl and .cube file formats. This is great for colour-matching footage supplied by a post house.
Spline Control
Intended for animating anything long and thin that requires fluid movement, the new Spine Control is similar to the particle system’s Animation Path wind, enabling users to animate and scale individual control points over time, providing a very flexible control system. Better still, unlike Path wind, it supports multiple splines.
Improvements to the Viewport Preview Rendering
In days long gone, features added in one version of LightWave were never really developed in the next, HyperVoxels being a key offender. In contrast, the real-time preview render option introduced in LightWave 10 has been iterated constantly with each successive release.
The VPR now supports lens flare previews and the option to [Shift]-click on any surface in the VPR window and have the Surface Editor pop up with that surface highlighted and ready to edit: a cool workflow enhancement on complex jobs that may contain hundreds of surfaces.
And while HyperVoxels still needs a major facelift, NewTek has at least debugged a few features that never worked properly: again, proof of its commitment to improvement.
Features that should be added in LightWave 12: a personal wish list
The 11.x series of releases has gone some way to addressing long-term users’ issues with LightWave, but there is still work to be done. In the next section, I will run through features that I feel still need to be improved.
Dust and destruction shots are still staples of visual effects work. Although partly updated during the 11.x series of releases, LightWave’s aging HyperVoxels system needs a proper overhaul.
Firstly, a personal favourite: HyperVoxels. It’s amazing how many effects shots need smoke and explosions, and HyperVoxels needs a major update, if not a complete rewrite. Third-party plugins such as TurbulenceFD point the way here: while TurbulenceFD doesn’t offer the interactivity provided by HVs combined with particles, the render results are amazing.
LightWave’s particle system also needs a serious update. It currently doesn’t integrate with Bullet, though it does have its own, limited solution for collision and dynamics. Softimage, and its excellent Lagoa multi-physics system, should be the benchmark here. Bullet itself could do with more materials presets, particularly for cloth.
The graph editor also needs to be improved, including support for multiple undos. This is a constant request from all the animators working at Darkside. Multiple undo should be implemented throughout the package, including surfacing. The number of times an animator will unintentionally make a change to a surface, then be unable to remember the previous settings is uncanny.
Rigging could also do with a major overhaul. Again, Softimage sets the benchmark here, particularly its rig-referencing options.
Recent releases have greatly improved workflow for exporting render passes, though some of the buffer outputs are still hit and miss. The open-source LightWave PassPort provides a fix, but it should be possible to break out every aspect of a scene without resorting to add-ons. In particular, Ambient Occlusion should be a standard output. It is possible to output an AO pass, but it should be a one-click solution like in most other 3D tools.
The handling of large data sets also needs to be improved. We regularly get caught out when freelance animators send in scenes that cannot be loaded into LightWave without manual reduction. This has regularly cost us days of production time, and the same scenes are easily run in Softimage or 3ds Max.
Full QuickTime support – present in LightWave until it went 64-bit – should also be reinstated. I don’t care if QuickTime is 32-bit: it should be a standard output from LightWave.
Finally, there are several key toolsets that are still missing entirely from LightWave: notably, 3D painting and fluid simulation. LightWave isn’t alone in lacking these – or at least, a production-ready implementation of them – but they would be a major bonus in future releases.
Conclusion
Despite the wish list above, LightWave is definitely moving in the right direction. LightWave 11.0 was a strong release, and both 11.5 and 11.6 are amazing upgrades, full of great new tools the LightWave community will love. Some have been in other 3D packages for a while, but that shouldn’t detract from what NewTek has achieved.
It’s also important to remember LightWave’s existing strengths. The render engine is excellent, and includes 999 render nodes as standard. The Virtual Studio Tools come built in as standard, as do built-in stereo previewing and full stereo controls – something that other packages are only just catching up with. And, at $1,495, it’s much cheaper than most other professional 3D packages.
We use LightWave extensively at Darkside Studios, but we use a lot of other packages as well: Softimage being a prime example. A few years ago, we very nearly moved away from LightWave completely. As it turns out, that would have been a mistake. We certainly couldn’t have completed the Outcasts series without it.
The 11.x series of releases puts NewTek back in the game. If you haven’t looked at it recently, now is the time to let a little LightWave in your life. There is still more to do, but the new way in which LightWave is being developed has given me huge encouragement for the future. I would go as far as to say that the 11.0 to 11.6 series of upgrades are the best the company has ever delivered. Well done Rob Powers, and congratulations to all the programmers and interface guys for doing a great job!
Links
Read more about LightWave 11.6 on NewTek’s website
About the author
Andy Bishop is co-owner of the UK’s Darkside Studios, with divisions dedicated to animation and VFX, game development and feature film work. Its clients include TV channels BBC, ITV, Discovery, National Geographic and Channel 5; film studios Universal, Warner Bros and New Line Cinema; and Microsoft and Google. The studio’s recent credits include visual effects for the BBC series Outcasts and Origins of Us.
Visit Darkside Studios online