5 tips to get more from your 3D characters
[Sponsored] Discover how the new features in Character Creator 4.1, the latest version of Reallusion’s character generation software, help artists to reuse a single 3D character across multiple applications.
Creating high-quality 3D characters from scratch takes time. Fortunately, Character Creator 4.1 is there to help you get more from your existing characters.
The latest version of Reallusion’s character design and rigging software includes new features designed to help artists repurpose 3D characters across a range of contexts, from movie and broadcast animation to videogames and mobile AR applications, and even massive crowd simulations for architectural visualisation.
-
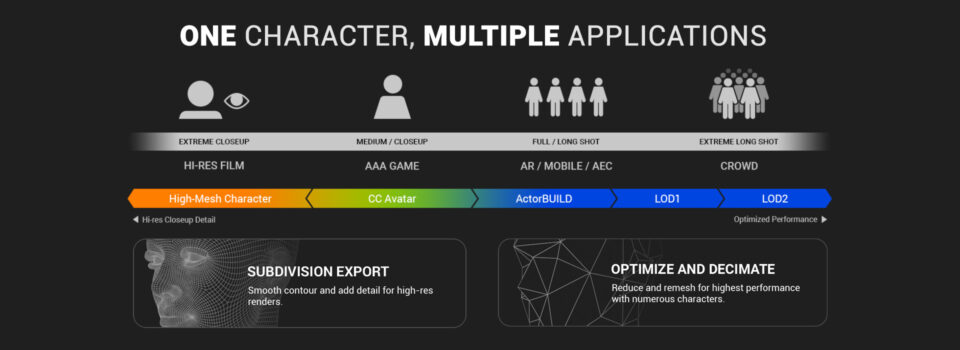
- One character, multiple applications. Click the image to view it full-size.

In this article, we will look at five of the ways in which Character Creator 4.1 removes the need to create a new 3D character for a project.
We will explore how the Optimize and Decimate tool generates Level of Detail (LOD) variants of a character for use in the background of a scene, how Subdivision Export up-reses real-time characters for use in offline animations, and how using Advanced AccuRIG can convert static 3D scans into animation-ready characters – and even turn one character into a crowd by creating variations of clothing and armour.
1. Use Optimize and Decimate to turn hero characters into crowd actors
Character Creator’s CC3+ Standard specification is designed for great-looking game characters.
With their 101-bone rigs, support for over 140 facial blendshapes, and the Digital Human Shader for realistic skin, eyes and hair, CC3+ characters look good even in extreme close-up.
But for background actors in crowd scenes, that level of detail can be overkill.
Character Creator’s new Optimize and Decimate tool, found in the Attribute tab of the Modify panel, makes it easy to optimise characters according to the distance at which they will be seen by the viewer, adjusting the density of the character mesh and the complexity of the character rig and shader set-up.
By using Optimize and Decimate, you can reduce the file size of CC3+ character from over 200MB to under 2MB, making it possible to turn a hero character into a lightweight version suitable for use in crowd scenes.
-

- Optimize and Decimate’s Level of Detail presets. Click the image to see it full-size.
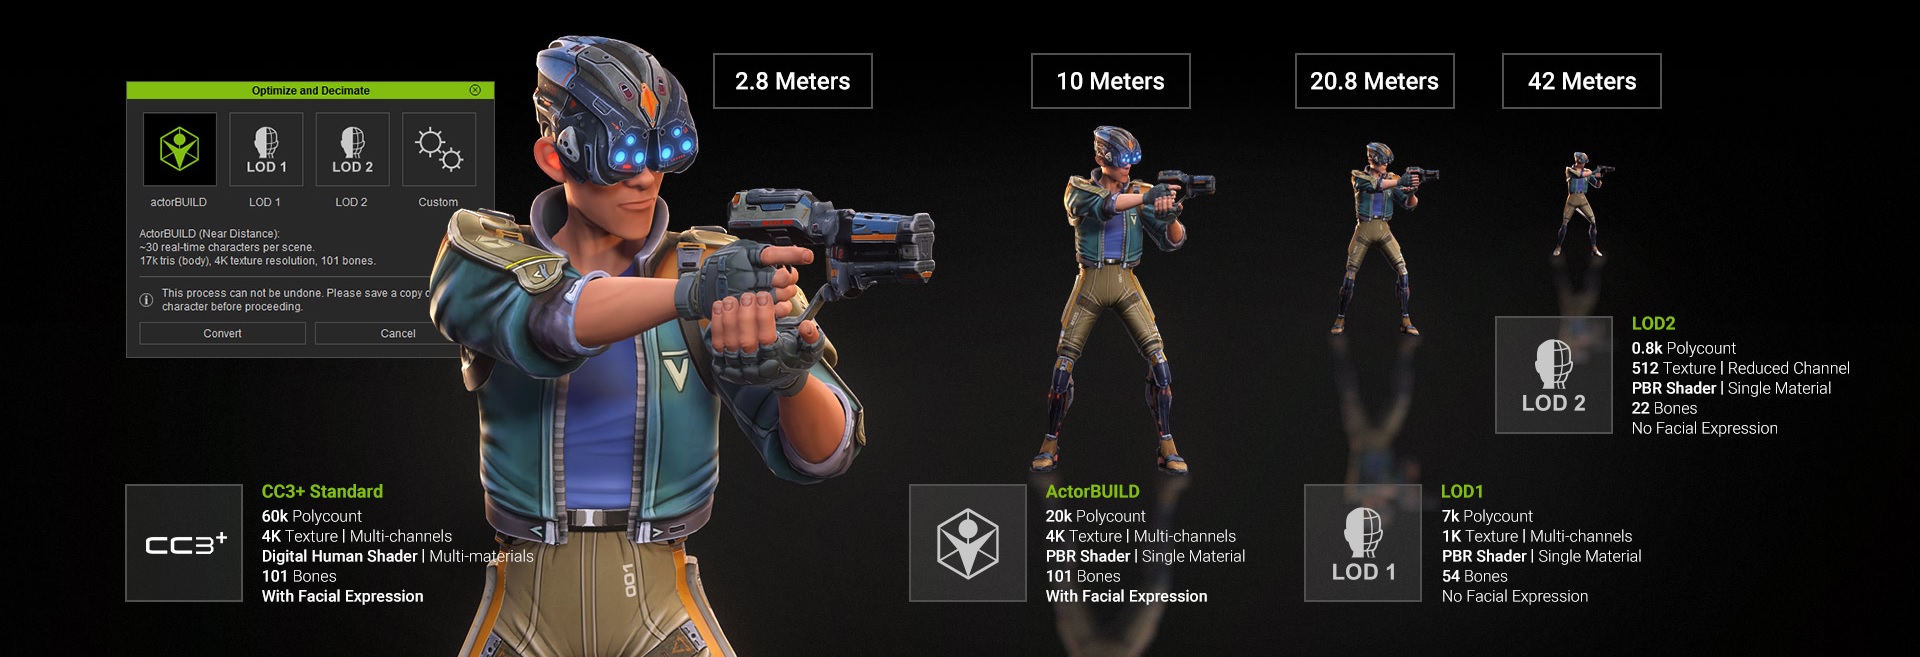
There are three useful presets, designed for viewing characters anywhere from 10 to 40m from the camera.
The first, ActorBUILD, is great for crowd characters that will be seen in the middle distance, where their facial expressions will still be noticeable.
Converting a CC3+ character to ActorBUILD cuts its poly count to under a third, and converts its materials to Game Base specs, but retains its facial blendshapes and all of its bones.
The other Level of Detail (LOD) settings, LOD1 and LOD2, are designed for background characters, and use lightweight triangle-based meshes and lower-resolution textures.
They don’t support facial expressions, but characters’ hands can still be positioned accurately: LOD1 rigs include finger bones, and hand positions can be baked out for LOD2 characters.
You can also create your own Level of Detail by using the Custom option in the Optimize and Decimate tool.
It makes it possible to tailor the resolution of the mesh and materials for an individual project, and even to remove bones from the rig individually: for example, to lock a character’s fingers in place around a weapon.
2. Use Subdivision Export to up-res characters for cinematics
Characters that look good in real time don’t always fare as well when it comes to offline rendering.
Even hero characters have a limited polygon budget to ensure that they display smoothly in-game, which can become noticeable when they are rendered at higher resolutions, or in extreme close-up.
Character Creator 4.1’s new Subdivision Export system solves the problem, increasing the density of the character mesh to smooth hard angles in its silhouette and remove faceting in its surface shading.
Subdivision makes it possible to reuse in-game characters in cinematics, or to repurpose low-resolution characters for use in previs, visualisations or even broadcast animation.
The Smooth Mesh section of the Modify panel has separate subdivision sliders for previews and final renders, letting you work interactively with the original character, then increase its poly count at render time.
-
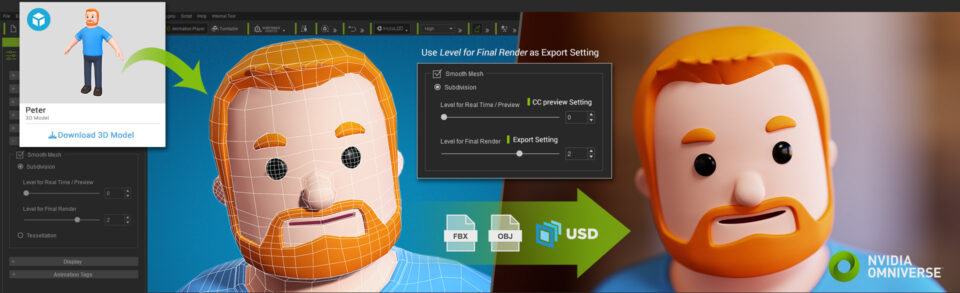
- Upresing a Sketchfab character with subdivision. Click the image to see it full-size.

Subdivision isn’t just for native Character Creator characters: you can upres any imported low-resolution character, providing it has all-quad topology.
And unlike with some software, the subdivided character doesn’t have to be rendered inside Character Creator itself: it can be exported in OBJ, FBX or USD format, preserving skin weights and facial morphs.
The system makes it possible to import characters from online asset stores like Sketchfab or Reallusion’s own ActorCore and upres them for rendering in the software of your choice, from DCC tools like 3ds Max, Blender, Cinema 4D and Maya to NVIDIA Omniverse and game engines like Unity and Unreal Engine.
-
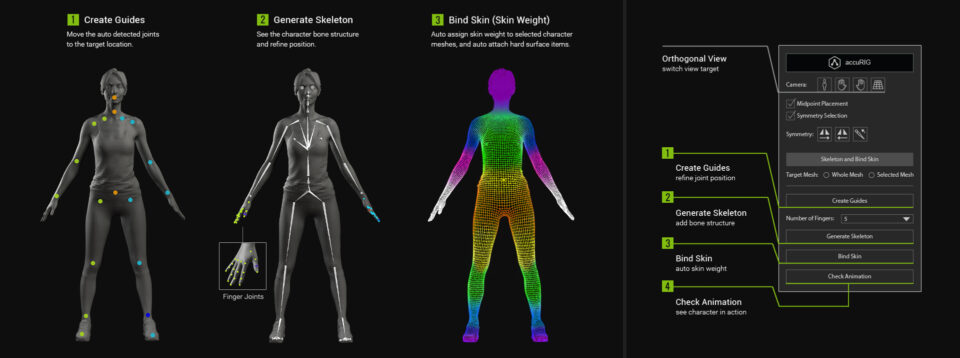
- Advanced AccuRIG automatically rigs 3D characters. Click the image to see it full-size.

3. Use Advanced AccuRIG to turn 3D scans into animation-ready characters
Character Creator also quickly converts characters that weren’t originally designed to be seen in motion for use in animations, cinematics or visualizations.
Whereas rigging a character by hand can take days, the new Advanced AccuRIG system in Character Creator 4.1 turns a static model – like a 3D scan or a ZBrush sculpt – into a rigged character in minutes.
Clicking the AccuRIG button in the Modify panel, then the Create Guides button in the Skeleton and Bind Skin section of the interface, generates markers over the character’s key body parts.
You can reposition them to match the exact proportions of your character by dragging in the viewport, then click the Generate Skeleton and Bind Skin buttons to have Character Creator automatically generate a rig.
Unlike some auto-rigging systems, AccuRIG isn’t only designed for human characters: it works with models with non-standard proportions like oversized heads or beast legs.
You can generate rigs with fewer than five fingers, and can even mask out individual bones in the skeleton, making it possible to rig characters with missing body parts.
The rigged character can be exported in FBX and USD format for use in a wide range of other software, including 3ds Max, Blender, Cinema 4D, iClone, Maya, MotionBuilder, Omniverse, Unity and Unreal Engine.
4. Create variations of clothing and armour to turn one character into a crowd
A quick way to populate crowd scenes is to reuse one character multiple times with different variations of clothes, accessories and props. Character Creator 4.1’s Advanced AccuRIG system makes this simple.
On importing a character with multiple meshes, you can choose which meshes you want to generate skin weights for, by selecting them in the Scene Manager, then activating AccuRIG’s Selected Mesh radio button.
-

- Meshes can be treated as clothing or accessories. Click the image to see it full-size.
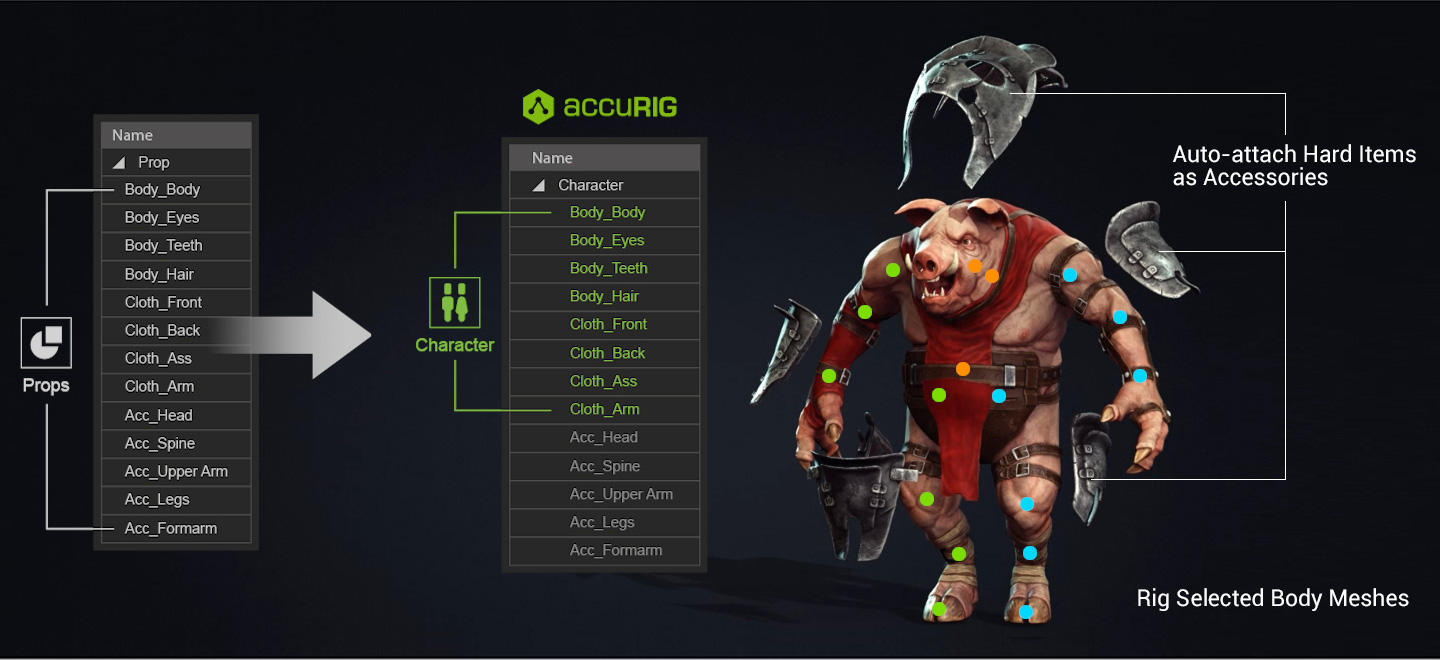
Character Creator will generate skin weights for the selected meshes, meaning that they deform as the character moves, behaving like clothing.
Meshes without weights are converted to rigid accessories, so they move with the character but do not deform, behaving like armour or props.
You can reposition rigid accessories – for example, to ensure a weapon sits snugly in the character’s hand – by using the Pivot button in the Modify panel, as shown at the end of the start of this tip.
-
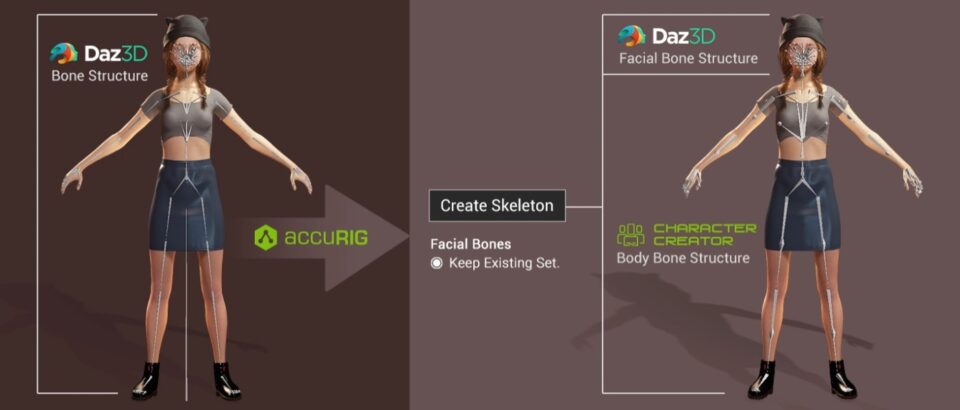
- Re-rigging a Daz 3D character in Character Creator. Click the image to see it full-size.
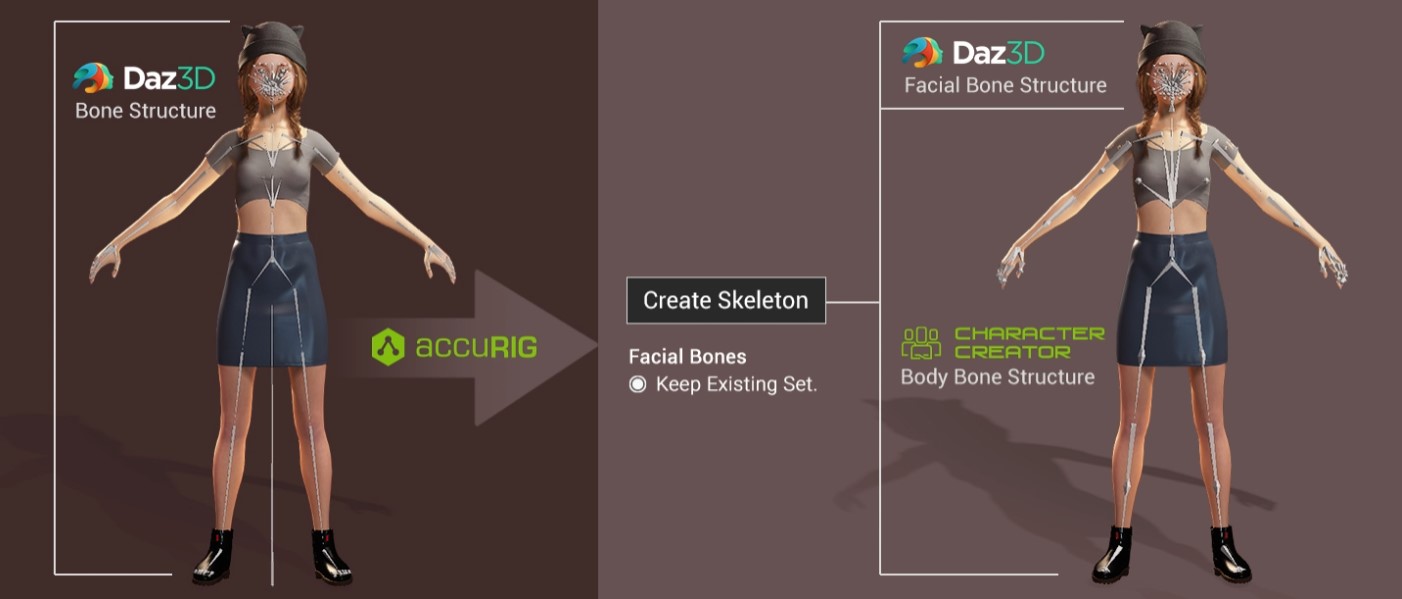
5. Selectively re-rig characters to repurpose them from other software
Advanced AccuRIG isn’t just for rigging characters from scratch: you can also use it to re-rig characters.
Converting a rigged character created in another 3D application to Character Creator’s native rig structure means that you can then edit the rig with Character Creator’s powerful tools.
For example, you could use Optimize and Decimate to convert a hero character rigged in Blender or Maya to a simplified, lightweight version suitable for use in crowd animations.
Characters with CC4 skeletons are also optimised for use in iClone, Reallusion’s real-time animation software, and the stock motion clips available in its Motion Library.
It’s even possible to create a new skeleton for a character, but to preserve its existing facial rig.
The video above shows how to do this for a stock character from Daz 3D: Character Creator detects the existing Daz skeleton and remaps its bones automatically, while readymade profiles for Daz 3D’s Genesis 1, 2, 3 and 8 figures make it easier to use the existing facial rig with Character Creator’s Facial Profile Editor.
Find out more about Character Creator
Character Creator 4 (CC4) is a complete character creation solution for artists working in creative fields including animation, game development and visualisation.
With it, artists can generate and customise stylised or realistic characters for use as animated avatars, or in other 3D software, including iClone, Maya, Blender, Unreal Engine, Unity, Daz Studio and 3ds Max.
Character Creator connects industry-leading pipelines, providing a single system for 3D character generation, character rigging, asset management, lookdev, rendering and interactive design.
Read more about Character Creator on Reallusion’s website
Download Character Creator 4.1 for free (30-day trial)
Upgrade to the latest version of Character Creator for free (for existing Character Creator 4 users)
Read more about the new features in Character Creator 4.1 on Reallusion’s forum