5 steps to creating convincing photorealistic 3D portraits
Discover how to model, texture and light realistic 3D characters as two of The Gnomon Workshop’s leading instructors reveal the steps they follow in their workflows and their tips for achieving believable likenesses.
The human face is an extraordinarily complicated thing: a mass of musculature, tissue and bone abundant in intricate details like skin pores, wrinkles and strands of hair. Recreating all of this detail believably in CG is one of the industry’s greatest challenges; one misstep can cause an image to tumble clumsily into the Uncanny Valley. However, thanks to today’s technology – and the talented artists who wield it – photorealism is more easily achieved than ever before. Doing so just takes time, effort and education.
Below, two exceptionally gifted character artists, Şefki Ibrahim and Adam Spring, reveal how they approach photorealistic portraits of human beings. Read on to learn how they get started with an image, how they sculpt, texture, and light their work, and how they add the finishing touches that elevate pixels to portraits.
You can find complete tutorials from both artists by taking out a subscription to The Gnomon Workshop, which provides access to over 300 expert CG art tutorials.
Step 1: Create the foundations
Şefki Ibrahim: The first part of the process is collecting references of human features. I source as many references as possible via Google or Getty Images and drag them into a PureRef scene. I collect photos of my subject from as many angles as possible. If possible, source different photographs from the same shoot; that way, the lighting and the focal length are the same in each one, and the subject is the same age.
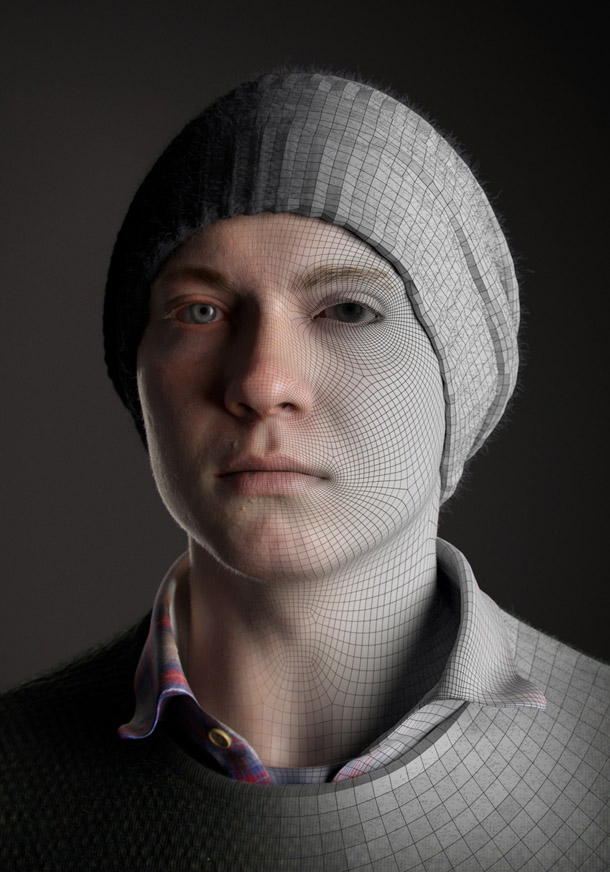
When starting on a portrait, I begin with my base mesh. My model must have good topology and sufficient UVs for the process. The model is then imported into ZBrush so I can start working on the sculpt.
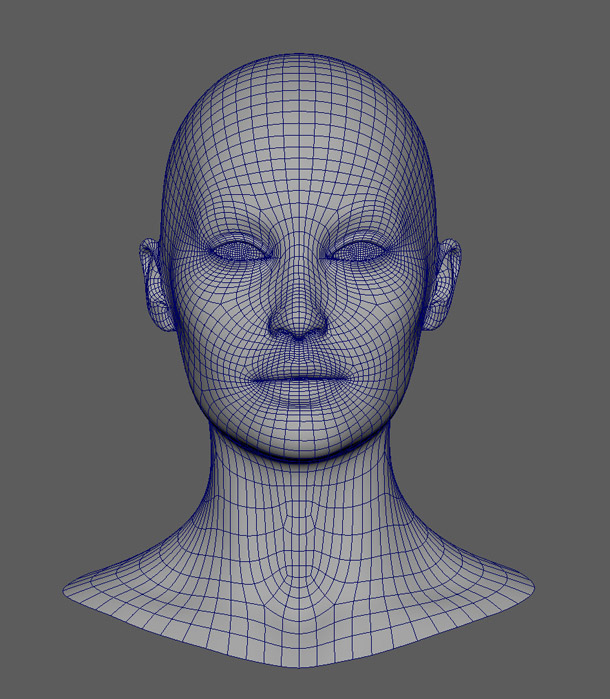
The base mesh is the foundation of your image. Even at this stage, its overall form should look believably human, and its proportions should be correct. Good topology and UVs will make it easier to add detail later.
Adam Spring: Collect plenty of references of the face from all angles: front, side and three-quarters are the most important. Also, having some unusual angles will help: a low angle, looking up, will help you to see the shape of the nostrils, the width of the bridge of the nose and the protrusion of the maxilla.
It’s also important to have different lighting references. Dramatic lighting will reveal a lot more information about facial structure than a flat lighting set-up.
If you’re working on a likeness, try to make sure your reference is focused on your subject at a specific age. Faces change so much over time, and your subject may have had work done on their face over the years.
It can also be good to study the work of painters, photographers and other 3D artists for inspiration. Take note of the things you like about their work; whether that be the mood, composition, posing or lighting.
If you are just starting out, try to keep things loose and avoid getting caught up with long projects. I learned a lot more from doing shorter projects to begin with. Doing quick practice sketches can really help you become familiar with the structure of the human head.
Don’t worry if your work doesn’t look great straight away. Most of my projects only come together right at the end. If you can learn to enjoy the struggle, the whole process will be more fun!
Keep working on your anatomy. Over the years I have learned how important it is to understand what is going on under the skin and where the major landmarks and muscles are on the face. Getting this right will really help you to achieve a convincing character model.
It is also good to understand how facial muscles deform when creating different expressions. Look at which muscles are used to create a smile or a frown, and see how that affects forms across the face, creating different volumes and patterns of wrinkles. Wrinkles always appear perpendicular to the pull of a muscle.
Looking for a great resource to help with learning facial anatomy?
Check out The Gnomon Workshop’s Subtle Performance Workflow Vol. 2
Step 2: Sculpt the forms
Şefki Ibrahim: The initial blocking stage is often the most fun and freeing. I like to use ZBrush’s ClayBuildup brush to add and remove volume from the model to define the prominent facial landmarks I observe in the reference photography. Some subjects have very notable features that are easier to capture early in the sculpting process. Others can be more subtle and may take a lot more time to get right. Use this time to work on your observational skills and knowledge of anatomy.
However, it’s important to remember that the human brain does not perceive all the intricacies of the human face – we view it almost symbolically; as a whole. Therefore, a big part of becoming a good character or portrait artist is unlearning the habit of focusing on the details. Instead, your focus should be on how the broader elements work together.
One way to improve your facial sculpting is to download or buy head scans. If you’re learning to draw or paint, you may copy 2D references as practice, so why not copy scans to practice sculpting? It’s a great way to build your knowledge of what a face looks like as a 3D form: its depth, cavities and planar changes.
A 3D human created by Şefki over five weeks, built in Maya, Wrap, Mudbox, ZBrush, Mari and Photoshop. You can see more from the project over on his ArtStation profile.
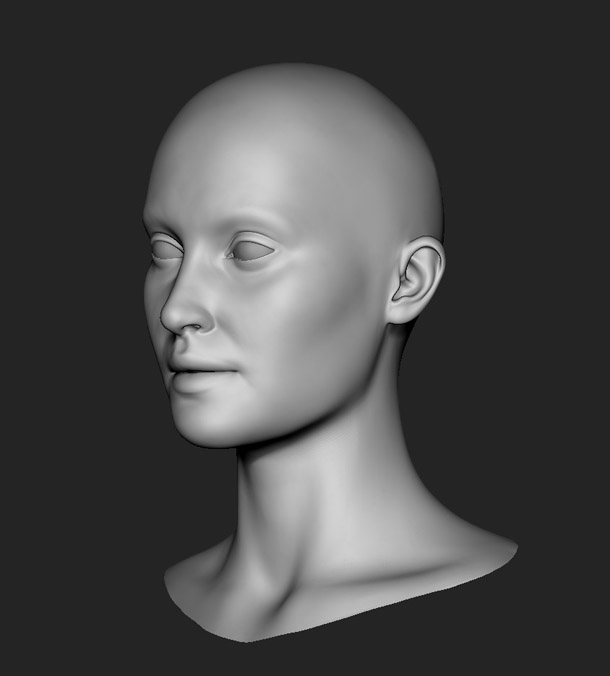
Adam Spring: If I’m starting from a sphere, I usually begin by setting up the shape of the skull; dropping down the jaw, marking three horizontal lines for the eyes, nose and mouth, then creating two flat planes on the sides of the face above and below the zygomatic arch – one for the cheeks and one for the temporalis.
Next, block out the primary forms and mark out where the eyes, nose and mouth should be. Once you have a good shape for the skull, you can start to add some of the major landmarks of the face, such as the zygomatic arch, nasolabial fold, and curvature of the maxilla. Study the distances and angles between parts of the face: the height of the philtrum, angle of the jaw, the distance between the eye sockets, and so on.
Sometimes when I get stuck, I try to focus on the silhouette of my model to see if there are any areas that don’t feel right. Also, to begin with, I find it helps to exaggerate the different planes of the face. The angles where each plane meets can give your eye something to lock onto and help your model read better, especially when viewing it from further away.
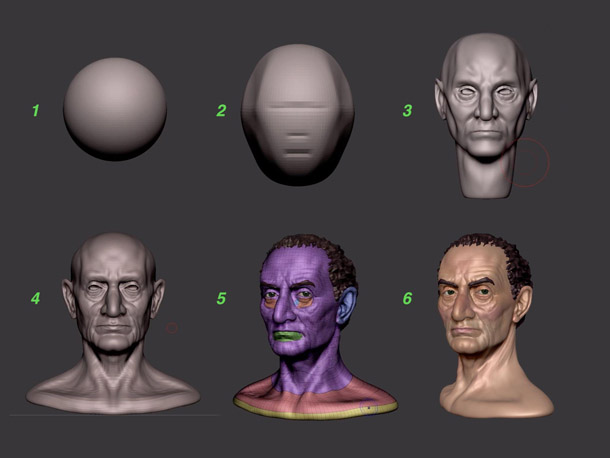
The stages of developing a 3D head from a sphere, first establishing the basic proportions, then blocking out the primary forms, progressively adding finer and finer detail, and finally adding surface textures.
Once you have got a solid base for your model, you can begin adding secondary forms, such as wrinkles around the eyes and across the forehead. I would say it is important to get your primary and secondary forms to a reasonable stage before getting stuck into any finer detailing, such as tertiary wrinkles, or skin pores. You can of course jump back and forth between all the levels of detail; however, I find it helps me to avoid having to redo work if I don’t jump ahead too quickly and really try to push the larger forms.
Another approach is to use photogrammetry. Scans can provide you with an amazing base for your model, and in production, they are often used to achieve results quickly. However, using them in personal work too often means that you miss out on the sketching phase, which is where you develop some of the most important skills required to become a character modeler.
A FACS rig made by Adam in his spare time. You can see more from the project on his ArtStation profile.
For realistic results, it is important to make your model asymmetric. In real life, faces are not perfectly symmetrical, so when we see asymmetry, it adds life and believability to the character. This idea can also be extended to posing the character; adding a twist to the shoulders or a tilt to the head will look so much more natural than a generic A-pose.
It is a good idea to view your model with the correct camera settings. If you are working on a close-up shot where the face completely fills the frame, try using a focal length of 100-200mm. If you are creating a full-body portrait, 50-85mm will work well.
Check out Adam’s Gnomon Workshop tutorial
Creating Digital Doubles With Single-Camera Photogrammetry
Step 3: Texture your character
Şefki Ibrahim: I like to use Mari to texture my characters, and mainly use resources from Texturing.xyz to create the diffuse and displacement maps.
The significance of a diffuse map cannot be understated; it may sound obvious, but if you swap the diffuse map from one 3D character to another, it will stop looking like the person it is based on. Even if you use Texturing.xyz, there’s still work to do to emulate the likeness of the person you are trying to recreate.
Once I have Texturing.xyz data projected onto the model, I spend time in Mari hand-painting features like freckles, dark circles, redness, and whatever else I observe in my reference. I then iterate the look of these maps by bringing them into Maya and Arnold and performing many render tests until I hit the right feel.

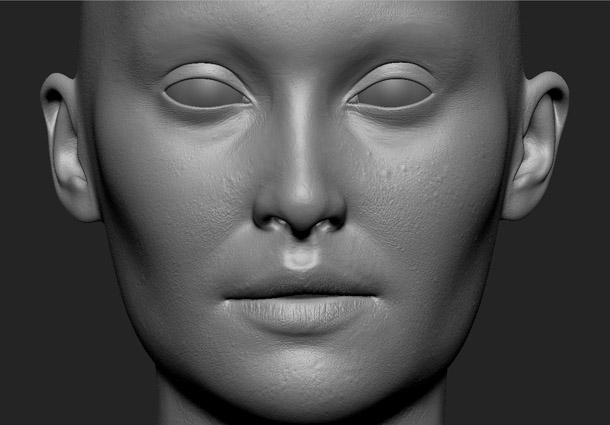
Texturing can really bring an image to life, through details like skin pores, lip wrinkles and vellus hair.
Adam Spring: When texturing, you can choose between hand-painting your model or using scan data.
Recreating the complextity of human skin requires a lot of work, so if you are hand-painting the diffuse map, you will need to add many layers of noise, break-up and variation in the skin tones. Pay attention to where the fleshy and bony areas are across the face; the closer the bone is to the surface, the less blood flow there will be in that area.
Using scans is a quick way to get photorealistic results, so scans are commonly used in production. You can quickly wrap the topology of your 3D model to a scan and transfer its surface colour onto your own UVs. The texture map can then be cleaned up by removing hairs and any baked-in lighting effects, like subsurface scattering or occlusion.
I would say that it is well worth learning how to texture without scans to get a better understanding of the process. This will allow you to be more creative if you start to use scans later, as you can then work on top of the maps they provide, and adjust them to match the design of your character.
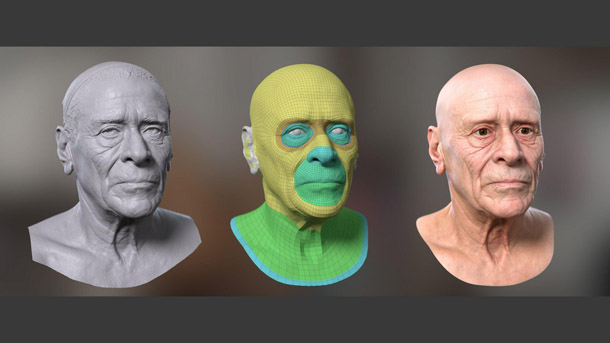
Wrapping a base mesh to a scan provides incredible detail in a 3D portrait, but preserves clean topology.
Step 4: Set up the lighting
Şefki Ibrahim: Lighting is where a portrait comes to life. When testing, I like to keep the lighting set-up very simple. Sometimes, it’s a single rectangular or disc light. Alternatively, I may use the Arnold Skydome to test the model against different HDRIs, which I source from Poly Haven or sIBL Archive.
When performing look dev on your model, consider the size of the light, how close it is to the subject, and the exposure of the image. All these factors will affect the look of the skin. And don’t stick with just one lighting set-up. When aspiring for photorealism, test your model in unflattering lighting conditions. You don’t have to share the results with anyone, but you will notice whether the model or the textures could use more work. Then you can return to a complimentary light set-up to show off your work.
Remember to iterate! Rework your model, fix your textures, tweak your look dev, and alter your light set-up, all while observing your references. It’s a cyclic process. With each cycle, your work will noticeably improve.
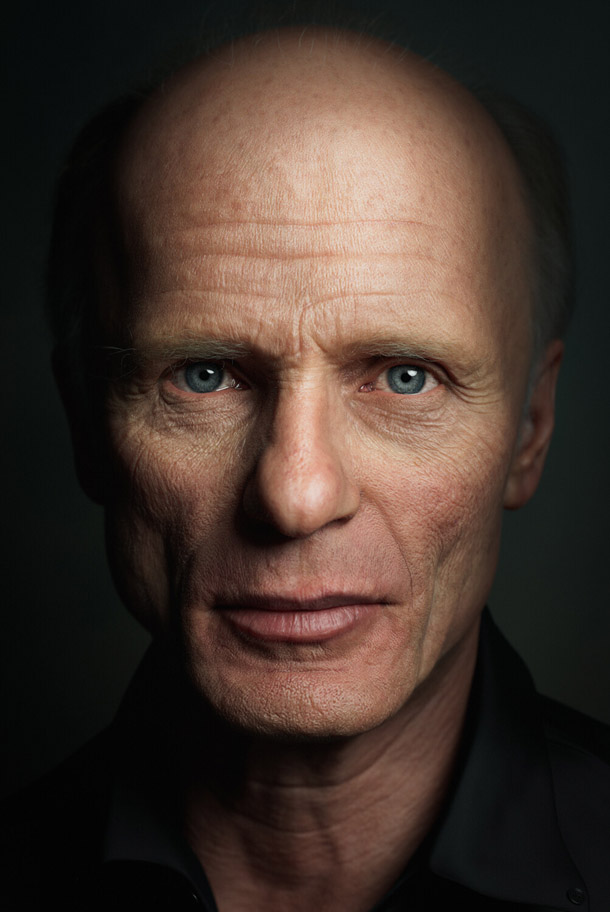
Şefki’s incredible portrait of actor Ed Harris was lit and rendered using Maya and Arnold. The project uses textures baked using SkinGen in Reallusion’s Character Creator software.
Adam Spring: Lighting is one of the most important steps. If you get it right, you can really sell your model. Study different artists and photographers, observing how they achieve different moods with lighting.
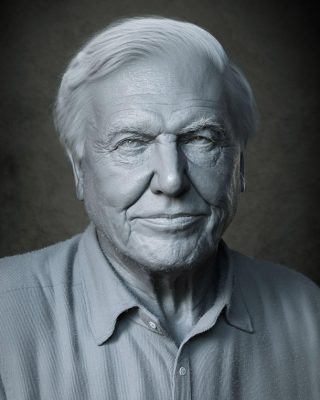
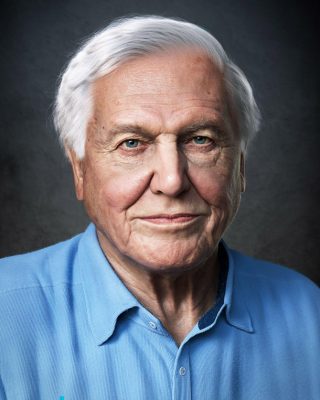
Adam’s portrait of Sir David Attenborough. See more behind-the-scenes images on his ArtStation profile.
You can create so many different effects with light, depending on how much you decide to illuminate your subject, and from which direction. You can even trick the viewer into thinking the face has changed shape; this can be used to create a more flattering look, or perhaps the opposite, depending on your subject. As a technical exercise, it is good to test your model under a variety of different lighting set-ups. This will help you to see whether the model is working well, or if any of the anatomy needs to be improved.
Check out Şefki’s Gnomon Workshop tutorial
Photorealistic Character Look Dev in Maya & Arnold
Step 5: The last 5%
Şefki Ibrahim: The elusive 5%! Before you proceeed to the final render, think about a few things. Could you repose the model or change the camera angle to add more interest to the portrait? Does the focal length help the likeness? (I like to go for a 50-70mm focal length, and pull the model a little closer to the camera, which I feel adds intimacy with the character.)
What story are you trying to tell with the lighting? Even if you’re just going for a studio lighting set-up, could you change the lighting to give the portrait more depth and intensity? Would adding depth of field, noise and chromatic aberration to the final render give it a more photographic quality?
I like to ask myself these questions when I finalise a portrait; after all, artists make conscious decisions with their work. It’s how, over time, we generate a personal style.
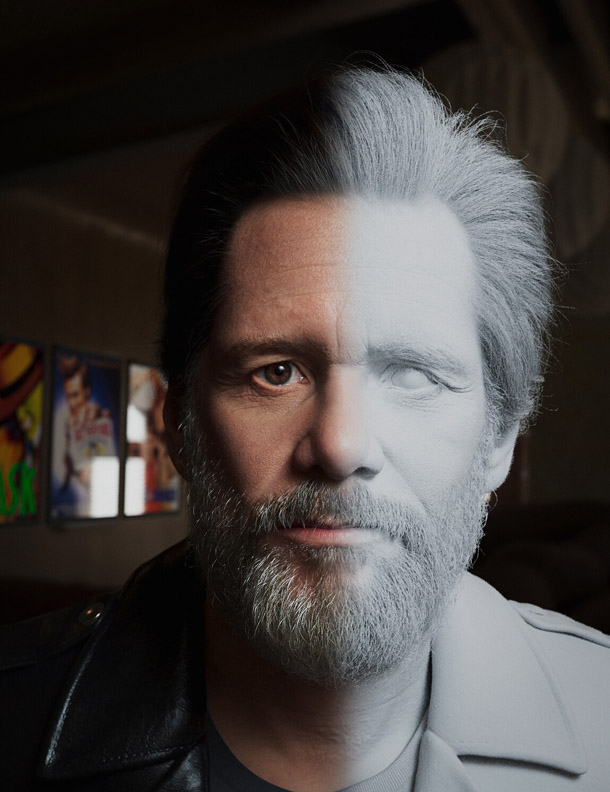
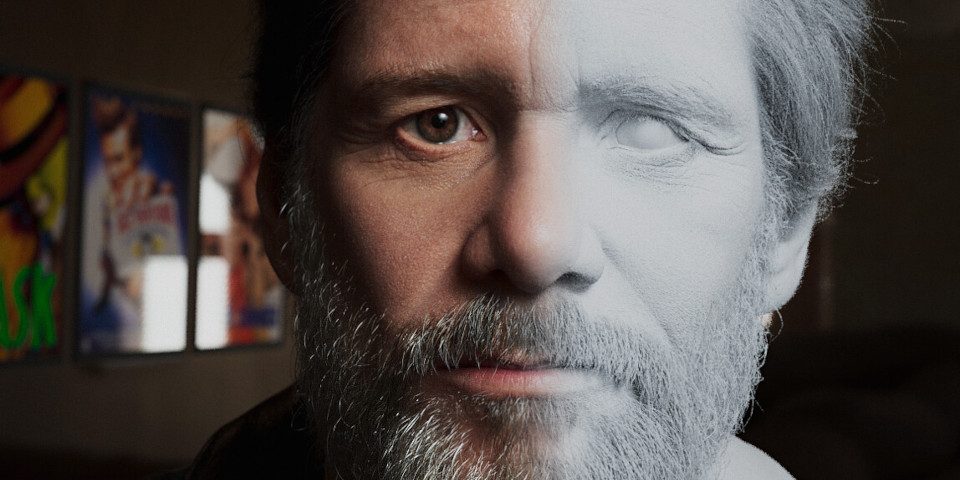
Another of Şefki’s portraits, of actor and comedian Jim Carrey. See more on his ArtStation profile.
Adam Spring: Once you have finished your model and have fine-tuned the look dev, experiment with how you composite the render passes, adding depth of field and motion blur (if using animation), and colour grading the result. All these things will add an extra layer of realism to your work.
Be careful about the background you choose for your character. I have found that it is best to pick a colour or pattern that compliments your character design whilst creating some separation between the character and its surroundings. Sometimes the best backgrounds are the simplest ones; adding too much into the scene can take the focus away from your character.
Get more from your 3D models by using them in new contexts. Adam’s FACS rig uses 51 blendshapes, 9 corrective shapes, and 18 blended textures in the colour and displacement channels of the skin shader.
To get the most out of your work, try using your model in as many different ways as possible: for example, using it to test facial rigging, or perhaps repurposing it for 3D printing.
If you would like to see a breakdown of my own character creation process, I have documented each of my projects from beginning to end in the highlights on my Instagram page.
 About the author: Şefki Ibrahim is a 3D character artist at Cubic Motion. He previously worked as a senior look dev TD at Industrial Light & Magic, specialising in high-end digi-doubles. His previous work includes scan data texture clean-up, digi-double modelling, texturing, grooming, and look dev for ads and digital human demos. Visit Şefki’s website
 About the author: Adam Spring is a senior 3D artist with over a decade of experience working in visual effects and animation. Over the past five years, he has worked on character pipelines for clients such as Blur Studio, Activision and Ubisoft, focusing specifically on facial modelling and FACS pipelines.Visit Adam’s website.