Turn a custom ZBrush model into a game-ready character with CC4
[Sponsored] Character Artist Francis Lamoureux reveals how he uses Character Creator 4 (CC4), Reallusion’s 3D character design software, as part of his professional workflow, enabling him to convert custom ZBrush sculpts into game-ready characters quickly and intuitively.
As a Junior Character Artist, one of my most recent professional experiences was at game developer Larian Studios, where I worked as an intern for four months. During that time, I discovered Character Creator 4 (CC4) through social media and immediately saw the potential of Reallusion’s 3D character design software.
In the course of integrating CC4 into my own pipeline for creating game characters, I watched many excellent tutorials, eventually developing a workflow that suits me well.
The workflow consists of six main steps:
- Transfer a custom mesh onto a CC4 base mesh topology
- Create the high- and low-resolution models, and textures for clothing and accessories
- Use GoZ to create clothing
- Clean up the skinning
- Simulate physics
- Export to your preferred render engine
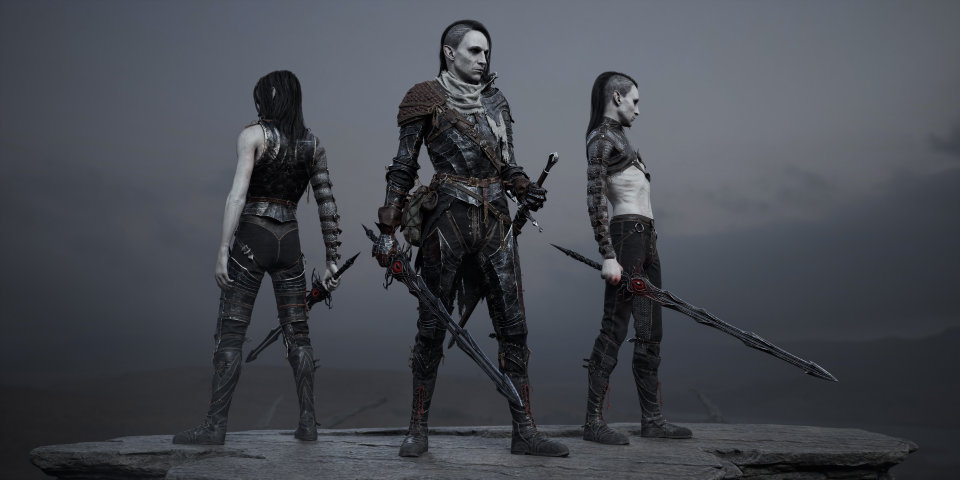
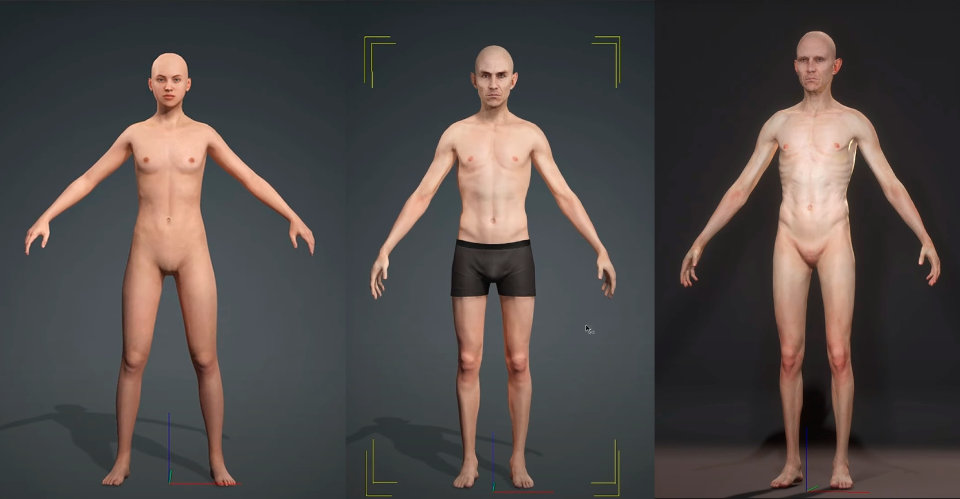
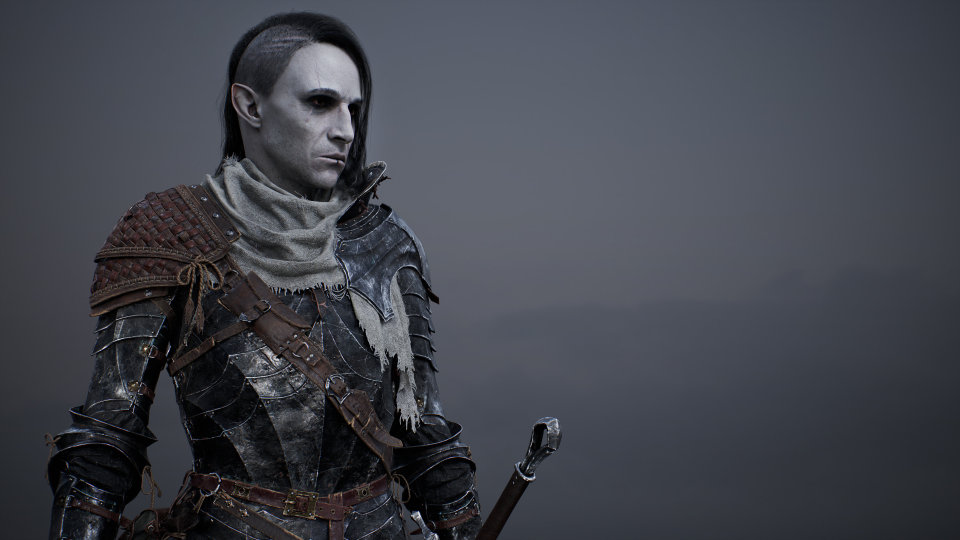
The first step is entirely optional if you begin your project using the CC4 base mesh. However, before my collaboration with Reallusion, I had already started sculpting the face and body of the character featured here, Hexblade Anathema, without the CC4 topology, so I had to find a way to transfer my custom sculpt to a CC4-compatible base mesh.
Step 1: Transform the custom 3D mesh into a CC4 base topology
Let’s say you’ve sculpted a face in ZBrush and want to convert it to the CC4 topology to take advantage of all of CC4’s features. For this, you need a separate add-on, Headshot 2.0, which can be found in the Plugin section of the Character Creator listing in the Reallusion Hub.
Headshot is a wrapping tool, and will wrap the CC4 topology around your custom sculpt. But there’s more to it – Headshot also automatically generates eyes, a mouth interior, teeth, tongue, lashes, and even a complete body, all based on CC4 topology.
Once the information from the custom head is transferred and attached to a CC4 base mesh, you can use Character Creator GoZ Plus (GoZ), Reallusion’s plugin for transferring assets between ZBrush and Character Creator, to send the character back to ZBrush and wrap the CC4 body around your custom body sculpt. All the details from your custom sculpt can be transferred to the CC4 base mesh using Project History or the History Recall brush.
Step 2: Create high- and low-poly models, and textures for clothing
Once the base ZBrush sculpt had been transferred to the CC4 topology, I took a break from CC4 to finish the high-resolution models of the character’s armor, clothing and accessories.
I also completed low-resolution versions of the assets, plus the character’s hair, and created all of their textures.
Step 3: Create clothing using GoZ
Next, I imported the low-resolution versions of the character’s clothing into the same ZBrush scene that contained the GoZ CC4 character, and linked it back to the character piece by piece.
Selecting Create Cloth in the GoZ Options causes the software to generate these parts as new assets and automatically transfer the character’s skin weights to them. This is a powerful feature that significantly speeds up the process of animating and posing a fully clothed character.
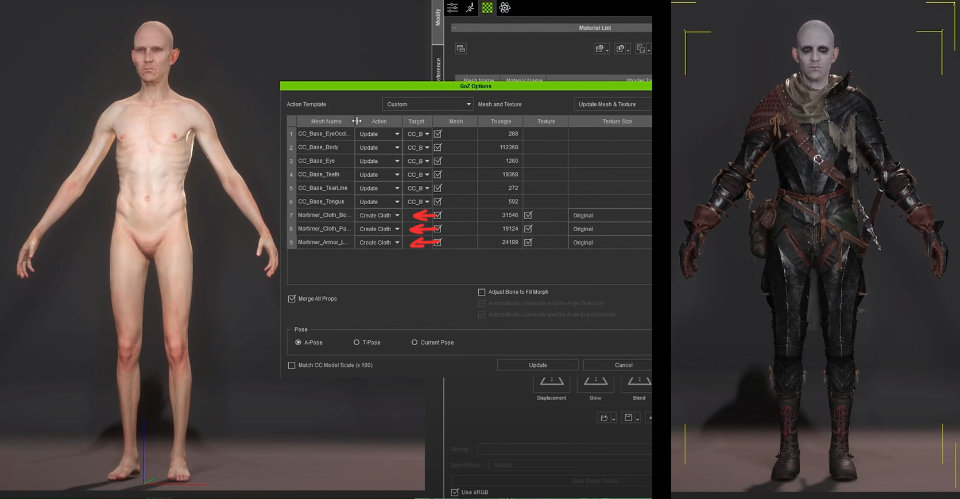
Once I had repeated the process for the other elements of the character’s clothing, I ended up with a custom, fully clothed character that shared the CC4 topology.
This unlocked all of the benefits of CC4, such as blendshapes, facial and body animation, compatibility with motion-capture pipelines, advanced materials, and asset integration.
The possibilities for creating different faces and body types are nearly endless, making CC4 especially efficient for generating NPCs. For example, you can generate bulkier, thinner, taller or shorter versions of a character, all from the same base asset.
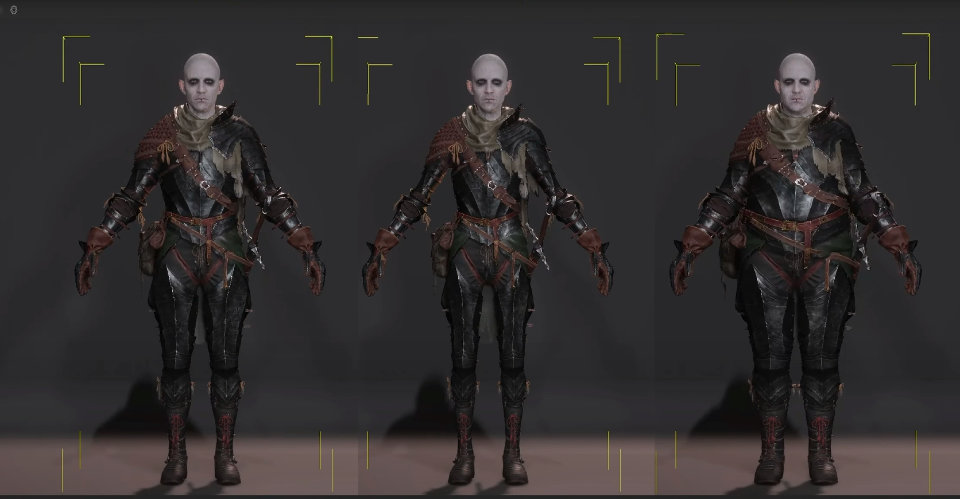
You can also use the morph tools to easily create facial variations of a character.
Step 4: Clean up the skinning
To achieve cleaner deformations when the character is animated, you may need to adjust its skinning, especially if the low-poly mesh imported from ZBrush is complex.
Fortunately, CC4’s skinning tools are quite user-friendly compared to those of other software. In my case, CC4’s auto weight transfer handled about 90% of the work.
However, there were areas, like the bag and scabbard, where I needed to refine the skin weights manually.
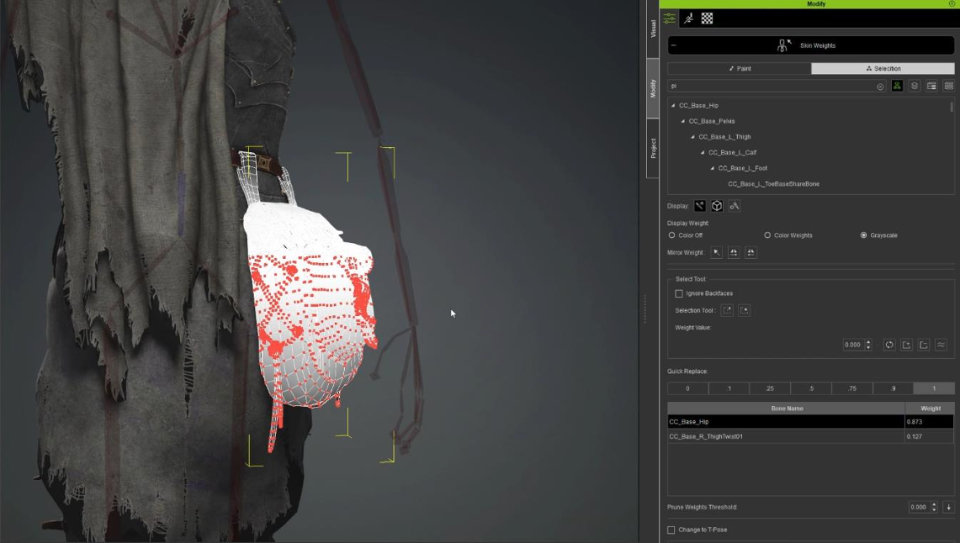
In the image above, you can see that some vertices on the bag are being influenced by multiple bones, causing unwanted stretching when the character walks. To fix this, I selected the affected vertices, selected the hip bone, and clicked the 1 button to assign 100% influence from the hip bone to those vertices.
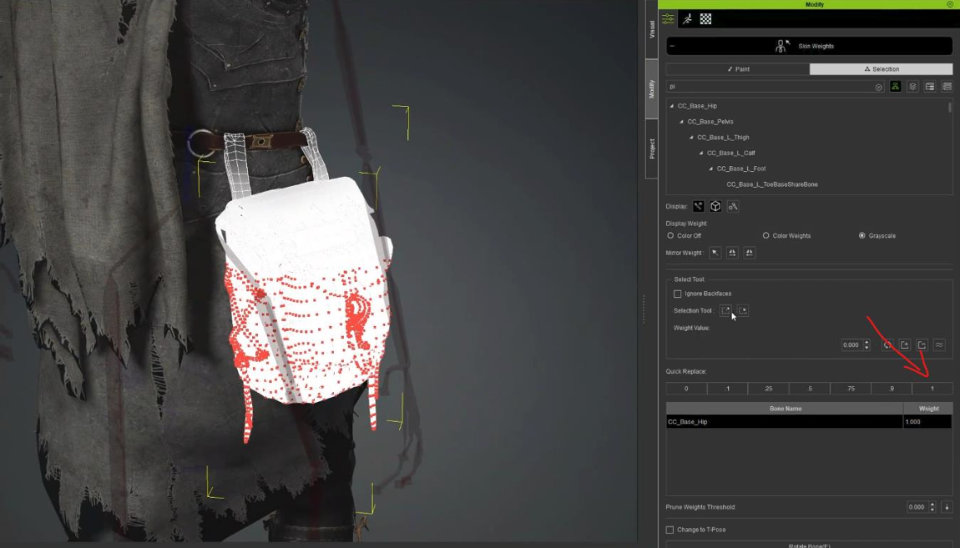
I used the same process for the scabbard, adding a bit of smoothing to create a cleaner transition along the belt.
As a side note, I used the visibility toggle to manage the different layers of clothing here. While all of the items of clothing were rigged using Create Cloth, some parts were hidden to maintain the proper layered appearance for the character.
Step 5: Simulate physics
Once you’re satisfied with the character’s skinning, it’s time to test the physics simulation.
The process starts by browsing Reallusion’s animation assets and dragging an animation onto the character to observe how the clothing behaves during movement.
To control which areas are affected by the simulation, you need to import a black-and-white texture map. I exported a JPEG of the UV layout from Maya and painted a weight map in Photoshop (white areas will be simulated, while black areas will remain static).
Next, you need to enable the necessary checkboxes for simulation. You can adjust settings to fine-tune the results until you’re happy. There are multiple presets available as starting points.
Here are a few key parameters you can experiment with:
- Distance between the simulated mesh and the collision volumes
- Distance between the simulated mesh’s vertices
- Wind force and direction
To achieve the best results, make sure that Rigid Body and Soft vs Soft Collision are enabled in the Global Physics Settings rollout of the Project settings.
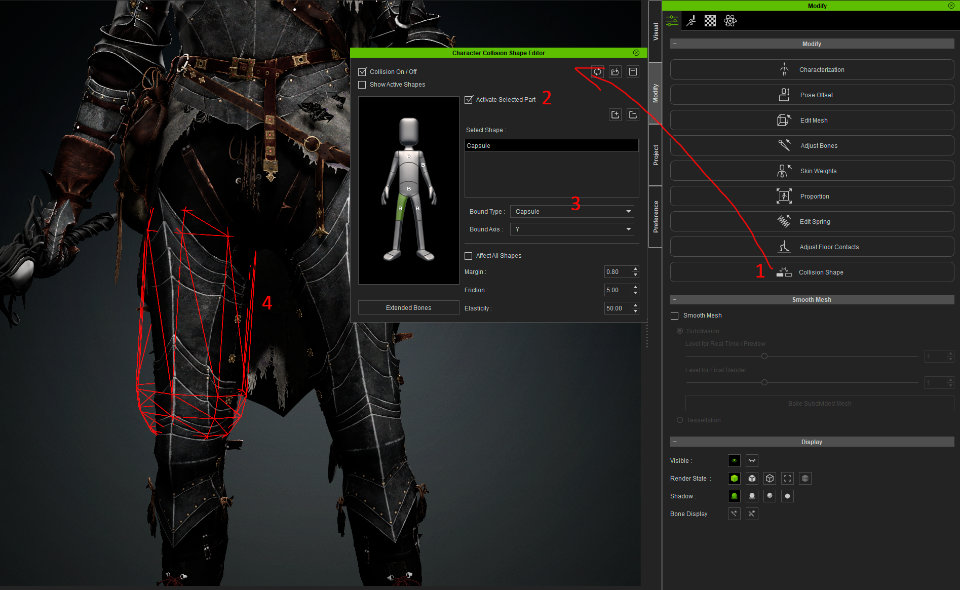
To avoid clipping issues, you may need to add collision volumes to the character. This is quite simple:
- Select the character and click on Collision Shape.
- Make sure both Collision On/Off and Activate Selected Part are enabled (with a body part selected on the dummy character in the interface).
- Choose the appropriate collision shape for the selected body part.
- Adjust the position of the collision shape and scale it directly in the viewport until you achieve the desired effect.
Play the animation to see how the collision volumes interact with the simulated clothing.
Step 6: Export to your preferred render engine
The settings you use to export your game-ready character will depend on how you plan to use it. Personally, I use Marmoset Toolbag for rendering, so I export everything in FBX format, except for the simulated parts of the character, which I export as Alembic (.abc) files. This ensures that the physics-based motion remains intact outside of CC4.
Final thoughts
This was a small glimpse into my workflow and how I integrate Character Creator 4 into it.
CC4 offers a fun, fast, intuitive way not only to bring your characters to life but to experiment with variations in facial features, silhouettes, and animation, and I’m grateful to Reallusion for the opportunity to share this pipeline with you. If you haven’t tried Character Creator 4 yet, I encourage you to give it a shot and see how well it fits into your own creative process.
Need a more detailed walkthrough?
You can find a longer version of this article on the Reallusion website, or watch a recording of the workflow on YouTube.
 About the author: Francis Lamoureux is a 3D Character Artist, currently working with independent videogame developer creā-ture studios. He previously interned at Larian Studios, where he worked on assets for Baldur’s Gate 3. Francis studied architecture for six years before switching careers to work in the game industry. See more of Francis’s work in his ArtStation portfolio