The making of Rebellion’s Evil Genius 2 cinematic trailer
The new trailer for Evil Genius 2 translates the game’s colourful spy-fi aesthetic into cinematic animation. Director HaZ Dulull and Rebellion VFX’s art team reveal how it was created using Houdini and Unreal Engine.
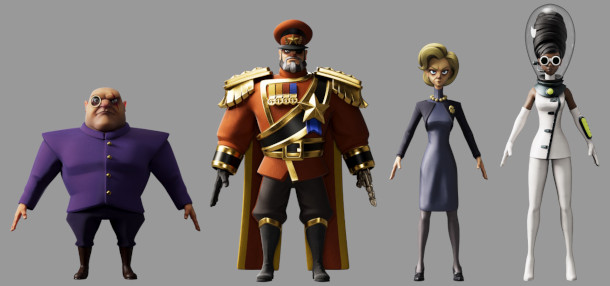
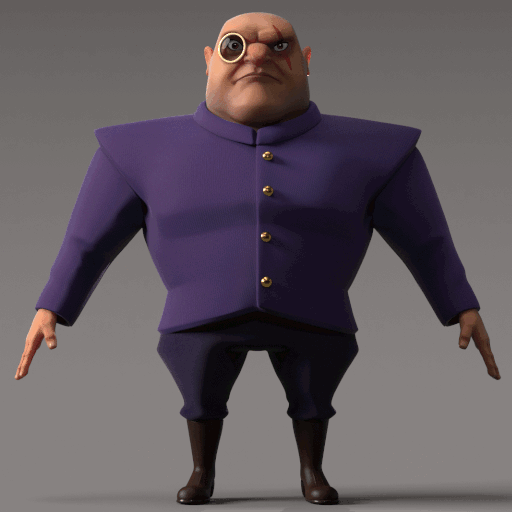
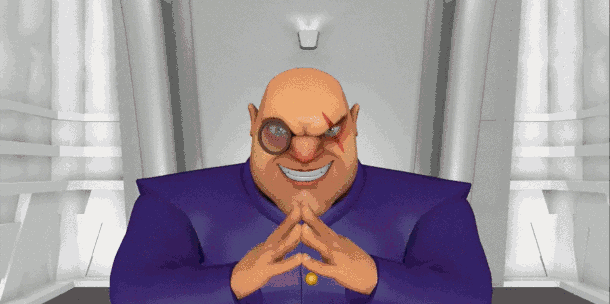
Evil Genius 2: World Domination, Rebellion Developments’ ‘satirical spy-fi lair builder’, re-imagines cult 2004 real-time strategy game Evil Genius for a new audience. Described by Destructoid as a “diabolical labor of love”, the sequel sees the player take on the role of one of four Evil Geniuses – Blofeld-alike Maximilian, henchman-turned-commander Red Ivan, spy boss Emma or mad scientist Zalika – to build a base, manage minions, and fend off do-gooding James Bond types aiming to thwart their plans for world domination.
The latest trailer, released last month, translates Evil Genius 2’s colourful world into cinematic animation, including a sweeping virtual camera move across a tropical island and down through a casino into a hidden lair, and a final section introducing the four playable villains. In the full trailer, the two sequences bookend actual gameplay footage, but the director’s cut (embedded above) shows them on their own.
For the sequences, Rebellion hooked up with VFX-artist-turned-director Hasraf ‘HaZ’ Dulull, whose resume includes indie sci-fi features The Beyond and 2036 Origin Unknown, both broadcast on Netflix, Disney+ miniseries Fast Layne, and upcoming animated feature RIFT. HaZ worked with Rebellion’s in-house VFX division, with a team that peaked at 16 artists towards the end of the trailer’s six-month production process.
Below, HaZ and three of those artists – Rebellion VFX head He Sun, senior lookdev artist Marcos Silva and compositor Chris Berry – reveal how the cinematic sequences were created using original game assets up-resed and reworked for use in a new USD-based virtual production pipeline, with real-time footage from Unreal Engine skilfully combined with shots rendered in Houdini and Redshift to create a seamless whole.
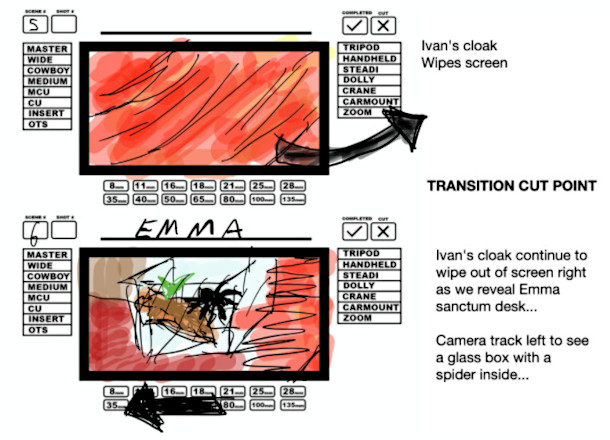
Previs
The brief for the project was to ensure that the trailer stayed true to the game’s retro-spy vibe, yet also felt fun and cinematic. HaZ, the director, proposed having most of the trailer presented in a single camera move with wide lenses to allow the audience to really soak in the world of Evil Genius, from the gorgeous island to the casino and into the lair, with some smart transitions to make everything gel.
HaZ: “It was important from the start that this felt like an opening to a spy movie, referencing things like the classic James Bond films and Austin Powers, and even the editing style – speed ramps and so on – that you see in Guy Ritchie films like Snatch.”
He Sun: “The VFX team worked closely with HaZ on rough boards, dubbed ‘HaZ-grams’, to walk [the team] though the vision he had [for the cinematic]. From there it was a lot of back and forth between [the two of us] to figure out how to pull this off. I also worked with the game director and marketing, and blended [their feedback] in with the director’s vision. It was a truly collaborative process.”
As production took place during lockdown due to the Covid-19 pandemic, all of the meetings throughout the project were done virtually. The previs team used rough boards to set up cameras and lay out the environments. Since we were up against it with time and resources, and the casino sequence was much bigger in scope than originally planned, we looked at Unreal Engine to handle that sequence.
HaZ was already using Unreal Engine on other projects, so he was able to block out the camera moves himself, sending the camera back to the team as an FBX file. This saved a lot of time going back and forth, since it meant that the artists were using a camera move approved by the director right from the start.
Animation and motion capture
The animation was a mixture of motion capture and keyframe animation. The mocap was recorded under Covid-19 protocols at Audiomotion‘s volume stage, where HaZ was able to direct the performers while operating a virtual camera inside the previs environment.
The animators were also present and helped massively during the session, advising on movement to ensure that the motion-capture data would translate well to their team.
The team used Rebellion’s internal tool to review the takes and make selections so that the data could be processed and handed over to animation to retarget onto the characters in Maya.
Creating the characters
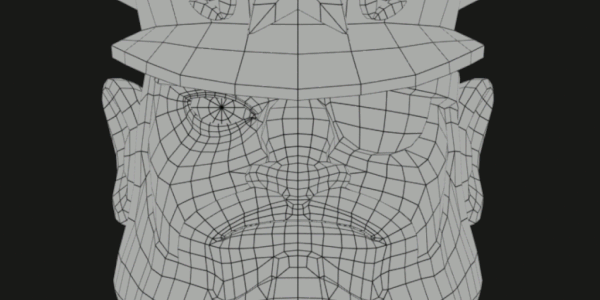
We started the character creation process with the assets provided by the Rebellion Games division. At this point the characters were already in a very good shape, but they were assets made for the game, so our first step was to upres the models. We spent a lot of time transferring the normal details – baked into the textures for the game assets – into the geometry itself to help the materials to look more realistic.
The base textures were created with Substance Painter. The details of the fabrics and small scratches on the metal and glass materials were all created with procedural textures at the lookdev stage. The most annoying part of this process was removing ambient occlusion baked into the textures. It was often hard to tell what was had been a creative decision on the part of the game artist, and what was just baked AO.
Marcos Silva: “Our main challenge during lookdev was the secondary and crowd characters, since they would appear in shots [rendered] with Redshift as well as the shots done with Unreal.”
Most offline render engines have very similar skin materials, which are very easy to use. But in the case of real-time engines like Unreal, subsurface scattering is relatively new render effect, and is less simple to set up. We ended up modifying the material from Epic Games’ Metahumans to create a detailed cartoon skin shader that matches the one made with Redshift.
To help with dailies, we created our Asset Auto Daily Tool, which enables artists to present an asset lookdev/model turntable, showing their work in progress from Houdini directly inside Shotgun.
Building the environments
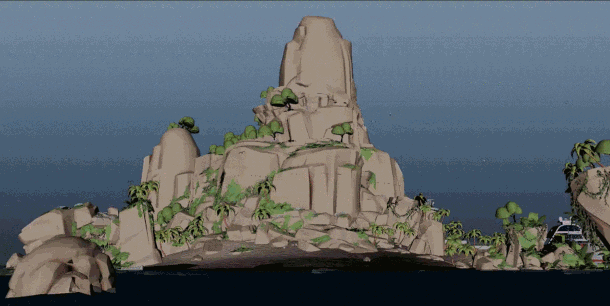
The workflow for the environments was very similar to that for the characters. First, we had to upres the assets we received from the games division. Assets made for games are very optimised, so our main task here was to create new edges in the geometries so that we could subdivide them smoothly. For objects that would be seen up close, like Emma’s spider terrarium and Max’s golden cat, we had to recreate a high-res asset based on the original.
Our biggest challenge was the opening shot, with the camera travelling right across the island towards the evil lair. We used the game model as a base, re-dressing the set ourselves, and using an in-house procedural tool to scatter new high-res vegetation and the crowd in Houdini. We also had to sculpt a new sand beach.
FX work
To create the stylised ocean FX, the team had to split the scene up into parts that could be done procedurally within the Houdini’s ocean tools, and parts that would need to be simulated. Multiple FLIP fluid simulation tanks which were blended with the ocean spectrum to create one seamless shot. The challenges with this were to make sure that everything that we passed on to the lighting and compositing team was consistent across the opening shot, and that you couldn’t see where the blends took place.
Working with USD also made it possible to hand updates further down the pipeline quickly and easily, with lighting always having the most up-to-date version of the FX layer. This was great when the FX team was doing multiple different layouts for the clouds in the sky. As soon as we had one we liked it was updated in the USD, and published to the next department.
Lighting
We put everything together during lighting. Each department (animation, FX and layout) was able to generate a unique USD layer which the lighting artists imported into the final scene. Our main references were the mood boards created by the director, since HaZ had put together his main references and brief for each shot.
Each Evil Genius has their own brand color, which were already being used by the game division’s marketing team, but our main goal was to lighting set-ups to make each shot unique. For Max, Ivan and Zalika it was easy, but with Emma we had to change her mood color, leaving the blue only for her freeze frame.

Composition and final details
HaZ had a lot of previous experience in directing real-time projects, so the goal was to be able to keep the look of the cinematic sequences flexible and controllable all the way through to the composite.
Chris Berry: “We had [two] tricky long shots with their own unique challenges: the island and the casino.”
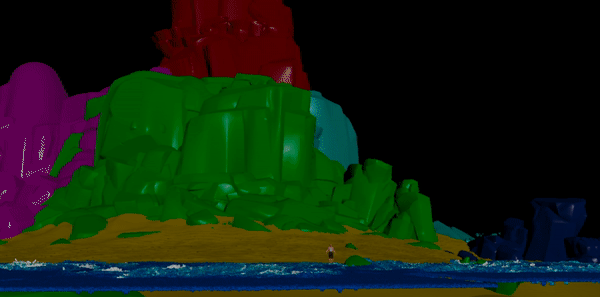
With the island flythrough, in order to help reduce turnaround times after updates to the lighting and sims, and to help minimise defocus issues with parts of the scene close to the camera, we split the island into multiple renders. Due to the complex nature of the camera move, it wasn’t obvious where to make the separations, so we used deep compositing to rebuild the shot in Nuke.
Our ocean render in Redshift was throwing lighting artifacts onto the island when we used motion blur, so we decided to render the shot without any. This made compositing the layers a bit simpler, but adding motion blur in post typically creates the same kind of tearing, smearing and doubling artifacts on every frame that you get when retiming a shot. We managed to avoid hand-painting out 99% of these by creating alternate settings for Nuke’s VectorBlur and Kronos nodes, and doing motion blurs on some layers separately to others, then mixing in whatever worked over each artifact.
To help maintain consistency between shots rendered in Redshift and those rendered in Unreal Engine, we also took the Unreal renders into Nuke and applied the same lensing set-ups to them. Out of the box, Unreal gives fewer utility passes to work with – primarily an aliased depth pass and simple ID passes – so we made sure that we rolled the bigger lookdev changes back up into the Unreal scene, while handling the final atmosphere, secret room reveal, and the transparent champagne glass in Nuke, to give us control over defocus effects and the refraction of light through the glass.
Conclusion
As well as being an effective marketing tool for the game, with the full version racking up 150,000 views in its first three weeks on YouTube, the Evil Genius 2 cinematic trailer has served as a model for future projects, both in terms of how teams communicate, and by establishing a new USD-based production pipeline.
He Sun: “From a team perspective, [having a] communication channel between all departments and the director was great. This project [also laid] the foundation of our brand new USD workflow, which [we are continuously developing] further. We are now in the middle of developing a new hyper-real project that uses the same pipeline, but improved in many ways.”
 About the authors: Hasraf ‘HaZ’ Dulull started his career in VFX before moving to directing and producing with indie sci-fi feature The Beyond, later licensed to Netflix. His second feature, 2036 Origin Unknown, also landed on Netflix. He was creative consultant for Disney action comedy series Fast Layne and directed several of its episodes. Visit HaZ’s website.
 About the authors: He Sun started his career in the game industry over 10 years ago, then transitioned to VFX for feature films and TV. He is currently is head of Rebellion VFX at Rebellion Film & TV Studios, working to create a new USD-based pipeline centralised around Houdini and Unreal Engine with other supervisors, artists and TDs. Visit Sun’s website.