Ziva Dynamics releases Ziva VFX 1.6 for Maya

Ziva Dynamics has released Ziva VFX 1.6, the latest update to its soft tissue simulation plugin for Maya, adding Ziva Anatomy Transfer, a neat automated system for transferring rigs from one character to another.
The new toolset enables users to transfer Ziva VFX skin and muscle set-ups between pairs of characters or creatures, even if the physical proportions of the target vary from those of the source.
A powerful tool for creating stable, accurate simulations of soft tissues
First released publicly in 2017, Ziva VFX is rapidly making inroads into visual effects pipelines, with the software now in use at studios including DNEG, Scanline VFX and Image Engine.
The plugin mimics the stiffness, density and volume preservation of real tissues, including bone, tendons, muscles and skin; and supports multiple types of physical damping.
As well as editing parameters directly, Ziva VFX supports a brush-based workflow making it possible to paint material properties and mesh resolution, and even paint in muscle attachment points and muscle fibres.
Ziva Anatomy Transfer: transfer a single master rig to characters of all shapes and sizes
To that, Ziva VFX 1.6 adds Ziva Anatomy Transfer (ZAT): a promising new semi-automated system for transferring rigs and rig settings from one character to another.
It effectively enables users to set up a single master rig, then roll it out to all of the characters in a project, greatly reducing set-up times.
The source and target characters need to have the same vertex count and triangle connectivity, but their bodily proportions can vary relatively widely.
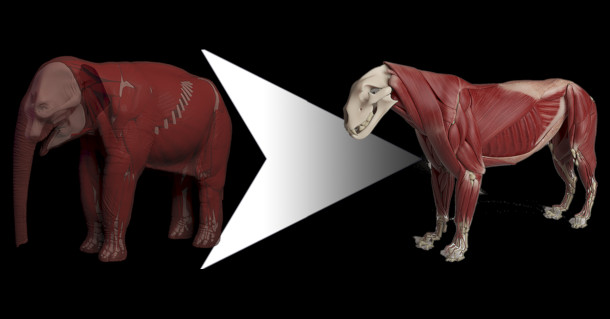
Ziva Dynamics’ demos show the rig for a human character being transferred to an humanoid alien, and a lion to a cheetah, but it is possible to push the system further.
The company tells us that in its own early R&D, the toolset was used to warp the rig for an elephant into that of its Zeke the Lion demo character, and estimates that a studio would probably need to create fewer than five basic ‘archetypes’ to cover all of the creatures required for the majority of VFX jobs.
A kit of parts rather than a black box operation
Speaking to CG Channel before the release, Ziva Dynamics CEO – and former Weta Digital creature supervisor – James Jacobs described ZAT as “an entire pipeline of capabilities”.
It is provided as a kit of parts rather than a single black-box operation, giving users more choice about how they integrate it into their workflows.
The workflow is a two-stage process, with users first warping the source character to match the proportions of the target, then using an automated function to transfer simulation properties.
There are separate deformers for bones, for skin and internal tissues, and for hair and clothing.
The zBoneWarp deformer uses source and target cage meshes – usually, the skin of the source and target characters – to repoportion the source character’s skeleton.
It is designed to keep bones straight and avoid disturbing the geometry of the bone ends.
In the demo we saw, the results looked good out of the box for the limbs and torso, although problem areas like the jaw and the digits required some manual adjustment.
That can be done within Ziva VFX by painting maps to identify landmarks: features on the skeleton whose relative positions need to be maintained during deformation.
Alternatively, it is possible to ‘break out’ from the process at any point and modify the partially warped geometry using any of Maya’s standard tools.
A separate zHarmonicWarp deformer handles skin and soft tissues, and can also warp Maya joint hierarchies, locators, curves and NURBS surfaces.
Unlike the bone warp, every vertex of the mesh is affected, so users cannot paint maps to control the result, but it is possible to set key properties of the harmonic function, including the resolution and tetrahedral size for the bounding volume.
The third deformer, zRBFWarp, is a more conventional Radial Basis Function solver, and can be used to warp external geometry like hair, eyebrows or clothing to fit the reproportioned character.
The final step of the process is to transfer rig and simulation properties, including attachments, fibres, materials and the simulation mesh, from the source to the target character.
Users can copy and paste properties for individual objects, or use a readymade zRigTransfer script to copy an entire rig onto an unrigged target character.
Other new features: zRivetToBone, improved simulation speed
Other changes in Ziva VFX 1.6 include zRivetToBone: a new deformer for attaching the CVs of line of action curves to bone meshes.
It can be used to drive line of action curves without introducing cycles in the dependency graph, simplifying scripting and improving script portability.
Under the hood, simulation stability and performance have been improved: Ziva Dynamics estimates a 15-20% speed boost on “typical anatomical rigs”.
In addition, anyone with a subscription to Ziva VFX will now be able to download and use Zeke the Lion, plus a new rigged character, Lila the Cheetah.
Ziva Dynamics’ main demo character for the past two years, Zeke includes 132 individual muscle tissues and an optimised fat/skin layer with approximately 880,000 collision points.
Pricing and system requirements
Ziva VFX 1.6 is available for Maya 2014-2018, running on Windows 7+ or Linux.
Updated 19 April 2019: Ziva VFX Indie, intended for productions with total revenues of under $500,000/year, costs $50/month or $500/year.
For larger projects, Ziva VFX Studio is priced at $1,800/year, while prices for non-interactive batch licences start at $95/month or $600/year.
Correction: the original version of this story implied that Ziva VFX is included in Ziva Dynamics’ Film Studio and Game Studio products, available in its online store, but these are purely character assets.
