10 subtle tricks to improve your character animation
Discover 10 small things that you can do today to improve your character posing and animation work with DreamWorks animator Adrien Liv’s production-proven tips.
In this article, I’m going to share some expert animation tips that I’ve learned during my 20 years of experience working in studios like Industrial Light & Magic, Illumination Entertainment, Sony Pictures ImageWorks and DreamWorks Animation, on movies like The Wild Robot, Trolls 3, the Despicable Me movies and Minions.
They’re all small, sometimes subtle things that you can do to improve your character animation work, helping to make key poses stronger, and movements more natural.
The example animations were created in Maya, using Alaa Afifeh’s Alaa character rig, available to buy from AnimProps, but the principles set out in the article apply to any 3D animation software, and to any character.

1. Balance your character poses
To keep your character looking balanced, keep their center of gravity (COG) – usually located around the belly button – above the area between their feet. The exact position of the COG will vary according to the character’s weight and the proportions of their head, arms and legs.
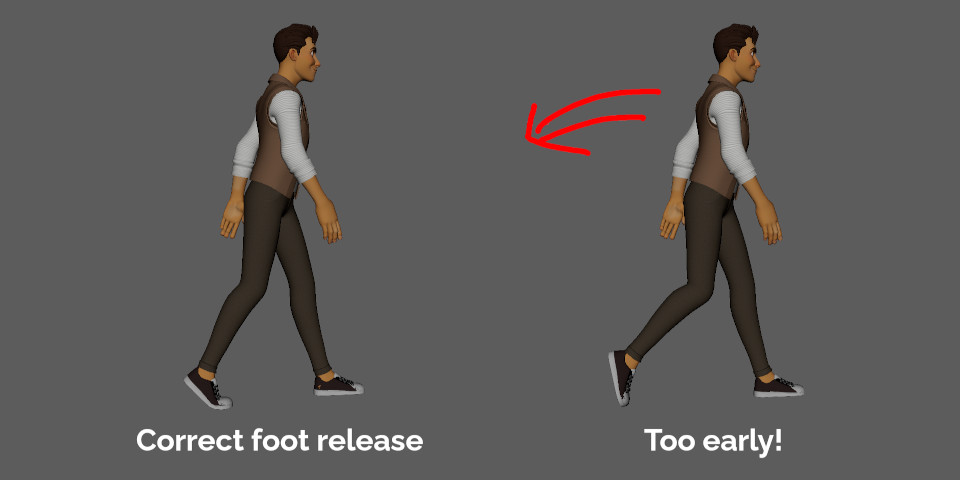
Balance – or the lack of it – is also important when animating walk cycles, since a walk is a succession of ‘falls forward’, during which the character overbalances, then catches themself by moving their front foot forwards.
This means the back foot cannot lift too early, or it will look like the character is falling backward. A difference of one or two frames is enough for the audience to feel that something is ‘off’.
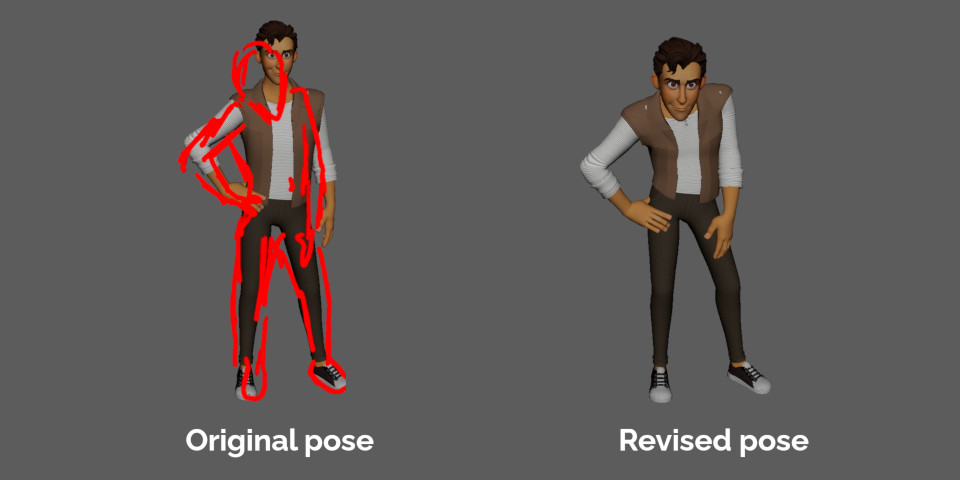
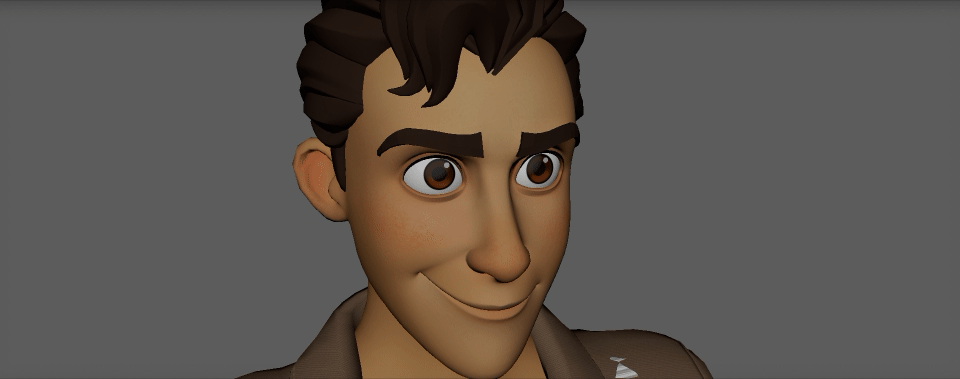
2. Draw over your 3D renders to improve the poses
Draw over test renders from your 3D software to make the poses stronger. (In Maya, you can use the 2D Pan/Zoom feature to focus in on the character, as this will not affect your camera angle and focal length.) Even if you think a pose is already good, drawing over it forces you to think in 2D and push what the software gives you.
As an example, take the pose from the previous tip. It looks okay at first glance, but rethinking it in 2D makes it a lot stronger. Don’t hesitate to translate or even scale the head to improve the silhouette or the visual appeal of the pose.

3. Create clean arcs for key body parts
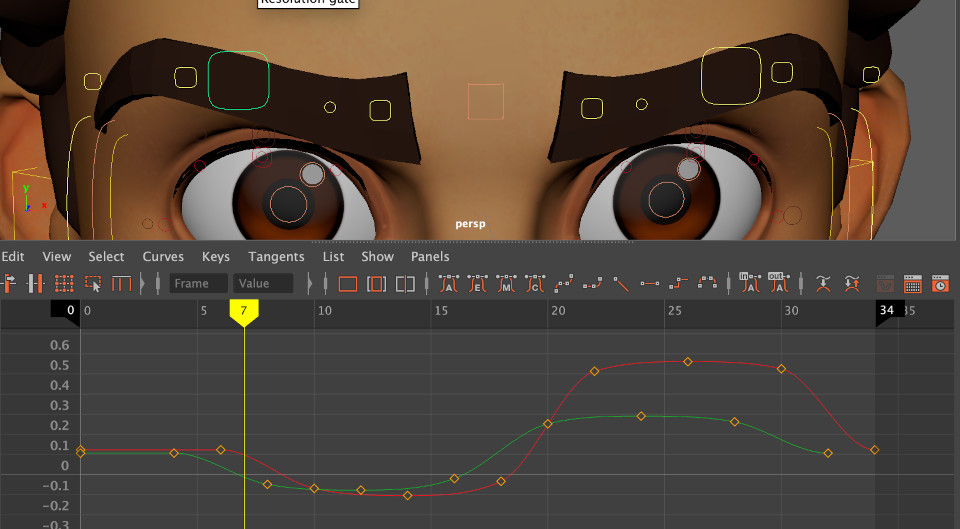
Having key parts of a character’s body move in realistic arcs is crucial to creating believable animation. To do this, it’s crucial to understand the relationship between the curves in the Graph Editor of your animation software and the arcs that the character’s body parts trace.
For example, in a 24-frame cycle, animated using the Y and Z rotation for the arm, when the two curves are aligned, the hand moves back and forth in a diagonal line, as shown above.

But by simply offsetting the curves, you can achieve quite different results. In the image above, an offset of 3 frames results in the hand tracing an oval shape.
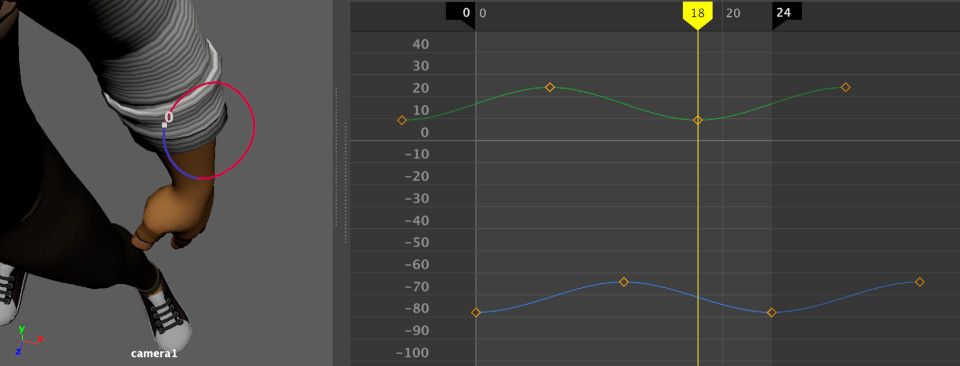
And with an offset of 6 frames, the hand moves in a full circle.
As well as hands, this workflow is especially useful for a character’s nose: track the nose nose as they move, then clean out the kinks in the Graph Editor to smooth out the arc.
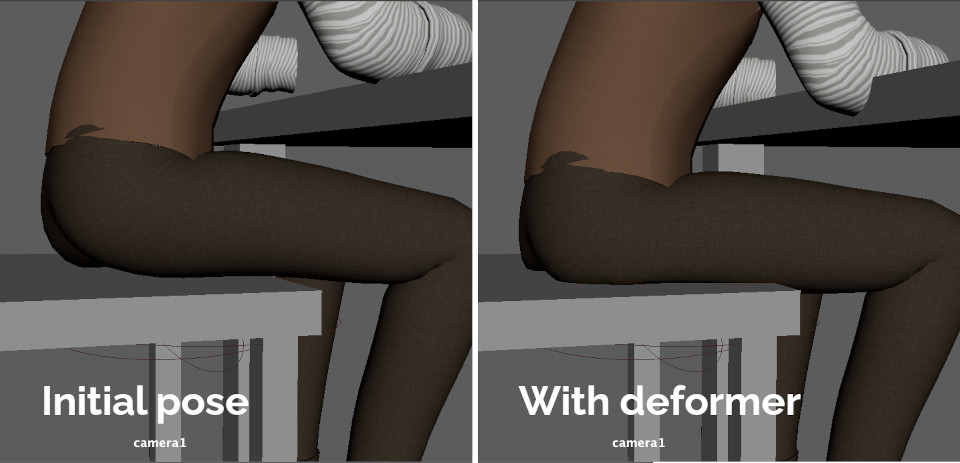
4. Push and pull the character to create realistic contacts
Deformers are a good way to shape the contact between a character and a hard surface: for example, when they are sitting in a chair.
Rather than having the character almost floating in the air to avoid an intersection, I like to push the body down into the chair and push the geometry up to show the impact of the chair on the character. Having the character’s buttocks deform in this way adds to a sense of their weight.
Remember that you can constrain the deformer to anything in the scene: if a character pushes their cheek, for example, you can constrain the deformer to their hand or their fingers.
5. Animate breathing early
While working on a shot, animate breathing early on. Being able to see the chest moving connects the audience to the character, subconsciously bringing that character to life.
One way to animate breathing is simply to scale the chest. (If you’re working in an application like Maya, you can add the animation on a separate layer and adjust its intensity as you go.) It’s nice to add in a bit of shoulder and chest rotation to support the movement, even it’s only slight. For the timing, take cues from the audio: inhales and exhales are often audible during dialogue.
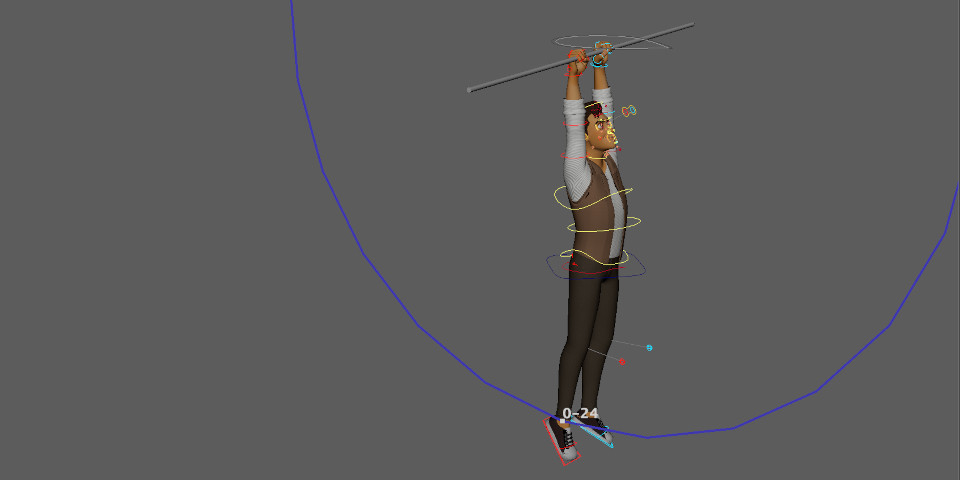
6. Move pivot points to simplify animations
To animate efficiently, you need to use as few rig controls as possible to achieve the desired result. One way to do this is to change the pivot point of some controls.
For example, to animate a character swinging around a bar, you can push their body down so the pivot point moves to where their hands are.
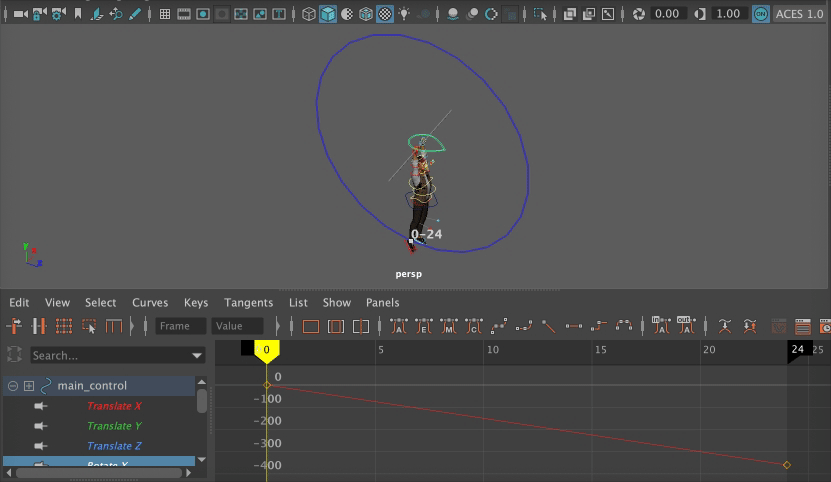
Rather than having to translate and rotate the master control, you can now achieve the same result using just one attribute, and the motion is going to be cleaner.
7. Use eye darts to bring resting characters to life
It’s a challenge to animate a character doing nothing. One thing that helps to bring a character to life even when their face is at rest is to have their eyes dart around.
As a rule of thumb, if a character is listening to someone else speak, the pattern of the eye darts should be a triangle, as in real life, we tend to look from one of the speaker’s eyes to the other, and then to their mouth. You can break the pattern if the situation calls for it.
8. Hold frames to add fleshiness to eyelids and lips
When animating a character blinking, I like to have their eyelids stick together for a few frames when they meet, particularly during slow blinks. This gives the lids a realistic sense of fleshiness, and avoids the animation feeling like automatic interpolation.
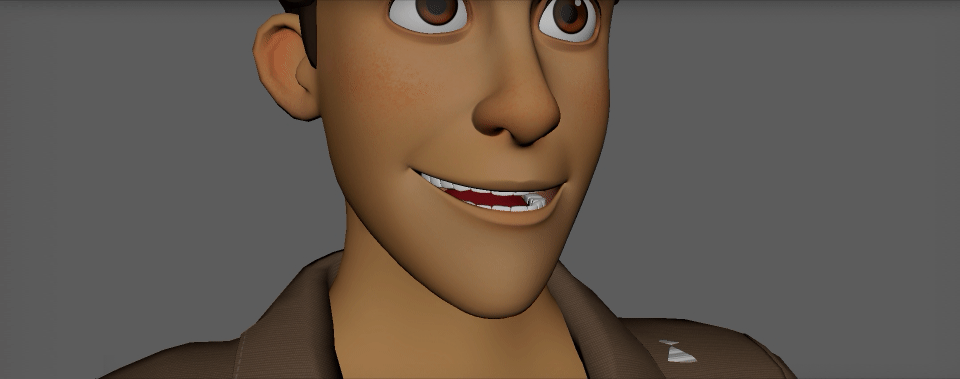
You can do the same thing for a character’s lips on phonemes like ‘M’, ’B’ and ‘P’. Keeping the lips together for a few frames, then releasing them with a small pop adds energy to the lip sync.

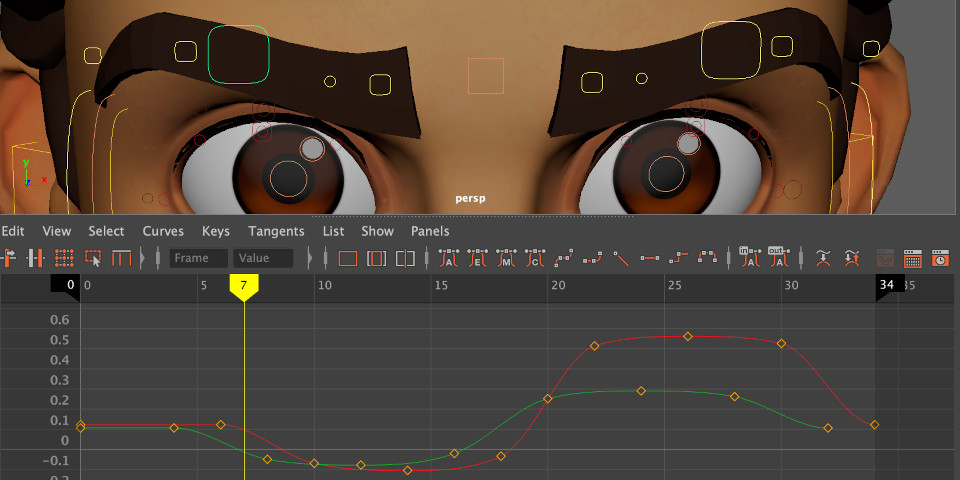
9. Offset the movements of eyebrows and mouth corners
Eyebrows move in a diagonal pattern. When they go up, they move away from one another, and when they go down, they get closer.
The animation above is relatively realistic, but there’s still more that we can do to it.
Delaying the lateral translation by two frames will make the movement less mechanical.
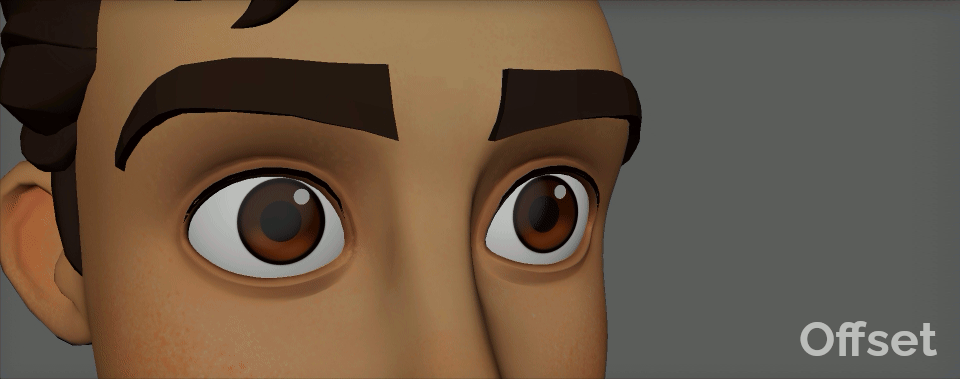
As you can see, the two-frame offset adds a lot of fleshiness to the brows.
The same thing applies to the corners of the mouth. Delaying their translation up and down by one or two frames makes lip sync more natural. (In most cases, at least: the rule doesn’t apply to ‘U’ and ‘O’ shapes, since they need to be held for a few frames to read visually.)

10. Break up repetitive patterns whenever you can
Break up the rhythm of repeated movements whenever you can. The human eye can spot patterns easily, so breaking up those patterns makes animation more visually interesting.
It’s easier to make sounds with interesting patterns, so one way to do this is to record guide audio, import the file into your animation software, and animate using the audio waveform as a cue.
For example, during a laugh, instead of having three regular beats, try having two small laughs, then a bigger one.
You can do something similar with dialogue. Even when the timing sounds even, you can break up the animation by hitting some accents ahead of the line, and others behind it.
 About the author: Adrien Liv is an animator at DreamWorks Animation. He has worked for some of the world’s leading animation studios, on movies including Despicable Me, Minions, Paddington 2, Mary Poppins Returns, and The Wild Robot. He was a lead animator on Trolls 3 and Animation Director on Riverdance: The Animated Adventure. See more of Adrien’s work on X.
Have your say on this story by following CG Channel on Facebook, Instagram and X (formerly Twitter). As well as being able to comment on stories, followers of our social media accounts can see videos we don’t post on the site itself, including making-ofs for the latest VFX movies, animations, games cinematics and motion graphics projects.