VFX techniques: how to build a photorealistic 3D city
Matte painting TD and environment lead Jeremy Boissinot shares his workflow and provides practical tips for approaching a big photorealistic shot efficiently, based on his work on Jack the Giant Slayer for Rodeo FX.
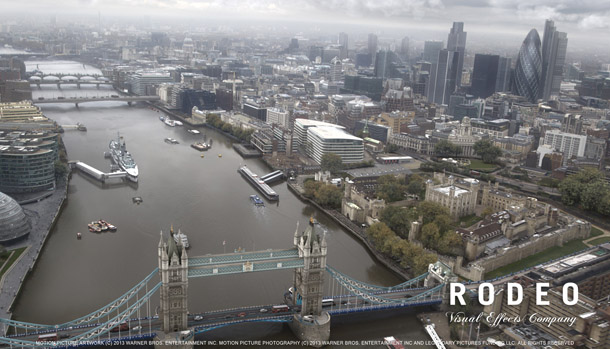
Although Bryan Singer’s 2013 movie Jack the Giant Slayer is set in a fantasy world, one key sequence takes place in contemporary London. In an impressive virtual camera shot that appears at the end of the movie, the camera pulls out from the Tower of London, zips under Tower Bridge, and ends in the sky. Since the shot could not be filmed practically, the team at Rodeo FX had to recreate London digitally.
You can see a breakdown video on the studio’s website.
In this article, I will be walking you through that process of recreating a photorealistic digital city using location photography and photogrammetry, breaking the work down into 10 key stages. During my time leading complex environment work, I have developed effective, production-proven methods, so I will also be providing practical tips that should help you work more efficiently and proactively on your own projects.
I will be assuming that you are familiar with concepts like photogrammetry, and with the key stages of a VFX workflow, so if you’re new to CG, you will need to do some background reading before tackling the tips.
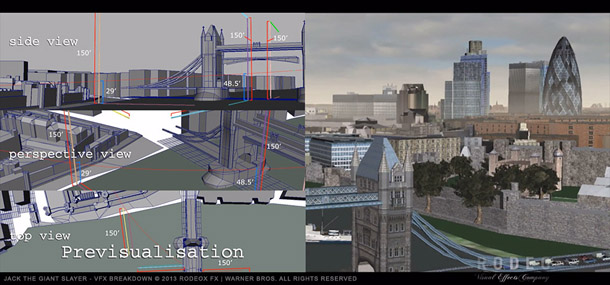
Previs is a vital part of any VFX project, helping you to plan what you need to capture on camera and what you need to recreate in post. It also provides a sense check as to whether the work is over-ambitious.
1. Previs
Previs is vital for complex projects like Jack the Giant Slayer: rather than simply recreate the whole of London digitally, it enabled us to establish exactly what would be featured in the final shot.
But it’s equally valuable for a personal or school project. Creating a previs animation or animatic helps you to state your ideas clearly and reassess whether they are over-ambitious for the time available.
By clearly defining what you need to film and how you will capture it on camera, previs will save you time in the live shoot, reduce post-production work and ensure a better-quality result.
When creating previs, don’t spend too much time on modelling or animation. You only need to get a good idea of the space and the timing, so use simple models and just block out the animation. Stock models can be helpful here, enabling you to focus on designing the shot instead of creating assets.
And don’t waste time setting up complex shaders or generating high-res renders. Use screen captures or basic renders of your scene in order to get a quick preview.
2. Planning
Artists are usually eager to start creating assets for a project, but without proper planning, jobs usually end up taking longer. It’s important to analyse your needs, how you will organise the workload, and what you can do to speed up your workflow.
Production-management software like Shotgun or ftrack can be helpful here. But if you can’t use such tools, create a Gantt chart in Excel or Google Docs. You can find downloadable templates online.
The chart should include all the main steps of the work process, complete with names and timeframes. This makes it possible to see whether your work is on schedule, what you need to prioritise, and where you can cut corners. For example, don’t spend too much time on organic modelling if your focus is on urban environments. You have to value more what you aim to specialise in.
Real-world photographs are an essential part of photorealistic visual effects projects, being used for photogrammetry, for camera projection, for texture work, and simply as references for the artists.
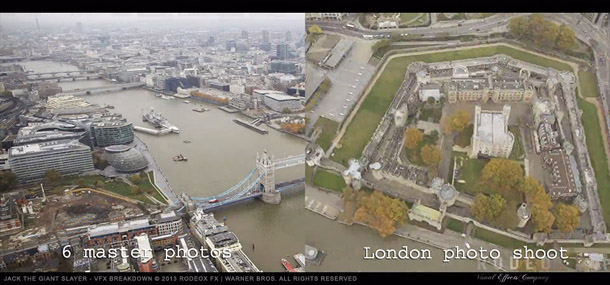
3. The reference shoot
For a photorealistic project like Jack the Giant Slayer, real-world images are essential: for photogrammetry, for camera projection, for textures, and simply for reference. We sent a shooting crew to London to capture still images and helicopter footage from approximately the virtual camera path.
For projection work, use your previs animation to identify the images you need. If you use photos that are taken too far from the ideal camera position, your projection will stretch and break down.
However, it’s also a good idea to take images from other angles for every position at which you shoot: it gives you more options in post-production.
You can use perspective images for camera projection, but use an orthographic point of view for texture images so you capture all of the detail.
Shoot in overcast conditions (without direct light) if possible, to get neutral elements to work with.
Capture images at the highest resolution you can afford: at least 4K if possible. If you don’t need high-resolution images for specific assets, you can always downsize them later, but it’s always better to work from hi-res source images.
Shoot in RAW format. RAW images capture the maximum range of colour information possible and give you much more control over your work, especially if you need to do a lot of colour correction. You should also shoot HDR images to use for lighting information: it helps to integrate CG assets with the live plates.
And it goes without saying that photos need to be in focus. It’s frustrating to get blurry images to work with!
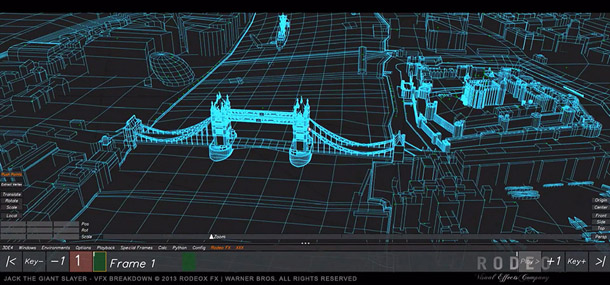
4. Photogrammetry
Photogrammetry makes it possible to recreate large real-world environments more quickly. On Jack the Giant Slayer, I used 3D-Equalizer to generate a point cloud of around 500 reference points aligned with 20 cameras, then set up a master 3D scene including cameras aligned with the photogrammetric solution that artists could use as a reference when modelling.
But if you don’t have access to 3D-Equalizer, there are a lot of other tools you can use: for example, PhotoScan, PhotoModeler, Enwaii, or commercial camera-tracking software.
You will be using undistorted images for the photogrammetry work. Knowing the type of camera that was used to capture the photos is essential to undistort them properly and give you good-quality results.
When shooting the images, use different camera angles to cover as much of the subject or location as possible. Gathering more angle views will help you in getting a more accurate world space position.
Even though your cameras may look properly aligned, it’s good to orient your photogrammetric solution in the world space. Look for features in the images that you can use as reference axes, such as the edges of buildings, rooftops or the line of intersection with the ground.
Use reference points from different buildings to help you refine the photogrammetric solution. Having your 3D scene well-oriented will make the modelling phase much easier and cleaner.
Recreating geometry from photogrammetry data needs a different mindset to creating models from scratch. Focus only on the major forms, and work from perspective as well as camera view.
5. Building accurate geometry
Working from photogrammetry requires a different mindset to creating models from scratch. The most common mistake I see artists make is to focus too much on modelling from the 2D camera view: it’s also important to evaluate the distance between objects to get good parallax and a good sense of scale in the final shot. That means creating geometry from a perspective view as well.
Don’t go crazy modelling all the details. Overly detailed geometry will result in projection duplications and other issues that need to be fixed later. Start simple and only add more detail once you’re worked out what you need to add in order to make the result look less flat. Don’t spend too much time modelling parts of the geometry that will not be visible or that will be less visible in the final shot, either.
Even though your models don’t need to be high-res, it’s good to subdivide them before use, particularly when projecting real location photography. This prevents image projections flickering in the render, especially on large surfaces.
When you have created all of the individual models, make sure that none of them are floating, and that the geometry intersects properly with the ground plane in order to avoid integration issues. You should also check that the normals of your assets are facing in the right direction in order to prevent projection issues.
6. Camera animation
Create a rough first pass of the geometry before you begin to refine the models. This allows the layout department to start work earlier, designing the camera animation and adjusting stereo separation.
There’s no typical poly count for blocking geometry: it depends on the asset, and how far it is from the camera. However, the geometry needs to be as light as you can get away with: designing the camera motion may take a lot of iterations, so the quicker it is to render, the better.
When recreating cities, focus on the overall shape of the buildings first. To get a proper layout for the city, your 3D models need to be the right height and the correct distance apart.
Once you’ve done that, you can begin refining the geometry by adding the roof elements, balconies, windows for close-up assets, and subdivisions for image-projection purposes.
Also, as a general rule, export your assets as clean models (check the normals, freeze transformations and delete the modelling history) in order to make them easier for other artists to work with.
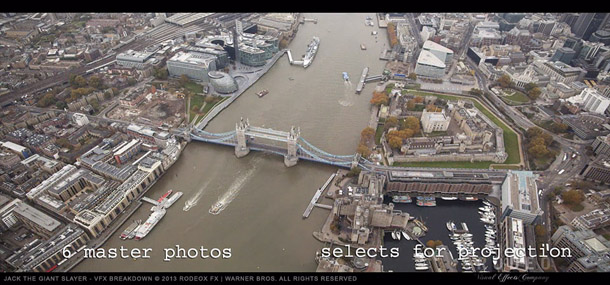
If you’re working with a team of other environment artists or matte painters, select the master photographs that will work best for texture projection, and identify the areas of each image that should be used.
7. Preparing projection textures
As well as creating geometry, you need to prepare the texture elements that will be projected onto it. If you’re working with other matte painters, select the master photographs that will work best and clearly define the areas of each image to be used for projection.
Once all the projection textures are finalised, you can create window mattes based on the texture layers. These show the parts of a texture representing windows as white shapes against a black background. To create one, draw round a reference window in Photoshop and fill the shape with white, then duplicate it and position the duplicates over every similar window. You can also use a square brush for smaller windows.
The window mattes can then be projected through the same projection setup as the textures themselves, for use as reflection mattes, and for grading purposes.
Testing assets inside your projection setup as they are created helps you to identify what still needs to be improved. Creating custom tools can speed up this process. For Jack the Giant Slayer, I created three such tools: one that created a new material based on a projection shader preset and the image file selected; one to assign materials to geometry automatically based on the naming convention; and one to go through every material and replace the projection textures with the latest versions exported.
8. Organising files
Being organised is the key to success, particularly on a project like Jack the Giant Slayer, where most buildings used multiple projected textures, built up in layers. Defining a directory structure and naming convention for the files helps avoid mistakes, and can also enable you to automate repetitive tasks.
Rather than having hundreds of texture files living in the same directory, it’s worth organising them in sub-folders, categorised by projection frame or image.
When it comes to file naming, every studio uses a different convention. Big studios also often use tools that automatically save files with the correct names. But if you have to do it manually, there are a few basic rules.
First, your naming convention should reflect all of the categories of work elements you are likely to create, from the most to the least important. Start with the main entity you are working on: a shot or an asset. Then list the type of task you are performing: modelling, texturing, matte painting, and so on.
Use abbreviations to shorten your file names: ‘mod’ for modelling, ‘tex’ for texturing, ‘mp’ for matte painting, ‘bldg’ for building, and so on.
When it comes to prepping projection textures, I would also recommend adding the projection frame or name of the source photo to the file name, and identifying your painting element as a projection layer. Otherwise, you may end up with different elements that share the same name, which is quite confusing.
Finally, it’s essential to include a version number for each file, so that you can identify the latest version of an asset, and track where changes were made.
Using such a naming convention will result in files with names like city_mod_v001, bridge_tex_v002 or shot01_mp_image02_bldg03_v004.
9. Adding CG elements
As well as buildings, you will need to create a number of other types of assets, like trees, street furniture, vehicles and people. It’s important to ensure that these are modelled at the correct scale, and animated at the proper speed, and that they do not intersect with other elements in the scene.
As a general rule, it’s good to create low-res, mid-res and high-res versions of each asset. Use the low-res version when the object is a long way from the camera, and the higher-res versions when it is closer. You can also use the low-res model for layout and the high-res version for rendering. This makes the scene easier to manipulate and helps to minimise render times.
Don’t spend too much time on objects that you will barely see. What matters is the viewer’s perception of the finished shot, not the asset itself, so it’s important to keep testing assets in the shot as you work. You may be surprised to see that they already hold up, and that you can concentrate on something else.
You can also use stock models for small or distant objects, or if you’re simply running out of time. However, make sure that they have an adequate resolution for your needs, that they match the location and time period you’re recreating, and that they fit with the surrounding architecture.
Pedestrians in the street are usually created with an in-house crowd system or commercial crowd software such as Massive or Golaem, but you can also use stock rigged and animated characters.
In Jack the Giant Slayer, we only created low-res models with a basic material for the street furniture. For the trees, we used SpeedTree: a great, user-friendly, flexible application for designing vegetation.
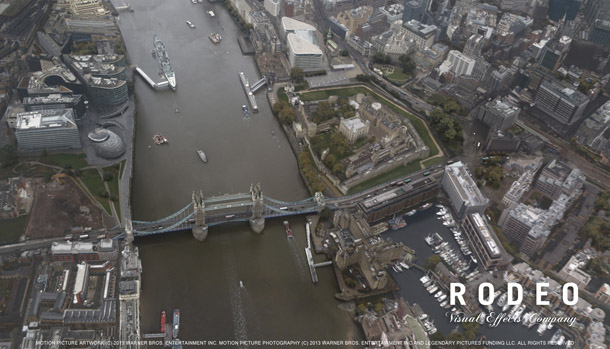
A final shot from Jack the Giant Slayer. To help your compositors, provide individual CG assets as separate renders, complete with all of the AOVs you are generating, plus extra render passes like AO and shadows.
10. Final composite
When delivering the final renders, provide the city and the sky as separate elements. You should also provide mattes for key parts of the buildings, like rooftops and windows.
To give your compositors more control over the look of the final shot, it helps to provide extra render passes like Z-depth, height, reflection and object ID. You can also provide a normal pass, for more control during colour grading; incidence, for more realistic reflections based on render camera incidence angle; and specular, for more detail in the reflections and highlights.
Individual CG elements should be delivered separately as a beauty pass with all the AOVs you have generated, plus additional passes such as ambient occlusion and shadow.
As an example of the types of elements you need to split out, on Jack the Giant Slayer, the CG team delivered the model of Tower Bridge, trees, street furniture, cars, boats, people and flags separately, while the FX team created the surface water in the River Thames, boat wakes, and volumetric clouds.
One final tip: precomp a few frames of each element to make sure that everything works correctly before kicking off the final renders, particularly for long shots with a large number of render layers, or when working in stereo, where everything has to be rendered twice.
 About the author: Having studied architecture, CG and multimedia design, Jeremy Boissinot specialised in technical directing and leading environment work for feature films including Furious 7, X-Men: Days of Future Past, Edge of Tomorrow, Pacific Rim and The Amazing Spider-Man, for companies such as Digital Domain and Rodeo FX. Visit Jeremy’s website