Posing 3D prints with ZBrush and Character Creator 4
[Sponsored] Digital sculptor Óscar Fernández reveals a game-changing workflow for producing 3D printed figures, using Character Creator 4 to rig and pose ZBrush sculpts, with the help of Reallusion’s new plugins, ZBrush Pose Link and ZBrush Pose Tools
In this article, I’m going to show you a workflow that literally changes the game when it comes to producing 3D printed figures for board games.
I’m talking about two new Reallusion plugins, ZBrush Pose Link and ZBrush Pose Tools, which allow you to connect ZBrush with Character Creator 4 (CC4), making it possible to rig a 3D character and pose it with unprecedented ease.
What’s more, this workflow preserves all of your SubTools and subdivision levels, and makes it possible to continue modifying the character even after posing, making it easy to adjust the anatomy, add details, or incorporate variations.
This is an overview of the process:

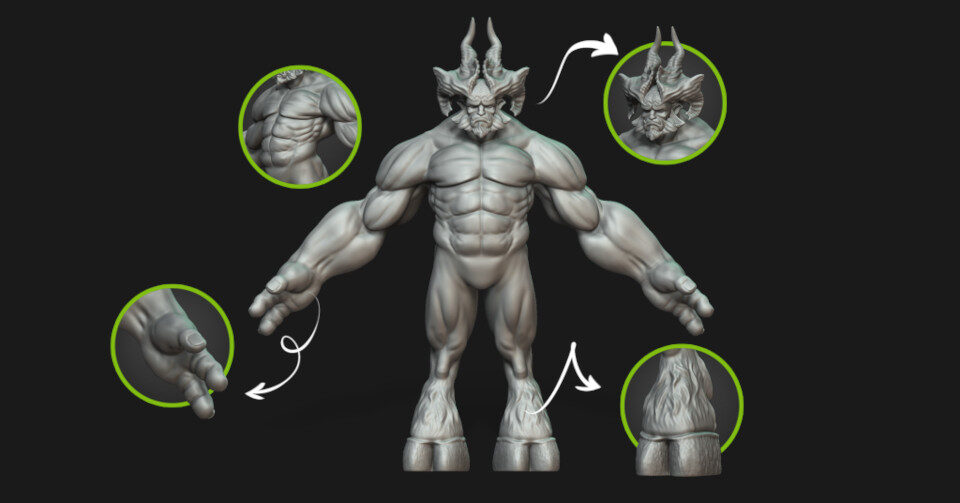
The initial idea
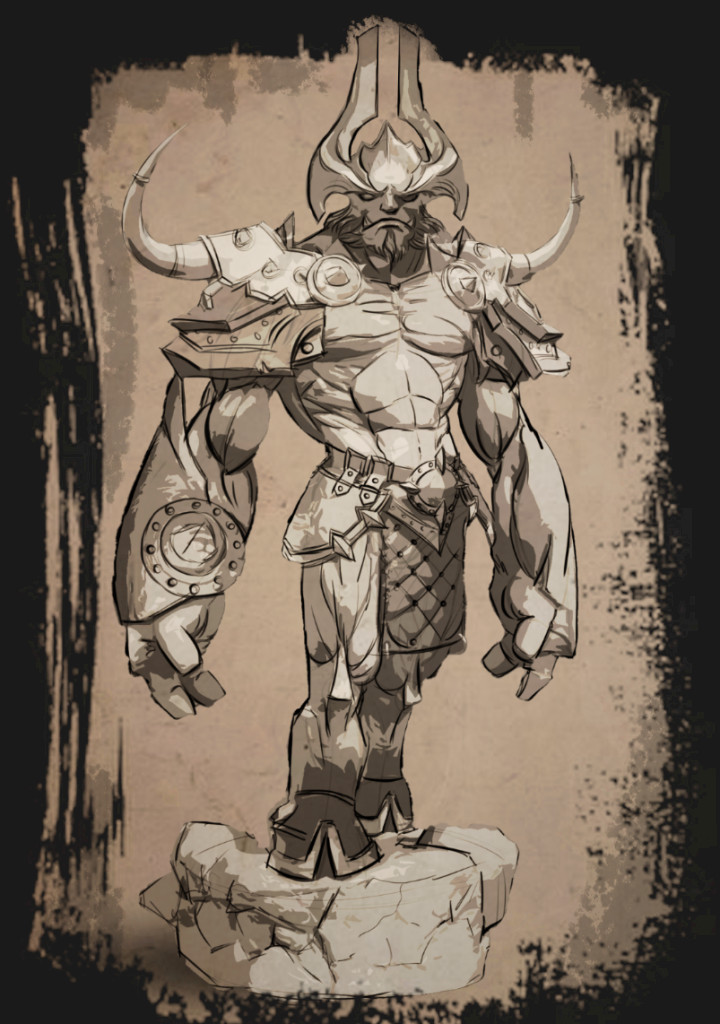
Before I begin sculpting, I create a quick 2D sketch to bring to life what was previously just an idea in my head. This is only an initial concept, and it will probably evolve as I begin working in 3D.
For this character, there were some elements that I was sure that would be present in the design, such as:
- Horns or a helmet that integrate with the shape of the head
- Armor with sharp elements to make the character more menacing
- Powerful anatomy that showcases the strength of the character
- Some fabrics to test how dynamics work in CC4
- Three fingers instead of five to test CC4’s AccuRIG auto-rigging
- Bull-like hooves to give the character a hybrid appearance without being a minotaur
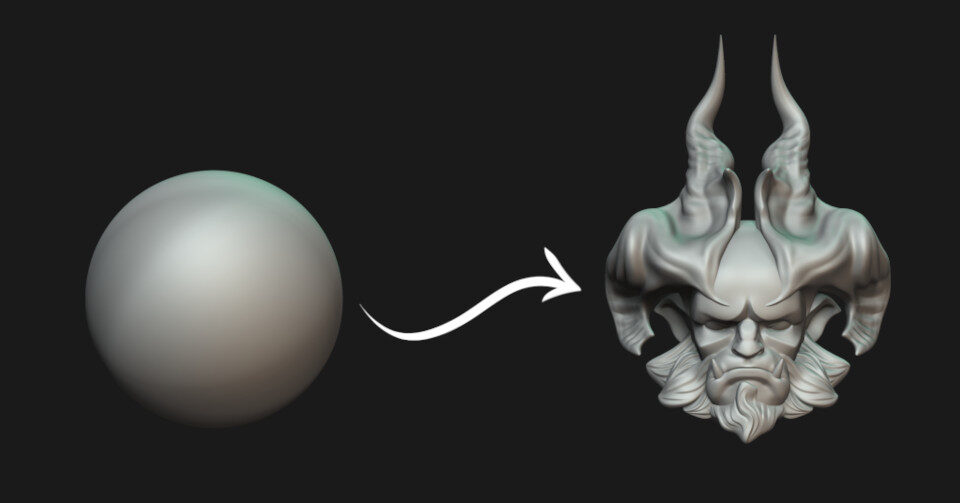
ZBrush | Sculpting the head
When starting a new character, I like to begin by defining how the head and face will look. I usually don’t proceed with the complete sculpt until I am satisfied with the shapes. As the sculpt progresses, I structure the facial anatomy by adding a couple of spheres for the eyes and incorporating other elements such as ears or a beard, which greatly defines the character.
Once all the elements are in place, I begin refining the shapes, after retopologizing the sculpt with ZRemesher, and applying subdivision levels. Afterwards, I add the fangs, details of the beard, and, finally, the horns.
CC4 | Creating the base mesh
To speed up the workflow, I use a CC4 avatar as the base mesh for the character’s body.
I put it in the A-pose and use the control sliders in Character Creator to modify the proportions. Since the character will have three fingers, I take the opportunity to create a similar structure that I will later modify in ZBrush. One click brings it into ZBrush.
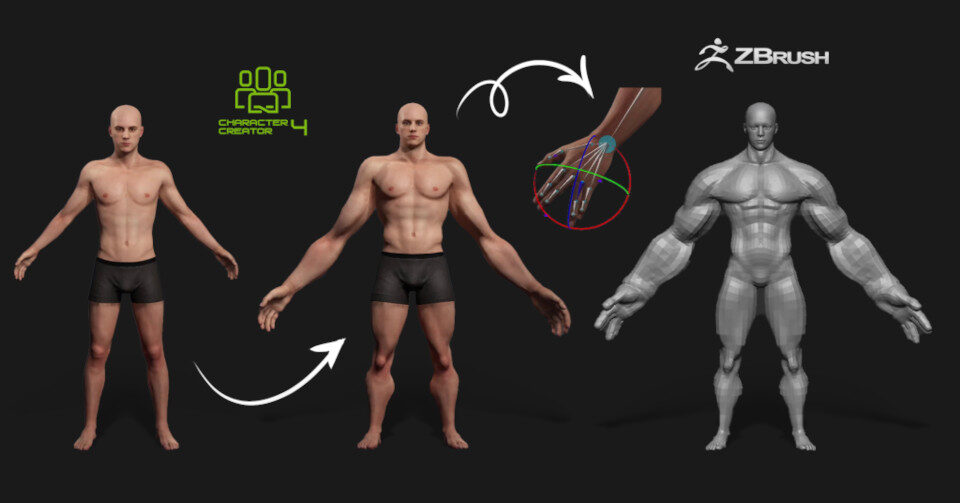
In ZBrush, I make further modifications to the proportions of the character, and attach the head I created earlier. By adjusting the size of the head to match the body I brought in from CC4, I ensure that the model’s measurements are optimized for use in CC4 later.
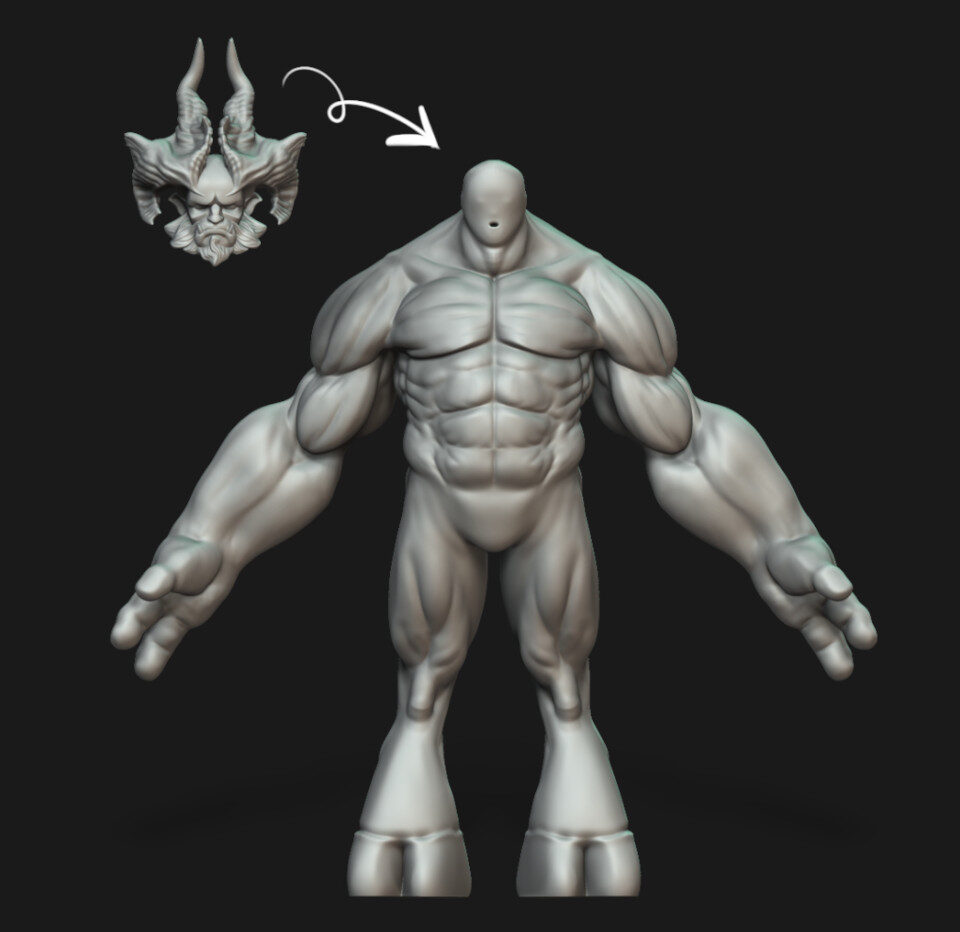
ZBrush | Sculpting the horns
It has been possible to transfer characters between ZBrush and Character Creator before, but in Character Creator 3, you couldn’t modify the topology of the base mesh, which was quite restrictive for character creation. With the arrival of CC4, you can use all of the standard ZBrush sculpting techniques to make any modifications necessary.
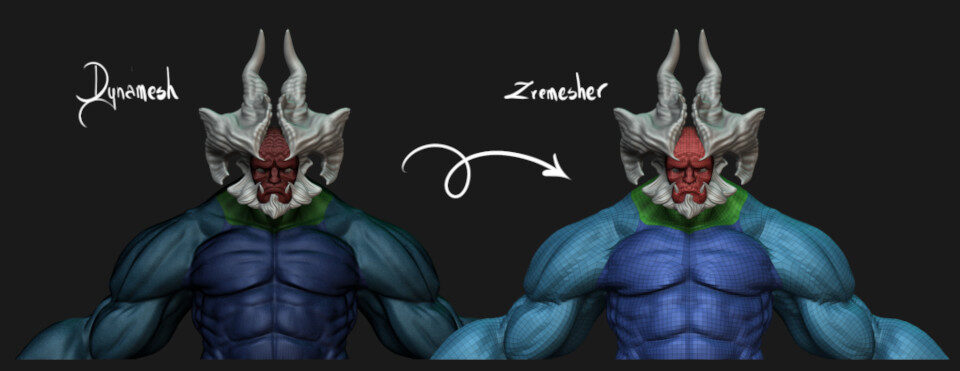
I start by applying DynaMesh to create those bull-like hooves and define the character’s anatomy. Placing the fingers together speeds up the process of creating the hand.
After achieving anatomical shapes that I am satisfied with, I merge the head with the body, again using DynaMesh.
I use ZRemesher to generate a more organized mesh, and project the details onto the different subdivision levels. This process helps to create a more refined and cohesive model, combining the head and body seamlessly while preserving fine details.
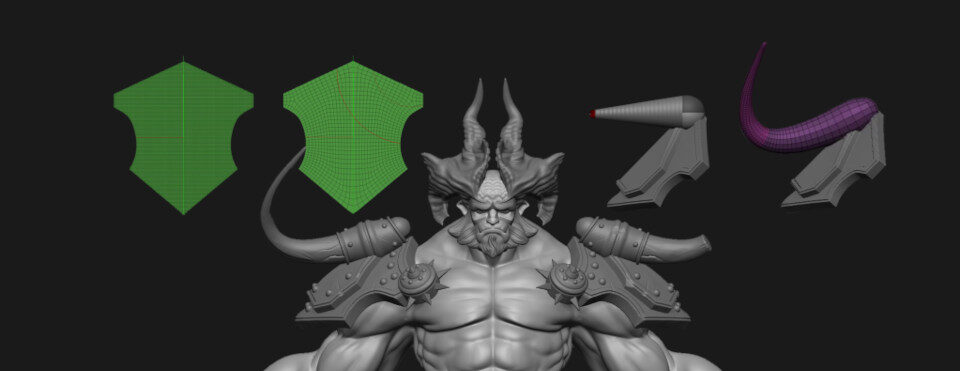
ZBrush | Modeling the accessories
It’s time to create the accessories for the character. I mainly use ZBrush’s ZModeler brush with a low polygon count to achieve cleaner and more polished shapes.
Since my goal is to design pieces of armor for 3D printing, I aim for fully solid pieces whenever possible, or with a slightly greater thickness than they would have in reality to ensure that the printed piece is not too fragile.
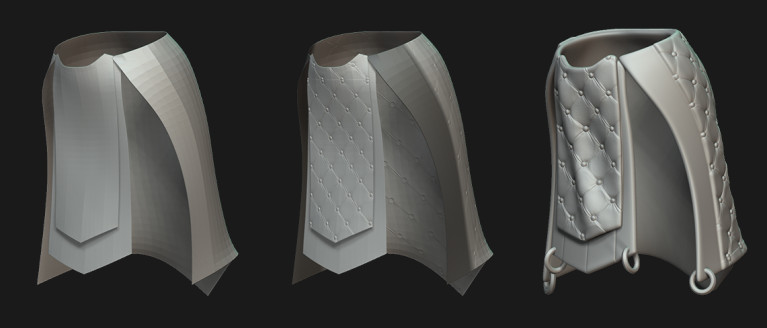
This character doesn’t require a lot of fabric: just a pair of flaps that cover part of the legs. Using the belt as a base, I apply an extrusion, keeping the part I am interested in, and then adjust the shape until I achieve the result I want. I use dynamic subdivision so that I can work with a plane but get an idea of the thickness the final piece will have.
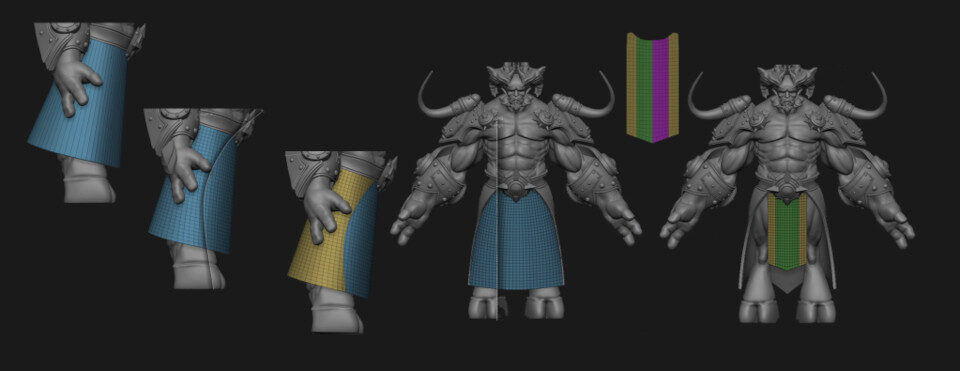
With the fabric complete, I have the complete blockout of the character, and can move on to the details. Since the topology is already correct, I only need to subdivide where necessary to add details like dents or scratches to give the piece more realism.
I still need to give the character his weapons, so using the same techniques as for the armor, I create an enormous battle-axe and shield.

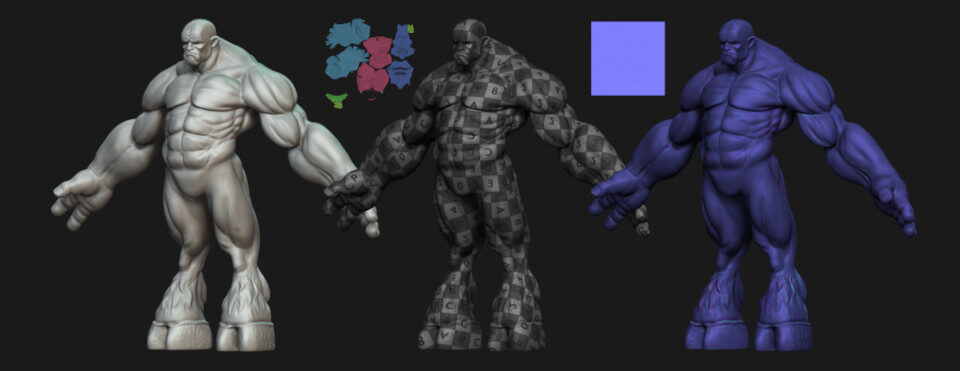
ZBrush | Creating UVs and normal maps
Next, I prepare the model for export. Although this step is not necessary, it improves the appearance of the character in CC4. I start by creating UVs for the different pieces of the sculpt and generating normal maps.
For the UVs, I use the new features introduced in ZBrush 2023 that let you use creases to define UV seams, making it possible to create UVs quickly without leaving the software. I adjust them within the grid and check that everything is fine by applying a test texture. Once the UVs are finalized, I generate the normal maps.
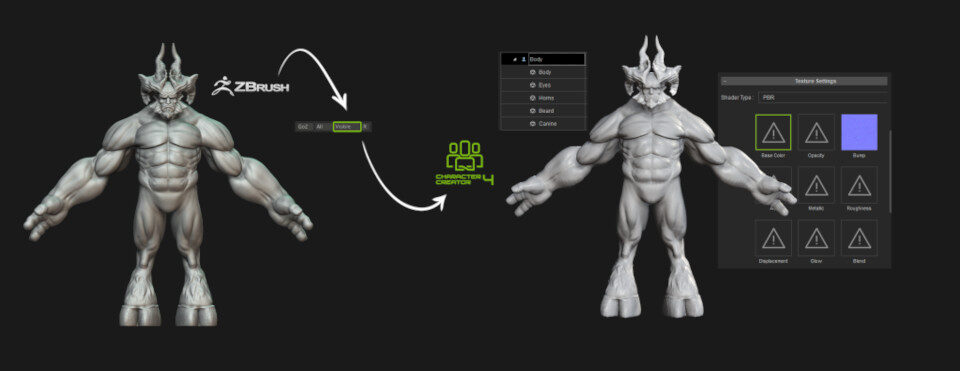
CC4 | Rigging the character using AccuRIG
Now I can transfer the character to CC4. Although you can send everything at once, I prefer to isolate the character’s body using the Visible option in GoZ. The character is transferred as a single element, but keeping all of the SubTools intact, so I apply the normal maps I created earlier to make everything look a little better.
Next, I use AccuRIG, the automatic rigging tool in CC4. I must confess that I have no idea about rigging, so this tool seems like pure wizardry to me!
When I press the AccuRIG button, the tool starts analyzing the mesh, placing points representing joints in approximately correct positions on the character. I adjust the placement of those points by clicking on each one and following the diagrams at the top of the interface. To speed up the work, I use the symmetry function, deactivating it if part of the character isn’t symmetrical. Next, I define the number of digits for the character – in this case, three – and hit Generate Skeleton.
Voilà! The skeleton is generated in literally two minutes.

The next step is to configure the finger layout. I adjust the position of the dots on each joint and the direction of a special point on the thumb that indicates its rotation.
Once everything is ready, I press the Bind Skin button. The software automatically calculates the skin weights around each joint so that all deformations occur smoothly. Once the complete skeleton is generated, Character Creator applies an animation so that you can check how it behaves.
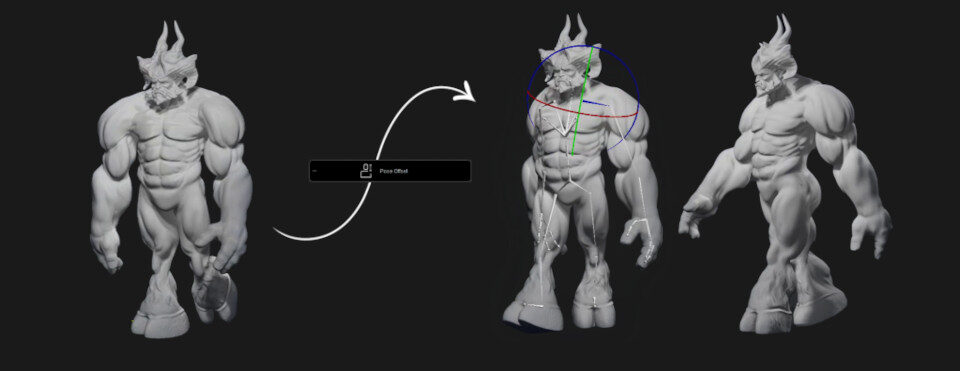
The Pose Offset controls lets you fine-tune the rig for a specific character. I adjust the position of the shoulders, the tilt of the torso, or the separation of the legs manually. Once everything is prepared, I save the CC4 project.
For someone like me, who is used to working with static figures, seeing a character come to life like this is truly amazing!
ZBrush and CC4 | Setting up fabric dynamics
I continue bringing accessories into CC4 as if I were dressing the character from the inside out, so now it’s time for the fabric.
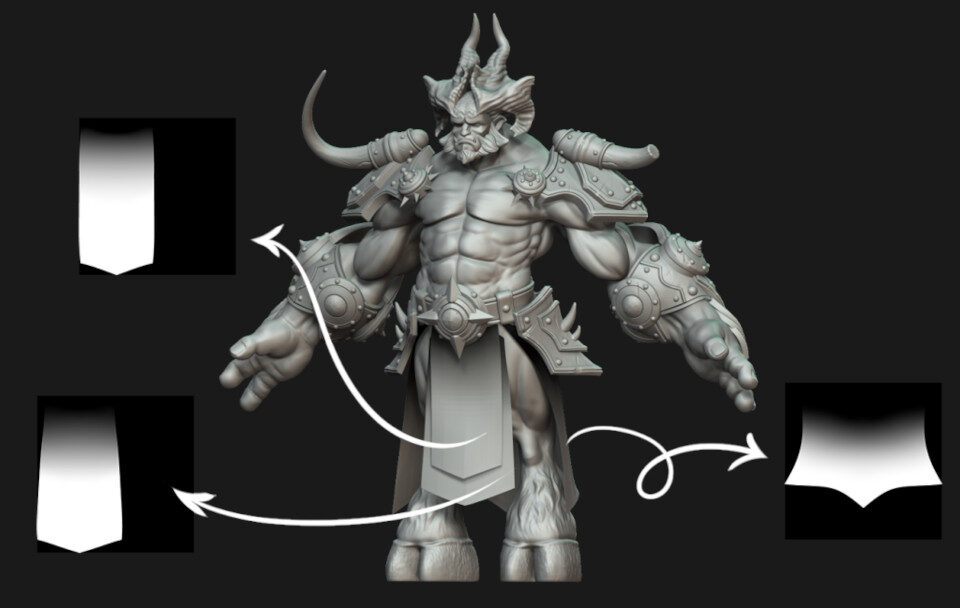
In ZBrush, I define the parts of the fabric that will deform and those that won’t using Polypaint: a process similar to applying a mask in Photoshop or Substance 3D Painter.
I paint the entire piece white, then protect the parts that I don’t want to deform when applying dynamics by painting them black. Since I am working with a high polygon count, I can achieve smooth gradients by just softening the paint a little. I unwrap the UVs for each piece and create a texture map from the Polypaint colors.
Again using the Visible option in GoZ, I transfer the fabric to CC4, importing the parts as individual accessories and adjusting them to the body. I delete the color map, link all the pieces to the character’s hip, and test that everything works correctly.
Now I only need to activate physics for each piece and load the weight maps I just generated with Polypaint.
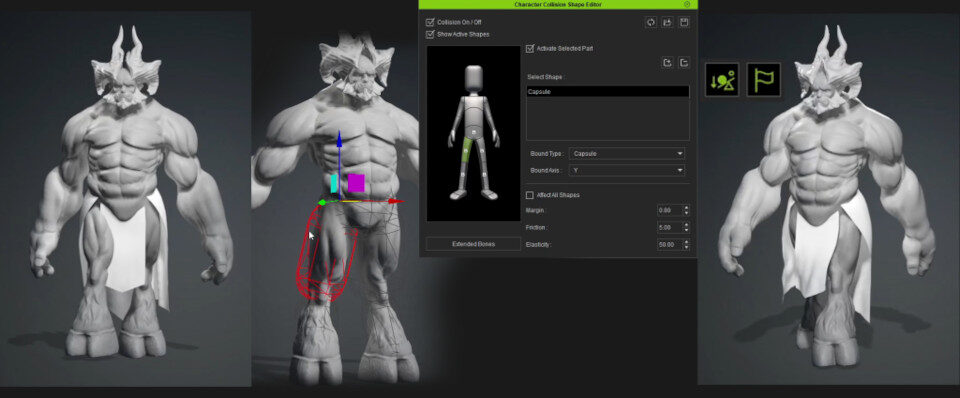
The pieces now behave like cloth, but I need to define which parts of the character they will collide with. To do this, I select the body and define the collision volumes for the hip and legs – in this case, deforming the capsule with the gizmo, as shown below.
ZBrush and CC4 | Setting up the armor and accessories
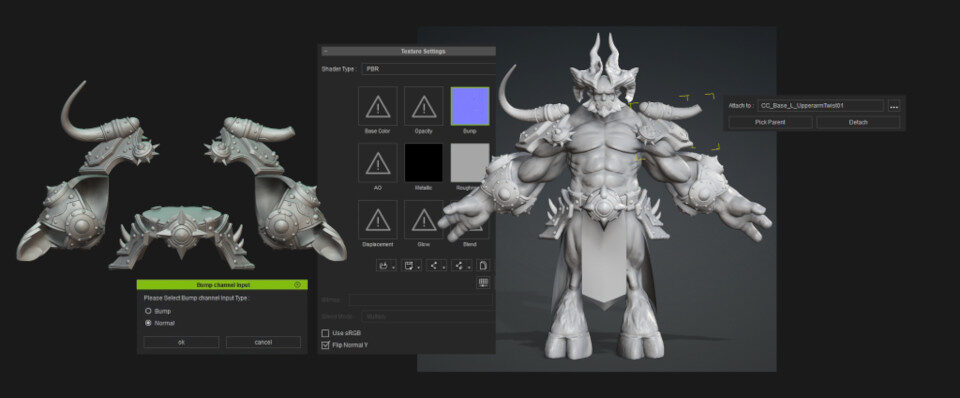
To bring the armor pieces into Character Creator 4, I follow the same process: I isolate the pieces that I want inside ZBrush and press Visible again. I import each SubTool as a new accessory, then head to the Texture Settings to load the normal maps for each of them. This step isn’t strictly necessary, but it makes everything look a bit better.
Since I’m importing the elements in stages, I have to position them manually and link them to the corresponding joints on the rig. This wouldn’t be necessary if I imported everything in one go, as the software would do it automatically. However, it’s a super-quick process: I just select each element, press the Pick Parent button, and click on the joint to which it should be linked.
I activate the fabrics again so that all of the accessories are visible and check how they behave with the walking test animation again.
At this stage, I can’t help but admit that I feel like Dr. Frankenstein: ‘It’s alive!’
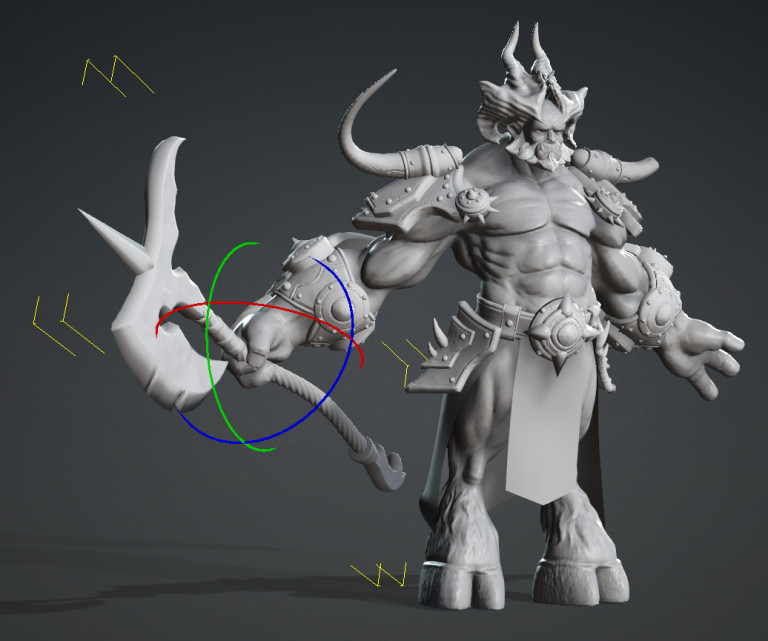
To add the weapons, I follow the same process, isolating the axe in ZBrush, make it visible, and then import it into CC4 as a prop. This results in a single element but with all of the SubTools intact inside.
Next, I set the pivot point to the center of the axe, position it in the hand, and check how it behaves during the animation. To complete the character’s equipment, I follow the same steps for the shield.
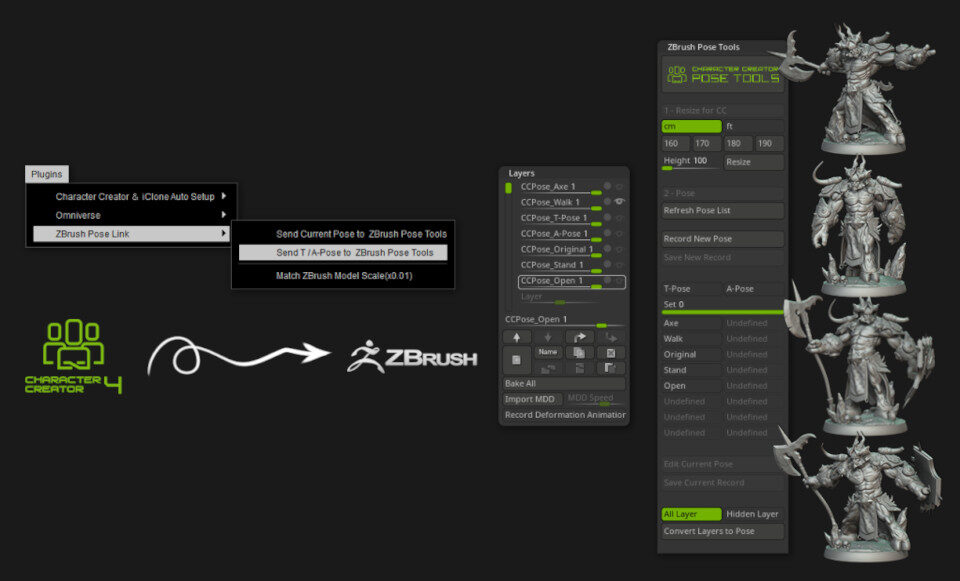
CC4 | Posing the character
We all know that posing a character in ZBrush is perfectly possible, but it can be quite time-consuming, making it a tedious task to create a set of multiple poses.
However, thanks to the ZBrush Pose Tools, ZBrush can be connected seamlessly to Character Creator. Making small changes or creating completely new poses becomes not only incredibly fast but enjoyable.
Rather than posing the character manually in Character Creator, I chose to use ActorCore, Reallusion’s online library of motion clips ready to use in CC4. Saving specific frames from the animations makes it possible to build up a library of dynamic poses.
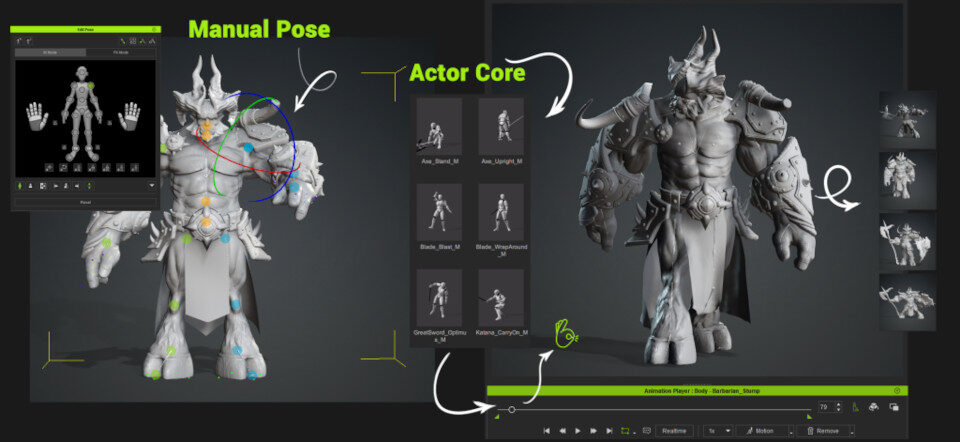
I use the animation as a general base for the pose, selecting the exact moment I want to immortalize, then make adjustments using the pose editor.
It’s worth highlighting how easy it is to pose the hands, moving each phalanx in a quick and intuitive way. You can even save hand gestures to use them in future poses, or apply ones available in the library to streamline the process.
ZBrush and CC4 | Finishing the project
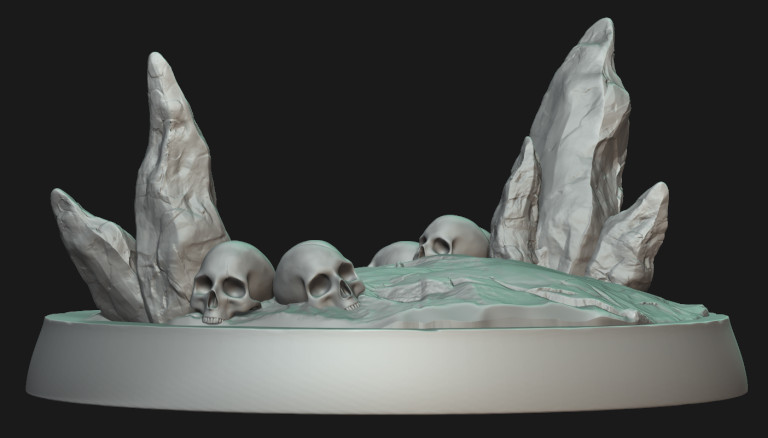
Back in ZBrush, I create a base for the character. I usually try to make the bases tell a story that goes beyond the one the character conveys, but here, I kept things simple.
Next, I bring all of the poses into the ZBrush project – yes, you read that correctly, all of them in the same project. In CC4 I apply the pose, select all the elements, go to plugins, and within ZBrush Pose Link, send the current pose.
The plugin now starts analyzing the correspondence between the elements in CC4 and the SubTools in ZBrush. It’s crucial that none of the SubTool names have been changed and that they are exactly the same as in CC4.
All the SubTools deform and move to the correct position automatically, allowing me to proceed to the next pose.
What’s actually happening behind the scenes is that each pose corresponds to a ZBrush layer for each SubTool, where all the changes are stored. The different poses are displayed in this layer stack, so you can rename them. Clicking on each pose activates its respective layer, showing the changes.
You can edit each pose separately to make adjustments to the character’s anatomy or minor changes in the position of accessories. Each of these changes is stored individually for each pose.
If you reopen a saved project, it might seem like you’ve lost the poses. However, the layer information remains active, so by clicking the refresh button for the pose list, you can make all of the poses available again. In the Layers panel, each SubTool has a layer with a name corresponding to the pose, and it will automatically activate when you select the linked pose.
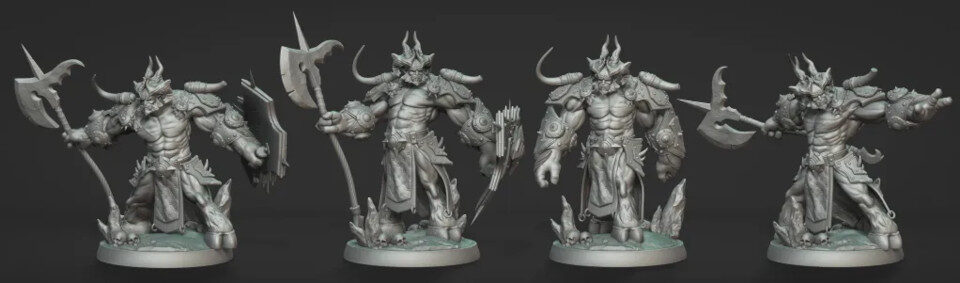
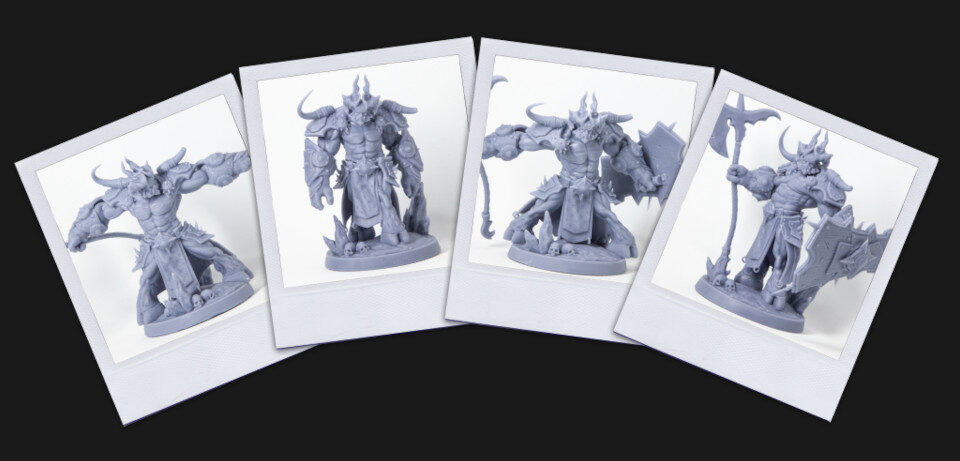
With all of the poses imported into ZBrush, I can choose the ones I like best. For this project, it took no more than an hour to go from the character in an A-pose to this set of four final poses (I tried out at least 10 more).
I also created a bust based on a figure I already had.

ZBrush | Preparing for 3D printing
The final step is to prepare the figure for printing. First, I add thickness to the fabric flaps since the physics system in CC4 requires you to create them as flat accessories.
Once that is done, I apply their textures.
Next, I ensure that the entire figure is a solid mesh and that there are no gaps between the different SubTools. I convert each SubTool into a single Polygroup, merge all the SubTools into a single mesh using Remesh by Union, and then separate the pieces using PolyGroups. I close any holes that may have remained.
Next, I create the joints between the printed parts. Once this is done, I slightly inflate the SubTools with male joints and create the final pieces using Boolean operations.
I decimate the mesh to reduce the polygon count, then add a solid object defining the scale for all the figures and export them as STL files.
I use 3D print preparation software Chitubox to add supports and slice the pieces for printing. Whenever possible, I try to add the supports manually. It’s a boring job, but it ensures that the pieces have fewer marks when the supports are removed. But in this case, I wasn’t concerned about marks, so I let Chitubox add the supports automatically.
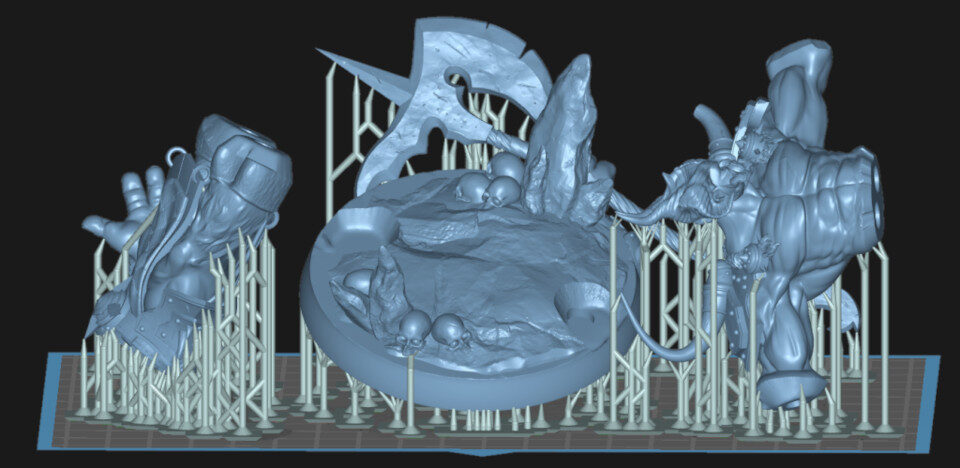
Once printing is finished, I remove the pieces from the printing plate, glue them together with cyanoacrylate, and that’s it!
This is the final result. I printed the figures at the standard size of 75 mm, which is considerably larger than the actual figures for tabletop games, but one that many painters demand.
Conclusions
As I mentioned at the start of this article, this workflow completely changes the game when it comes to creating sets of characters or even armies for board or tabletop games.
One of the things that held me back as an artist was that in previous versions of Character Creator, you were dependent on the topology of the base mesh. Now I have all the freedom I need to create creatures, pose them, and continue creating variations.
This combination of software – ZBrush for sculpting and Character Creator 4 and its AccuRIG toolset for rigging and posing characters – is a fantastic formula for increasing productivity while maintaining complete artistic freedom and creativity.
If you want to see the process in more detail, check out the video walkthrough at the top of the story. You can also download PDF versions of the tutorial in English or Spanish.
 About the author: Óscar Fernández is a digital sculptor who specializes in producing 3D figures for printing. You can see more of his work in his ArtStation gallery and his Facebook and Instagram accounts, and watch complete timelapse videos of some of his sculpts on his YouTube channel.