VFX breakdown: the making of Little Kaiju
Created by Nick Losq and directorial duo TWiN, the cute-but-gritty Little Kaiju tells the story of a strange creature who lives in a vending machine in modern Tokyo. Below, Nick runs through the production process on the short.
I was first approached by Jon and Josh Baker of the directing group TWiN about Little Kaiju in October 2011. The idea was simple: to follow a small, Uglydoll-inspired creature as it explored the streets of Tokyo.
After they shared the concept art, I was sold. I have always had a fascination with Japanese anime and manga characters, especially those that have deep characterization and an emotive quality despite their simple, sometimes ‘cute’ look. I’m even more intrigued when these bright spirits set out to explore the gritty real world – and how, as viewers, our character can change the perception of the world that they are exploring.
TWiN’s vision from start to finish was always in this vein, and so I was excited to take their initial sketches and bring Little Kaiju to life.
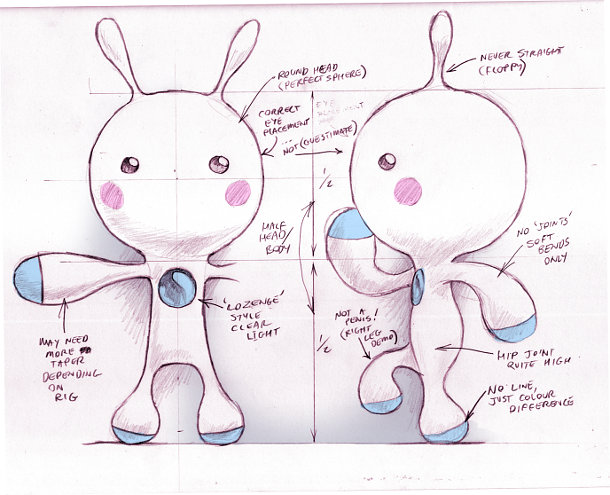
The concept art for Little Kaiju was simple, but nuanced. Note the ‘Not a penis!’ annotation.
Building a team
After agreeing to handle all the VFX on the project, I started reaching out to artists. I don’t often get the opportunity to work on a project that I am this passionate about, so I felt comfortable calling in favors for the cause.
Chris Clyne, a long-time friend and collaborator, was the first to sign on as lead 3D artist. Kiel Figgins, one of the best character animators I’ve known, was the second. After discussing the project as a group, we decided that we would also need a full-time animator, and were recommended the Chicago-based Jeremy Chapman. These were the core team members, and were responsible for roughly 90% of what is seen on screen.
Designing the pipeline
Our pipeline was built to support artists working remotely: Chris and I were working together on site but we were the only two artists sharing the same physical space.
After finalizing the model of the character, Chris and I spent the majority of the front-end time tracking our shots (mostly nodal pans) and then hosting the Maya files and the backplates on my FTP server so that our animator could access them.
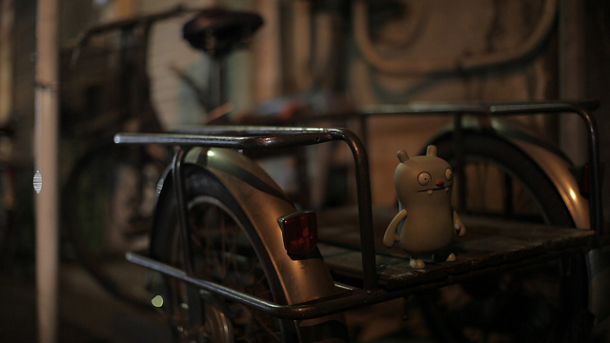
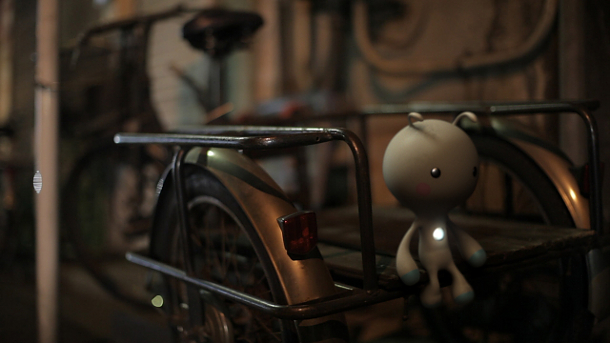
From raw background plate to final VFX shot. Some rather cute stand-ins were used for Kaiju during filming.
We tracked the majority of the plates using boujou with After Effects and Nuke for our 2D tracks. If a rig or camera changed, we would update the rig on the FTP and then replace this in our animation files. From this point on our pipeline proved to be quite seamless.
Building the assets
Little Kaiju was built entirely in Maya. We toyed with the idea of using Mudbox or ZBrush, but after some testing, we found that it was better to keep him looking “perfect” and that Maya was the best tool to achieve this.
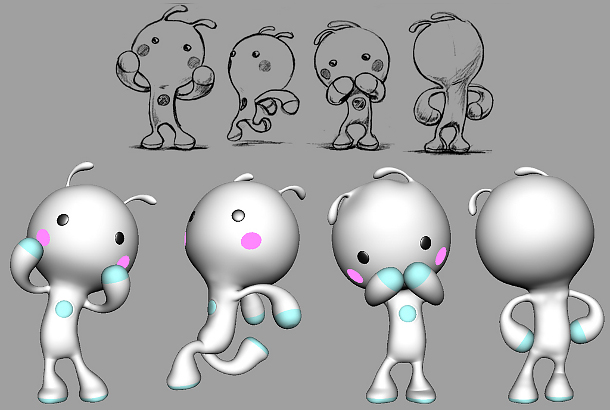
Although the model itself is simple, Little Kaiju had to be capable of subtle, expressive movements.
The rig for the little guy was one of the deepest that I have ever worked with. Having talked to Kiel, we knew that we wanted a standard FK-IK rig with the ability to squash and stretch, but also wanted what we called the “noodle arm effect”. To keep Little Kaiju looking cute, we wanted to avoid any angular breaks in his joints. Instead, we wanted his limbs to look like elbow noodles. [That’s macaroni, if you’re reading in Europe – Ed.]
To achive this, we made all the joints stretchy, with custom controls that allowed us to translate each one individually. In total, we created five skeletons that all contributed to driving the model.
With the FK-IK-Noodle set-up complete, Kiel started building custom joints and controls in Little Kaiju’s extremities to create secondary squash-and-stretch. We wanted to make sure that we could convey a sense of the character’s mass through the animation, so it was important that his foot pads could compress on each step, and that his head was able to compress and release.
The last detail was the eyes. Using classic anime as a guide, we created a series of eight blendshapes for each one: a breath of fresh air after laboring through all the other complexities of the rig.
Background plates
Once the pipeline had been tested and proven, we took a good look at the live footage. In all of the shots into which we had to integrate Little Kaiju, the crew had puppeteered a practical light to show his movements and to simulate illumination from his iconic glowing chest light.
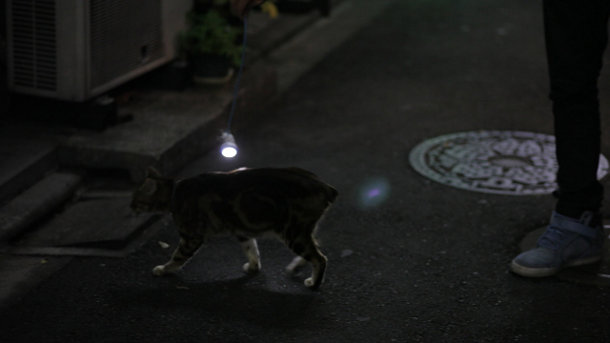
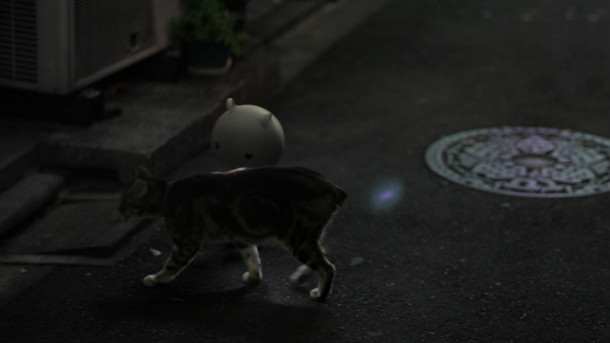
A practical light stood in for Kaiju during the live shoot, leading to some complex paint-out work.
As we got into the clean-up work, we found that it was much more challenging than we expected. The issue was not covering the light so much as painting out the shadows cast by the light and the puppeteer. This ended up being the most time-consuming part of the project: we kept finding more elements within the scenes that needed to be painted out or over. Each time we fixed one, it revealed another.
We did the majority of the work in one of two ways. The first was to paint a clean frame in Photoshop, project it back onto our proxy geometry in Maya and then matte out the areas we needed in After Effects and Nuke. The other was by straight 2D tracking and matting the clean frame bits in comp. For the handful of shots that contained a rack focus, we used a standard After Effects lens blur, animating it to match the footage by eye.
We were able to use these techniques even in shots that contained moving objects. The cat shot [shown above] proved to be the most difficult to roto, but we got it done with a bit of elbow grease.
Lighting
We were provided an uncompressed edit and some script notes but no HDRI photography or detailed photos of surrounding objects. This proved a welcome challenge. After some testing, we found that by creating proxy geometry, projecting the backplates over it, and then rendering in mental ray with Final Gather, we were able to achieve a result that felt well-integrated. From here, we would add in our key lights, determining their positions from the backplates with a little assistance from the script notes.
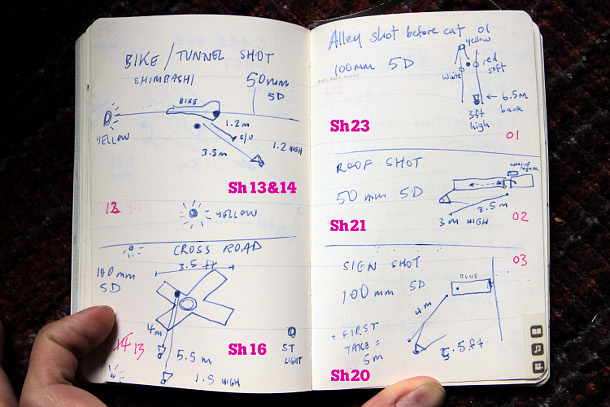
Shooting notes from the film. The information was used to help match the CG character into the live backplate.
I was quite surprised to find this technique worked so well. In the past I had relied heavily on HDRI imagery when lighting in mental ray. This technique proved so efficient that I have almost completely stopped shooting HDRIs, relying instead on projection onto proxy geo for the indirect lighting in a shot.
As we were rendering the images entirely on our local machines, we decided that we would not rely heavily on render passes. The majority of shots were rendered on a 12-core Mac Pro with 16GB of RAM, with each frame an average of 15 minutes to render, and the heavier shots coming closer to 30 minutes per frame. So that I could work uninterrupted, I set shots rendering overnight, and heavier shots rendering over the weekends.
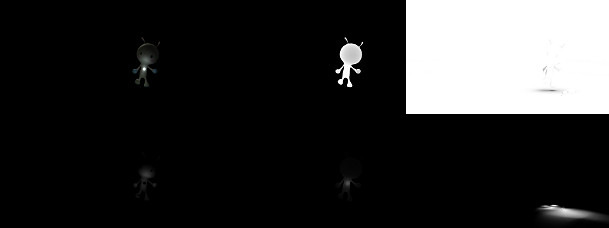
Render passes from a typical shot. Top, left to right: beauty, depth, AO. Bottom: two lighting passes, shadow.
In total, we had a beauty pass, an ambient occlusion pass, a cast shadow pass from our key light, and one volumetric pass to give us a touch more hazy glow from the chest light. For a few shots, we rendered an additional subsurface pass for Little Kaiju’s hands as they passed in front of his chest light, but we got him looking so good in the raw render that this was rarely needed.
Once in the composite, we created a set of effects presets that were then applied to all the shots, including a light color grade, a light wrap, focus blur and finally a Match Grain. With this system in place, the work became straightforward, allowing me to composite five 3D shots in a single day. While I worked in After Effects, Chris worked entirely in Nuke, taking on the shots that required more challenging roto and paint work. Once Chris had finished his comps, he would then pass me his plates as well as the CG elements with an alpha, so that I could apply a very subtle color grade to match the AE shots.
Looking back
Little Kaiju has gotten a great response online and from our colleagues, friends and family. As with any CG project, one of the questions I am commonly asked is, “How did you guys do that?” – but in this case, the simplicity of our approach makes me smile.
There was nothing overly technical or new about the methods we used: it was simply our approach that made the job unique. The project was an exercise in using fundamental techniques, but doing so with an extreme level of focus and care. Thanks to the small team and the hands-on way in which we worked, each of us was able to hone our skills while applying everything we had previously learnt to bring Little Kaiju to life.
 Nick Losq (aka ‘Mouse’) was “educated by a band of skateboarding warrior monks in the gritty slums of Palo Alto”. Having worked for VFX houses such as Motion Theory and MPC, he now employs his skills in the service of bi-coastal production company Rabbit, where he is “willing to wage war for any person in need of unbridled filmmaking”.
Additional text: Chris Clyne, head of CG; Lloyd D’Souza, senior producer.
