10 killer tips for better character animation
Sébastien Wojda’s latest demo reel. Below, the DreamWorks veteran presents his 10 expert tips for creating better character animation: from how to shoot better reference footage to traps to avoid when lip-synching.
I love animating. I like working in different styles, from cartoony to realistic, and during the last few years at DreamWorks, I’ve started using reference video more often, which helps improve the acting in my shots.
Below, you can find ten tips that I use in my own workflow, from ways to record better video reference to things to avoid when lip-synching. They’re arranged in chronological order, from the start of the animation process to the final polish. They should help you keep yourself organised, and bring a more organic feel to your shots.
The tips are aimed at people who have been animating for a while, so I’m assuming that you’re already familiar with how your 3D software works, and the order in which animation passes are normally carried out.
1. Record video reference right
After deciding how to stage your character to maximise appeal and clarity, record video reference of you or a colleague acting out the shot. Make sure the camera angle is the same as in your shot, so that you know if the silhouette of the character will read clearly, and act using clear gestures.
While you’re recording, think about original ways to perform the shot. Do a lot of different takes, choose a few of the best, and use them as guides to film yourself again. This usually helps to get a clearer performance.
When you’re satisfied, import the video reference into your shot and synchronise it with the dialogue or audio.

2. Prepare your shot properly
Once that you have planned your animation, think about the controllers you’re going to use. Place the character’s global control in a position that enables you to use as few controls as possible. It’s better to use only translate Z to get the character to go forwards than to need to use both translate X and translate Z.
It’s also better to get the follow on the head set up in World mode, so whenever the character rotates its body, the head stays in the same position. This avoids the need for counter animation. It’s the same with the arms: set them up in Local mode only for physical shots, when the character is going to move a lot.
Use IK only for contact poses: otherwise stay in FK mode. It might be faster to block out a movement with IK, but it’s painful to deal with the inbetweens later in order to get the result to look believable.
3. Block out using step interpolation
Based on your reference, block out your shot using step mode for interpolation (in Maya, Constant interpolation). Determine from your video reference which poses are key blocking poses, and try to place those keys on even-numbered frames so that it’s easier to add inbetweens and breakdowns later on.
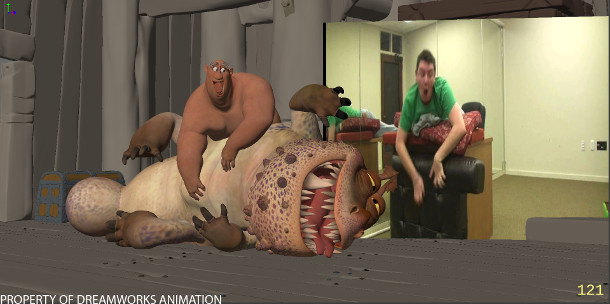
4. Interpret the video reference: don’t just recreate it
When posing the main keys, always remember which controls you used, and make sure that you always use the same ones so that you don’t end up with one control counter-animating another.
Most of the time you’re going to have to exaggerate the poses to add more energy to your animation. Hide everything that could be distracting, like clothing, to really focus on the motion of the character’s body.
You can see the finished animation for the shot above on Vimeo.
5. Get the order right when switching to spline interpolation
When going from step to spline interpolation (in Maya, Bezier interpolation mode), always start with the body’s translate Y control (up/down) in order to get the weight right. This is the most important requirement for a good animation. If possible, hide the other parts of the character – the head, arms and legs – so that it’s easier to focus on the main movements, then keep working on the body using translate X and Z and rotations.
When you get the body moving in a believable way, work on the head with just keep the head and body visible; then the arms; and finally the legs.
Depending on the length of your shot, work in small chunks: for example, 24 frames at a time. It’s easier to focus on small portions of the animation, and it looks less overwhelming.
Always keep a video of the step-interpolated version of your shot to compare with your spline-interpolated version, and try to keep the same energy in the animation.
6. Use shark fin curves for facial animation
For facial animation, it’s sometimes good to use a type of curve called the ‘shark fin’, which helps to simulate rapid movements, like those of the eyebrows and lips.
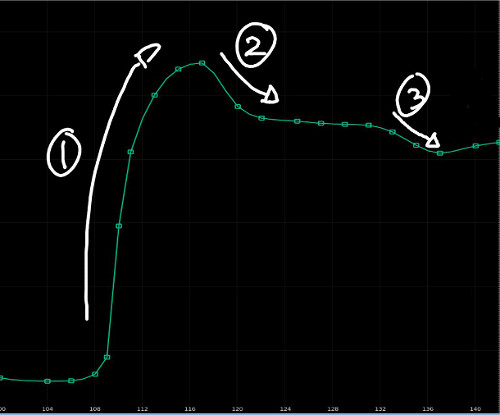
If you look at the image above, you can see the movement starts quickly (1) before slowing down, creating a strong attack. This also works well with the eyelids. I also like to stop a movement before continuing it again, as you can see between points (2) and (3), so that the timing of the animation doesn’t look too even.
Every part of the face moves really fast, especially the eyes, so try to get their movements to happen in one or two frames; three if the spacing is really big.
7. Avoid common timing traps for lip-synch
Avoid a ‘snappy’ jaw: try to have at least three or four frames for each jaw opening movement. Also, try not to have the jaw and the mouth/lips move at exactly the same time: overlap them for a more natural effect. For more softness, copy the jaw animation curve into the squash-and-stretch controls for the lower face.
When lip-synching, remenber that the ‘oo’ shape always arrives sooner than you expect. If you analyse footage of someone saying the words ‘Where are you?’, you will see that their mouth is starting to get into the ‘oo’ shape at ‘are’, a full syllable before the word ‘you’.
And hit your phonemes one or two frames before the sound, to compensate the delay between what you see and what you hear: light travels faster than sound.
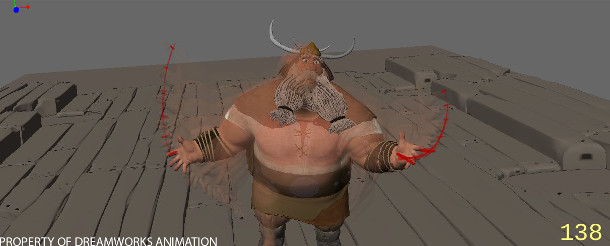
8. Exaggerate your curves
When refining the motion of a character, add an exaggeration pass. By playing with your curves and redesigning them a little bit, you can add extra weight and energy to the animation.
You can add also extra controls on top of your animation. To create overlaps and some nice bounciness, copy the translate Y curve for the body onto the translate curves for the hips and upper body, shift it by one or two frames and tone it down. You can also copy this curve to the head and shoulders, or even the cheeks.
You can see the finished animation for the shot above on Vimeo.
9. Character not doing anything? Add ambient movements
If your character is not too active in your shot, add ambient movement. If you have a body 2 control, it’s a good idea to apply this pass on it: play with the curves to get something subtle enough to keep the character alive when isn’t moving much.
You can also do this pass on the head, arms, and shoulders, showing that the character, as in real life, is constantly fighting gravity and adjusting accordingly.
At this point, you can also check where you can add a fat/jiggle pass for a more organic feel to the animation.
10. Use onion skinning to check your arcs
Finally, if you have an onion skin option in your software, use it to check your arcs and spacings. If not, you can get the same effect by drawing small dots directly onto a transparent plastic sheet taped on top of your monitor.
 About the author: Sébastien Wojda is a character animator at DreamWorks Animation, where he has worked on movies including Puss in Boots, Madagascar 3, Mr. Peabody & Sherman and the upcoming Kung Fu Panda 3. A graduate of renowned French animation school Gobelins, he has also worked in commercials. See more of Sébastien’s work on his blog